Archive:Development/Tutorials/First program (zh TW)
Development/Tutorials/First_program
Languages: عربي | Asturianu | Català | Česky | Kaszëbsczi | Dansk | Deutsch | English | Esperanto | Español | Eesti | فارسی | Suomi | Français | Galego | Italiano | 日本語 | 한국어 | Norwegian | Polski | Português Brasileiro | Română | Русский | Svenska | Slovenčina | Slovenščina | српски | Türkçe | Tiếng Việt | Українська | 简体中文 | 繁體中文
Template:TutorialBrowser (zh TW)
摘要
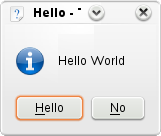
你的第一個程式將會用一句 「Hello World」 來向這個世界問好。為了實現它,我們將使用 KMessageBox,並自定其中的一個按鈕。

閱讀此教學以正確設定 KDevelop。你可以先用 KDevelop 打開一個已存在的 KDE 4 應用程式來檢驗設定是否正確。
不過,你仍然需要手動編輯 CMake 檔案。
程式碼
我們需要的全部程式碼都放在一個 main.cpp 檔案中。使用下列程式碼創建立檔案:
- include <KApplication>
- include <KAboutData>
- include <KCmdLineArgs>
- include <KMessageBox>
- include <KLocale>
int main (int argc, char *argv[])
{
   KAboutData aboutData(
                        // 內部使用的程式名稱。
                        "tutorial1",
                        // 消息登記名稱
                        // 如果為 null,則使用程式名稱。
                        0,
                        // 顯示使用的程式名稱字串。
                        ki18n("Tutorial 1"),
                        // 程式版本號字串。
                        "1.0",
                        // 對程式功能的簡要描述。
                        ki18n("Displays a KMessageBox popup"),
                        // 程式碼發布授權
                        KAboutData::License_GPL,
                        // 版權聲明
                        ki18n("(c) 2007"),
                        // 顯示在關於對話框的選擇性文字。
                        // 可以包含任意要求的資訊。
                        ki18n("Some text..."),
                        // 程式首頁字串。
                        "http://tutorial.com/",
                        // 回報 bug 的 email 地址
                        "[email protected]");
   KCmdLineArgs::init( argc, argv, &aboutData );
   KApplication app;
   KGuiItem yesButton( i18n( "Hello" ), QString(),
                       i18n( "This is a tooltip" ),
                       i18n( "This is a WhatsThis help text." ) );
   KMessageBox::questionYesNo( 0, i18n( "Hello World" ),
                               i18n( "Hello" ), yesButton );
   return 0;
}
The first KDE specific code we come across in this program is KAboutData. This is the class used to store information about the program such as a short description, authors or license information. Pretty much every KDE application should use this class.
Then we come to KCmdLineArgs. This is the class one would use to specify command line switches to, for example, open the program with a specific file. However, in this tutorial, we simply initialise it with the KAboutData object we created so we can use the --version or --author switches.
Then we create a KApplication and KLocale object. This needs to be done exactly once in each program since it is needed for things such as i18n.
Now we've done all the necessary KDE setup, we can move on to doing interesting things with our application. We're going to create a popup box but we're going to customise one of the buttons. To do this customisation, we need to use a KGuiItem object. The first argument in the KGuiItem constructor is the text that will appear on the item (in our case, a button). Then we have an option of setting an icon for the button but we don't want one so we just give it QString(). We then set the tooltip (what appears when you hover over an item) and finally the "What's This?" (accessed through right-clicking or Shift-F1) text.
Now we have our item, we can create our popup. We call the KMessageBox::questionYesNo() function which, by default, creates a message box with a "Yes" and a "No" button. The second argument is the text that will appear in the message box above the buttons. The third is the caption the window will have and finally we set the KGuiItem for (what would normally be) the "Yes" button to the KGuiItem yesButton we created.
Note that all user-visible text is passed through the i18n() function; this is necessary for the UI to be translatable. More information on localization can be found in the localization tutorial.
We're all done as far as the code is concerned. Now to build it and try it out.
構建
You want to use CMake for your build environment. You provide a file CMakeLists.txt, cmake uses this file to generate all Makefiles out of it.
CMakeLists.txt
Create a file named CMakeLists.txt in the same directory as main.cpp with this content:
project (tutorial1)
find_package(KDE4 REQUIRED)
include (KDE4Defaults)
include_directories(${KDE4_INCLUDES})
set(tutorial1_SRCS main.cpp)
kde4_add_executable(tutorial1 ${tutorial1_SRCS})
target_link_libraries(tutorial1 ${KDE4_KDEUI_LIBS})
install(TARGETS tutorial1  ${INSTALL_TARGETS_DEFAULT_ARGS})
The find_package() function locates the package that you ask it for (in this case KDE4) and sets some variables describing the location of the package's headers and libraries. In this case we will use the KDE4_INCLUDES variable which contains the path to the KDE4 header files.
In order to allow the compiler to find these files, we pass that variable to the include_directories() function which adds the KDE4 headers to the header search path.
Next we create a variable called tutorial1_SRCS using the set() function. In this case we simply set it to the name of our only source file.
Then we use kde4_add_executable() to create an executable called tutorial1 from the source files listed in our tutorial1_SRCS variable. Afterwards, we link our executable to the KDE4 kdeui library using target_link_libraries() and the KDE4_KDEUI_LIBS variable which was set by the find_package() function. The line starting with install writes a default "install" target into the Makefile.
Make 與執行
You can invoke CMake and make manually:
mkdir build && cd build
cmake .. # Note the two dots - this is no ellipsis, but "parent directory".
make
Or, if you set up your environment as described in Getting Started/Build/KDE4, you can compile this code with:
cmakekde
And launch it with:
./tutorial1
繼續前進
現在你可以開始學習下一課使用 KXmlGuiWindow。
