Development/Tutorials/Using KXmlGuiWindow (it)
Development/Tutorials/Using_KXmlGuiWindow
Languages: عربي | Asturianu | Català | Česky | Kaszëbsczi | Dansk | Deutsch | English | Esperanto | Español | Eesti | فارسی | Suomi | Français | Galego | Italiano | 日本語 | 한국어 | Norwegian | Polski | Português Brasileiro | Română | Русский | Svenska | Slovenčina | Slovenščina | српски | Türkçe | Tiếng Việt | Українська | 简体中文 | 繁體中文
| Collezione di Tutorial | Tutorial per Principianti |
| Prerequisiti | Tutorial 1 - Ciao Mondo |
| A Seguire | Tutorial 3 - KActions and XMLGUI |
| Ulteriori Letture | KXmlGuiWindow |
Prefazione
Questo tutorial parte dal precedente Ciao Mondo ed introdurrà la classe KXmlGuiWindow.
Nel precedente tutorial il programma faceva apparire una finestra di dialogo, ma ora faremo dei passi verso un programma funzionale.

KXmlGuiWindow
KXmlGuiWindow provides a full main window view with menubars, toolbars, a statusbar and a main area in the centre for a large widget. Most KDE applications will derive from this class as it provides an easy way to define menu and toolbar layouts through XML files (this technology is called XMLGUI). While we will not be using XMLGUI in this tutorial, we will use it in the next.
In order to have a useful KXmlGuiWindow, we must subclass it. So we create two files, a mainwindow.cpp and a mainwindow.h which will contain our code.
mainwindow.h
- ifndef MAINWINDOW_H
- define MAINWINDOW_H
- include <KXmlGuiWindow>
- include <KTextEdit>
class MainWindow : public KXmlGuiWindow
{
 public:
   MainWindow(QWidget *parent=0);
 private:
   KTextEdit* textArea;
};
- endif
First we Subclass KXmlGuiWindow on line 7 with class MainWindow : public KXmlGuiWindow.
Then we declare the constructor with MainWindow(QWidget *parent=0);.
And finally we declare a pointer to the object that will make up the bulk of our program. KTextEdit is a generic richtext editor with some KDE niceties like cursor auto-hiding.
mainwindow.cpp
- include "mainwindow.h"
MainWindow::MainWindow(QWidget *parent) : KXmlGuiWindow(parent)
{
 textArea = new KTextEdit();
 setCentralWidget(textArea);
 setupGUI();
}
First, of course, on line 1 we have to include the header file containing the class declaration.
On line 5, we initialise our text editor with an object. Then on line 6 we use KXmlGuiWindow's built-in setCentralWidget() function which tells the KXmlGuiWindow what should appear in the central section of the window.
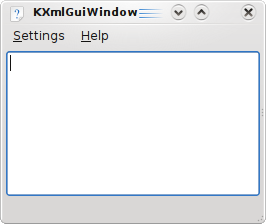
Finally, KXmlGuiWindow::setupGUI() is called which does a lot of behind-the-scenes stuff and creates the default menu bars (Settings, Help).
Back to main.cpp
In order to actually run this window, we need to add a few lines in main.cpp:
main.cpp
- include <KApplication>
- include <KAboutData>
- include <KCmdLineArgs>
- include "mainwindow.h"
int main (int argc, char *argv[])
{
 KAboutData aboutData( "tutorial2", 0,
     ki18n("Tutorial 2"), "1.0",
     ki18n("A simple text area"),
     KAboutData::License_GPL,
     ki18n("Copyright (c) 2007 Developer") );
 KCmdLineArgs::init( argc, argv, &aboutData );

 KApplication app;

 MainWindow* window = new MainWindow();
 window->show();
return app.exec();
}
The only new lines here (compared to Tutorial 1) are 5, 18 and 19. On line 18, we create our MainWindow object and then on line 19, we display it.
CMake
The best way to build the program is to use CMake. All that's changed since tutorial 1 is that mainwindow.cpp has been added to the sources list and any tutorial1 has become tutorial2.
CMakeLists.txt
project (tutorial2)
find_package(KDE4 REQUIRED)
include_directories(${KDE4_INCLUDES})
set(tutorial2_SRCS
 main.cpp
 mainwindow.cpp
)
kde4_add_executable(tutorial2 ${tutorial2_SRCS})
target_link_libraries(tutorial2 ${KDE4_KDEUI_LIBS})
Compile it
To compile, link and run it, use:
mkdir build && cd build
cmake ..
make
./tutorial2
Moving On
Now you can move on to using KActions.
