Development/Tutorials/Using KXmlGuiWindow (ko)
| Tutorial Series | Beginner Tutorial |
| Previous | 튜트리얼 1 - Hello World |
| What's Next | 튜트리얼 3 - KActions과 XMLGUI |
| Further Reading | KXmlGuiWindow |
개요
이 튜트리얼은 첫 번째 프로그램 튜트리얼에서 계속되며, KXmlGuiWindow 클래스를 소개할 것이다.
- This tutorial carries on from First Program Tutorial and will introduce the KXmlGuiWindow class.
이전 튜트리얼에서 프로그램은 팝업되는 다이얼로그박스로 나타났지만, 기능적인 어플리케이션으로 나아가기 위해 단계를 밟아 나아가야한다.
- In the previous tutorial, the program caused a dialog box to pop up but we're going to take steps towards a functioning application.

KXmlGuiWindow
KXmlGuiWindow 는 중심의 메뉴바, 툴바, 상태바와 큰 위젯을 위한 중간의 메인 창이 포함된 하나의 전체 메인 윈도우를 제공한다. 대부분의 KDE 어플리케이션은 이 클래스로부터 상속받을 것이다. 이것은 메뉴와 툴바 레이아웃을 XML 파일을 통해 정의하는 쉬운 방법을 제공한다. ( 이 기술을 XMLGUI라고 부른다.) 우리는 이번 챕터에서 XMLGUI를 사용하지 않을 것이며, 다음부터 사용할 것이다.
- KXmlGuiWindow provides a full main window view with menubars, toolbars, a statusbar and a main area in the centre for a large widget. Most KDE applications will derive from this class as it provides an easy way to define menu and toolbar layouts through XML files (this technology is called XMLGUI). While we will not be using XMLGUI in this tutorial, we will use it in the next.
유용한 KXmlGuiWindow를 사용하기 위해서는 이 클래스에서 상속받아야만 한다. 그러므로 우리는 코드에 포함될 두 개의 파일(mainwindow.cpp, mainwindow.h)을 생성한다.
- In order to have a useful KXmlGuiWindow, we must subclass it. So we create two files, a mainwindow.cpp and a mainwindow.h which will contain our code.
mainwindow.h
#ifndef MAINWINDOW_H
#define MAINWINDOW_H

#include <KXmlGuiWindow>
#include <KTextEdit>

class MainWindow : public KXmlGuiWindow
{
  public:
    MainWindow(QWidget *parent=0);

  private:
    KTextEdit* textArea;
};

#endif
먼저 7번째 줄에서 KXmlGuiWindow를 상속받는다. (class MainWindow : public KXmlGuiWindow)
- First we Subclass KXmlGuiWindow on line 7 with class MainWindow : public KXmlGuiWindow.
그리고 생성자를 선언한다. (MainWindow(QWidget *parent=0);)
- Then we declare the constructor with MainWindow(QWidget *parent=0);.
그리고 마지막으로 우리의 프로그램 대부분을 전담하는 오브젝트의 포인터를 선언한다. KTextEdit는 커서 auto-hiding과 같은 KDE의 몇몇 미미한 것들을 포함한 일반적인 richtext 에디터이다.
- And finally we declare a pointer to the object that will make up the bulk of our program. KTextEdit is a generic richtext editor with some KDE niceties like cursor auto-hiding.
mainwindow.cpp
#include "mainwindow.h"

MainWindow::MainWindow(QWidget *parent) : KXmlGuiWindow(parent)
{
  textArea = new KTextEdit();
  setCentralWidget(textArea);
  setupGUI();
}
- 우선 1번째 줄에서 클래스 선언을 포함한 헤더파일을 추가하였다.
First, of course, on line 1 we have to include the header file containing the class declaration.
line 5에선, 오브젝트와 같이 텍스트 에디터를 초기화하였다. line 6에서는 KXmlGuiWindow의 setCentralWidget() 함수를 사용하였다. 이 함수는 KXmlGuiWindow에게 윈도우의 중앙 섹션에 무엇이 보여져야하는지를 말해준다.
- On line 5, we initialise our text editor with an object. Then on line 6 we use KXmlGuiWindow's built-in setCentralWidget() function which tells the KXmlGuiWindow what should appear in the central section of the window.
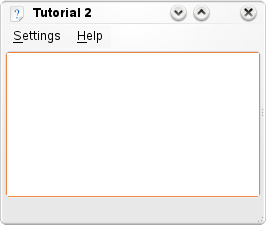
마지막으로 KXmlGuiWindow::setupGUI()는 많은 behid-the-scenes의해 호출며, 기본적인 메뉴바(Settings, Help)를 생성한다.
- Finally, KXmlGuiWindow::setupGUI() is called which does a lot of behind-the-scenes stuff and creates the default menu bars (Settings, Help).
main.cpp로 돌아가기
실제적으로 이 윈도우를 실행하기 위해 main.cpp에 몇 줄을 추가할 필요가 있다. :
- In order to actually run this window, we need to add a few lines in main.cpp:
main.cpp
#include <KApplication>
#include <KAboutData>
#include <KCmdLineArgs>

#include "mainwindow.h"

int main (int argc, char *argv[])
{
  KAboutData aboutData( "tutorial2", 0,
      ki18n("Tutorial 2"), "1.0",
      ki18n("A simple text area"),
      KAboutData::License_GPL,
      ki18n("Copyright (c) 2007 Developer") );
  KCmdLineArgs::init( argc, argv, &aboutData );

  KApplication app;

  MainWindow* window = new MainWindow();
  window->show();

  return app.exec();
}
(튜트리얼1과 비교해서) 추가된 줄은 5, 18, 19라인이다. 18라인에서 우리는 MainWindow 오브젝트를 생성하고, 19라인에서 이것을 보이게 한다.
- The only new lines here (compared to Tutorial 1) are 5, 18 and 19. On line 18, we create our MainWindow object and then on line 19, we display it.
CMake
프로그램을 빌드하는 가장 좋은 방법은 CMake를 사용하는 것이다. 튜트리얼1 이후로 변경된 점은 소스 리스트에 mainwindow.cpp가 추가된 것과, tutorial1이 tutorial2로 바뀐 것 뿐이다.
- The best way to build the program is to use CMake. All that's changed since tutorial 1 is that mainwindow.cpp has been added to the sources list and any tutorial1 has become tutorial2.
CMakeLists.txt
project (tutorial2)

find_package(KDE4 REQUIRED)
include_directories(${KDE4_INCLUDES})

set(tutorial2_SRCS
  main.cpp
  mainwindow.cpp
)

kde4_add_executable(tutorial2 ${tutorial2_SRCS})
target_link_libraries(tutorial2 ${KDE4_KDEUI_LIBS})
Compile it
컴파일, 링크, 실행을 하기 위해서 다음을 입력하라. :
mkdir build && cd build
cmake ..
make
./tutorial2
나아가기
- 이제 당신은 KActions 사용하기로 나아갈 수 있다.
- Now you can move on to using KActions.
