Development/Tutorials/First program (de)
Development/Tutorials/First_program
Languages: عربي | Asturianu | Català | Česky | Kaszëbsczi | Dansk | Deutsch | English | Esperanto | Español | Eesti | فارسی | Suomi | Français | Galego | Italiano | 日本語 | 한국어 | Norwegian | Polski | Português Brasileiro | Română | Русский | Svenska | Slovenčina | Slovenščina | српски | Türkçe | Tiếng Việt | Українська | 简体中文 | 繁體中文
Aller Anfang ist leicht...
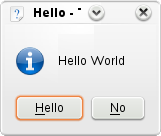
Unser erstes Programm hat die Aufgabe, einen freundlichen Gruß anzuzeigen. Dafür verwenden wir die Klasse KMessageBox und ersetzen einen der standardmäßigen Buttons.


Leider sind die Klassendokumentationen momentan nur in englischer Sprache zu erreichen.

Lesen Sie diesen Artikel um KDevelop für die Programmentwicklung mit KDE einzurichten.
Trotzdem müssen Sie allerdings die CMake-Dateien per Hand erstellen.
Der Programmcode
Für dieses einfache Projekt können wir noch den gesamten Programmcode in einer einzigen Datei, main.cpp speichern.
Erstellen Sie diese Datei mit dem folgenden Programmcode:
- include <QString>
- include <KApplication>
- include <KAboutData>
- include <KMessageBox>
- include <KCmdLineArgs>
- include <KLocalizedString>
int main (int argc, char *argv[])
{
   KAboutData aboutData("tutorial1",                  // Der interne Programmname
                        0,                            // Der Nachrichtenkatalogname, wenn hier Null steht, wird der Programmname verwendet
                        ki18n("Tutorial 1"),          // Der Programmname, der später angezeigt wird
                        "1.0",                        // Die Version des Programms
                        ki18n("KMessageBox popup"),   // Eine kurze Programmbeschreibung
                        KAboutData::License_GPL,      // Lizensinformationen
                        ki18n("(c) 2007"),            // Copyright-Hinweise
                        ki18n("beliebiger Text..."),        // Hinweise zum Programm
                        "http://tutorial.de",        // Die Homepage des Programms
                        "[email protected]");       // Die Mailadresse, an die Fehlerberichte geschickt werden sollen
   KCmdLineArgs::init( argc, argv, &aboutData );
   KApplication app;
   KGuiItem guiItem( QString( "Hallo" ), QString(),
                     QString( "Dies ist ein Tooltip!" ),
                     QString( "Dies ist ein \"Was ist das\"!" ) );
   KMessageBox::questionYesNo( 0, "Hallo Welt!", "Hallo", guiItem );
}
Der erste spezielle KDE-Code ist die Nutzung der Klasse KAboutData.
Diese Klasse speichert Informationen über das Programm, wie Autor, Beschreibung und Lizenz. Jede KDE Anwendung sollte diese Klasse verwenden.
Then we come to KCmdLineArgs. This is the class one would use to specify command line switches to, for example, open the program with a specific file. However, in this tutorial, we simply initialise it with the KAboutData object we created so we can use the --version or --author switches.
On line 13 we create a KApplication object. This needs to be done exactly once in each program since it is needed for things such as i18n.
Now we've done all the necessary KDE setup, we can move on to doing interesting things with our application. We're going to create a popup box but we're going to customise one of the buttons. To do this customisation, we need to use a KGuiItem object. The first argument in the KGuiItem constructor is the text that will appear on the item (in our case, a button). Then we have an option of setting an icon for the button but we don't want one so we just give it QString(). Finally we set the tooltip (what appears when you hover over an item) and finally the "What's This?" (accessed through right-clicking or Shift-F1) text.
Now we have our item, we can create our popup. we call the KMessageBox::questionYesNo() function which, by default, creates a message box with a "Yes" and a "No" button. The second argument is the text that will appear in the middle of the popup box. The third is the caption the window will have and finally we set the KGuiItem for (what would normally be) the "Yes" button to the KGuiItem guiItem we created.
We're all done as far as the code is concerned. Now to build it and try it out.
