Kehitys/Oppikurssit/Qt4 Ruby -oppikurssi/Kappale 06
Development/Tutorials/Qt4 Ruby Tutorial/Chapter 06
Languages: عربي | Asturianu | Català | Česky | Kaszëbsczi | Dansk | Deutsch | English | Esperanto | Español | Eesti | فارسی | Suomi | Français | Galego | Italiano | 日本語 | 한국어 | Norwegian | Polski | Português Brasileiro | Română | Русский | Svenska | Slovenčina | Slovenščina | српски | Türkçe | Tiếng Việt | Українська | 简体中文 | 繁體中文
| Tutorial Series | Qt4 Ruby -oppikurssi |
| Previous | Oppikurssi 5 - Rakennetaan lohkoja |
| What's Next | Oppikurssi 7 - Yksi asia johtaa toiseen |
| Further Reading | n/a |
Rakennetaan Blocks Galore!

Files:
Yleistä
Tämä esimerkki näyttää, kuinka kaksi käyttöliittymäkomponenttia kapseloidaan uuteen komponenttiin ja kuinka helppoa on käyttää monia käyttöliittymäkomponentteja. Ensimmäisen kerran käytämme räätälöityä käyttöliittymäkomponenttia lapsikäyttöliittymäkomponenttina.
require 'Qt4'

class LCDRange < Qt::Widget
  def initialize(parent = nil)
    super()
    lcd = Qt::LCDNumber.new(2)

    slider = Qt::Slider.new(Qt::Horizontal)
    slider.setRange(0, 99)
    slider.setValue(0)

    connect(slider, SIGNAL('valueChanged(int)'), lcd, SLOT('display(int)'))

    layout = Qt::VBoxLayout.new()
    layout.addWidget(lcd)
    layout.addWidget(slider)
    setLayout(layout)
  end
end

class MyWidget < Qt::Widget
  def initialize(parent = nil)
    super()
    quit = Qt::PushButton.new(tr('Quit'))
    quit.setFont(Qt::Font.new('Times', 18, Qt::Font::Bold))
    connect(quit, SIGNAL('clicked()'), $qApp, SLOT('quit()'))

    grid = Qt::GridLayout.new()

    for row in 0..2
      for column in 0..2
        grid.addWidget(LCDRange.new(), row, column)
      end
    end

    layout = Qt::VBoxLayout.new()
    layout.addWidget(quit)
    layout.addLayout(grid)
    setLayout(layout)
  end
end

app = Qt::Application.new(ARGV)

widget = MyWidget.new()
widget.show()

app.exec()
Läpikäynti rivi rivilltä
class LCDRange < Qt::Widget
LCDRange-käyttöliittymäkomponentti on ilman mitään API-sovellusrajapintaa. Sillä on vain konstruktorir. Tämä tyyppiset käyttöliittymäkomponentit eivät ole kovin hyödyllisiä, joten lisäämme jonkun API-sovellusrajapinnan myöhemmin.
def initialize(parent = nil)
  super()
  lcd = Qt::LCDNumber.new(2)
  slider = Qt::Slider.new(Qt::Horizontal)
  slider.setRange(0, 99)
  slider.setValue(0)

  connect(slider, SIGNAL('valueChanged(int)'), lcd, SLOT('display(int)'))

  layout = Qt::VBoxLayout.new()
  layout.addWidget(lcd)
  layout.addWidget(slider)
  setLayout(layout)
end
Tämä on nostettu suoraan MyWidget-konstruktorista Kappaleessa 5. Ainoa ero on Quit-painike ja luokan uudelleennimeäminen.
class MyWidget < Qt::Widget
MyWidget ei myöskään sisällä API-sovellusrajapintaa, paitsi konstruktorin.
def initialize(parent = nil)
  super()
  quit = Qt::PushButton.new(tr('Quit'))
  quit.setFont(Qt::Font.new('Times', 18, Qt::Font::Bold))
  connect(quit, SIGNAL('clicked()'), $qApp, SLOT('quit()'))
The push button that used to be in what is now LCDRange has been separated so that we can have one Quit button and many LCDRange objects.
grid = Qt::GridLayout.new()
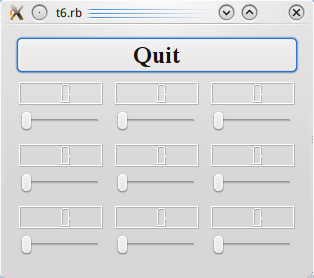
We create a Qt::Widget with a Qt::GridLayout that will contain three columns. The Qt::GridLayout automatically arranges its widgets in rows and columns; you can specify the row and column numbers when adding widgets to the layout, and Qt::GridLayout will fit them into the grid.
for row in 0..2
  for column in 0..2
    grid.addWidget(LCDRange.new(), row, column)
  end
end
We create nine LCDRange widgets, all of which are children of the grid object, and we arrange them in three rows and three columns.
Running the Application
This program shows how easy it is to use many widgets at a time. Each one behaves like the slider and LCD number in the previous chapter. Again, the difference lies in the implementation.
Exercises
Initialize each slider with a different/random value on startup.
