Development/Tutorials/KCmdLineArgs (de)
Development/Tutorials/KCmdLineArgs
Languages: عربي | Asturianu | Català | Česky | Kaszëbsczi | Dansk | Deutsch | English | Esperanto | Español | Eesti | فارسی | Suomi | Français | Galego | Italiano | 日本語 | 한국어 | Norwegian | Polski | Português Brasileiro | Română | Русский | Svenska | Slovenčina | Slovenščina | српски | Türkçe | Tiếng Việt | Українська | 简体中文 | 繁體中文
| Tutorial Series | Anleitung für Anfänger |
| Previous | Anleitung 4 - Laden und Speichern von Dateien |
| What's Next | Tutorial 6 - ###) |
| Further Reading | KCmdLineArgs KCmdLineOptions |
Zusammenfassung
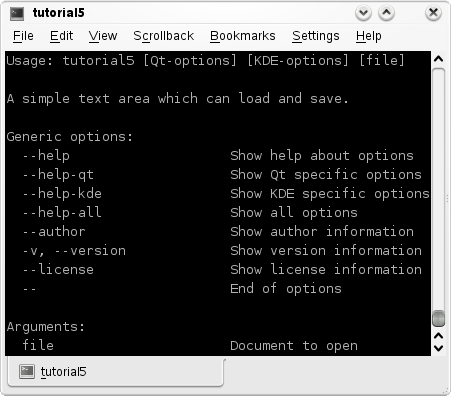
In diesem Kapitel werden sie lernen ihrer Anwendung zu ermöglichen, Dateien über die Befehlszeile zu öffnen oder sogar mit 'Öffnen mit' von Dolphin aus zu verwenden.

The Code
main.cpp
- include <KApplication>
- include <KAboutData>
- include <KCmdLineArgs>
- include <KUrl> //new
- include "mainwindow.h"
int main (int argc, char *argv[])
{
 KAboutData aboutData( "tutorial5", "tutorial5",
     ki18n("Tutorial 5"), "1.0",
     ki18n("A simple text area which can load and save."),
     KAboutData::License_GPL,
     ki18n("Copyright (c) 2007 Developer") );
 KCmdLineArgs::init( argc, argv, &aboutData );
 KCmdLineOptions options; //new
 options.add("+[file]", ki18n("Document to open")); //new
 KCmdLineArgs::addCmdLineOptions(options); //new
 KApplication app;

 MainWindow* window = new MainWindow();
 window->show();
 KCmdLineArgs *args = KCmdLineArgs::parsedArgs(); //new
 if(args->count()) //new
 {
   window->openFile(args->url(0).url()); //new
 }
return app.exec();
}
mainwindow.h
- ifndef MAINWINDOW_H
- define MAINWINDOW_H
- include <KXmlGuiWindow>
- include <KTextEdit>
class MainWindow : public KXmlGuiWindow
{
 Q_OBJECT

 public:
   MainWindow(QWidget *parent=0);
   void openFile(const QString &inputFileName); //new

 private:
   KTextEdit* textArea;
   void setupActions();
   QString fileName;

 private slots:
   void newFile();
   void openFile();
   void saveFile();
   void saveFileAs();
   void saveFileAs(const QString &outputFileName);
};
- endif
mainwindow.cpp
- include "mainwindow.h"
- include <KApplication>
- include <KAction>
- include <KLocale>
- include <KActionCollection>
- include <KStandardAction>
- include <KFileDialog>
- include <KMessageBox>
- include <KIO/NetAccess>
- include <KSaveFile>
- include <QTextStream>
MainWindow::MainWindow(QWidget *parent)
   : KXmlGuiWindow(parent),
     fileName(QString())
{
 textArea = new KTextEdit;
 setCentralWidget(textArea);

 setupActions();
}
void MainWindow::setupActions()
{
 KAction* clearAction = new KAction(this);
 clearAction->setText(i18n("Clear"));
 clearAction->setIcon(KIcon("document-new"));
 clearAction->setShortcut(Qt::CTRL + Qt::Key_W);
 actionCollection()->addAction("clear", clearAction);
 connect(clearAction, SIGNAL(triggered(bool)),
         textArea, SLOT(clear()));

 KStandardAction::quit(kapp, SLOT(quit()),
                       actionCollection());

 KStandardAction::open(this, SLOT(openFile()),
                       actionCollection());

 KStandardAction::save(this, SLOT(saveFile()),
                       actionCollection());

 KStandardAction::saveAs(this, SLOT(saveFileAs()),
                       actionCollection());

 KStandardAction::openNew(this, SLOT(newFile()),
                       actionCollection());

 setupGUI();
}
void MainWindow::newFile()
{
 fileName.clear();
 textArea->clear();
}
void MainWindow::saveFileAs(const QString &outputFileName)
{
 KSaveFile file(outputFileName);
 file.open();

 QByteArray outputByteArray;
 outputByteArray.append(textArea->toPlainText());
 file.write(outputByteArray);
 file.finalize();
 file.close();

 fileName = outputFileName;
}
void MainWindow::saveFileAs()
{
saveFileAs(KFileDialog::getSaveFileName());
}
void MainWindow::saveFile()
{
 if(!fileName.isEmpty())
 {
   saveFileAs(fileName);
 }
 else
 {
   saveFileAs();
 }
}
void MainWindow::openFile() //changed
{
openFile(KFileDialog::getOpenFileName());
}
void MainWindow::openFile(const QString &inputFileName) //new
{
 QString tmpFile;
 if(KIO::NetAccess::download(inputFileName, tmpFile,
        this))
 {
   QFile file(tmpFile);
   file.open(QIODevice::ReadOnly);
   textArea->setPlainText(QTextStream(&file).readAll());
   fileName = inputFileName;

   KIO::NetAccess::removeTempFile(tmpFile);
 }
 else
 {
   KMessageBox::error(this,
       KIO::NetAccess::lastErrorString());
 }
}
tutorial4ui.rc
<?xml version="1.0" encoding="UTF-8"?>
<!DOCTYPE kpartgui SYSTEM "kpartgui.dtd">
<gui name="tutorial5" version="1">
 <ToolBar name="mainToolBar" >
   <text>Main Toolbar</text>
   <Action name="clear" />
 </ToolBar>
 <MenuBar>
   <Menu name="file" >
     <Action name="clear" />
   </Menu>
 </MenuBar>
</gui>
Dies ist identisch mit tutorial'X'ui.rc aus den letzten beiden Anleitungen ausser dass name zu 'tutorial5' geändert wurde.
Erklärung
mainwindow.h
Hier haben wir nichts weiteres gemacht als eine neue openFile Funktion hinzuzufügen, die einen QString annimmt:
void openFile(const QString &inputFileName);
mainwindow.cpp
Hier gibt es keinen neuen Code, nur Umordnen. Alles aus void openFile() wurde in void openFile(const QString &inputFileName) verschoben, ausser der Aufruf an KFileDialog::getOpenFileName().
Auf diese Weise können wir openFile() aufrufen, wenn wir einen Dialog anzeigen möchten, oder wir können openFile(QString) aufrufen, falls wir den Namen der Datei bereits kennen.
main.cpp
Hier passiert die ganze KCmdLineArgs Hexerei.
Erzeugen, Installieren und Ausführen
CMakeLists.txt
project(tutorial5)
find_package(KDE4 REQUIRED)
include_directories( ${KDE4_INCLUDES} )
set(tutorial5_SRCS
 main.cpp
 mainwindow.cpp
)
kde4_add_executable(tutorial5 ${tutorial5_SRCS})
target_link_libraries(tutorial5 ${KDE4_KDEUI_LIBS}
${KDE4_KIO_LIBS})
install(TARGETS tutorial5 DESTINATION ${BIN_INSTALL_DIR})
install( FILES tutorial5ui.rc
DESTINATION ${DATA_INSTALL_DIR}/tutorial5 )
Mit dieser Datei kann die Anleitung auf die gleiche Weise erstellt und ausgeführt werden wie Anleitung 3 und 4. Für mehr Informationen siehe Anleitung 3.
mkdir build && cd build
cmake .. -DCMAKE_INSTALL_PREFIX=$HOME
make install
$HOME/bin/tutorial5
Weiter Geht's
Now you can move on to the ### (TODO User:milliams) tutorial.
