Development/Tutorials/Qt4 Ruby Tutorial/Chapter 07/fi: Difference between revisions
Centerlink (talk | contribs) Created page with "Funktion '''<tt>setValue()</tt>''' toteuttaminen on yhtä suoraviivaista. Huomaa, että koska liukukytkin ja nestekidenäyyttö on yhdistetty toisiinsa, liukukytkimen arvon asett..." |
Centerlink (talk | contribs) Created page with "Ensimmäinen [http://doc.qt.nokia.com/latest/qobject.html#connect QObject::connect()]-kutsu on sama kuin minkä näit edellisessä kappaleessa. Toinen on uusi; se yhdistää liuk..." |
||
| Line 58: | Line 58: | ||
</syntaxhighlight> | </syntaxhighlight> | ||
Ensimmäinen [http://doc.qt.nokia.com/latest/qobject.html#connect QObject::connect()]-kutsu on sama kuin minkä näit edellisessä kappaleessa. Toinen on uusi; se yhdistää liukukytkimen [http://doc.qt.nokia.com/latest/qabstractslider.html#valueChanged QAbstractSlider::valueChanged()]-signaalin tämän objektin '''<tt>valueChanged()</tt>'''-signaaliin. Kyllä, se on oikein. Signaalit voidaan yhdistää muihin signaaleihin. Kun ensimmäinen signaali lähetetänä, myös toinen signaali lähetetään. | |||
Let's look at what happens when the user operates the slider. The slider sees that its value has changed and emits the [http://doc.qt.nokia.com/latest/qabstractslider.html#valueChanged QAbstractSlider::valueChanged()] signal. That signal is connected both to the [http://doc.qt.nokia.com/latest/qlcdnumber.html#intValue-prop QLCDNumber::display()] slot of the [http://doc.qt.nokia.com/latest/qlcdnumber.html Qt::LCDNumber] and to the '''<tt>valueChanged()</tt>''' signal of the '''<tt>LCDRange</tt>'''. | Let's look at what happens when the user operates the slider. The slider sees that its value has changed and emits the [http://doc.qt.nokia.com/latest/qabstractslider.html#valueChanged QAbstractSlider::valueChanged()] signal. That signal is connected both to the [http://doc.qt.nokia.com/latest/qlcdnumber.html#intValue-prop QLCDNumber::display()] slot of the [http://doc.qt.nokia.com/latest/qlcdnumber.html Qt::LCDNumber] and to the '''<tt>valueChanged()</tt>''' signal of the '''<tt>LCDRange</tt>'''. | ||
Revision as of 12:11, 26 September 2011
Development/Tutorials/Qt4 Ruby Tutorial/Chapter 07
Languages: عربي | Asturianu | Català | Česky | Kaszëbsczi | Dansk | Deutsch | English | Esperanto | Español | Eesti | فارسی | Suomi | Français | Galego | Italiano | 日本語 | 한국어 | Norwegian | Polski | Português Brasileiro | Română | Русский | Svenska | Slovenčina | Slovenščina | српски | Türkçe | Tiếng Việt | Українська | 简体中文 | 繁體中文
| Tutorial Series | Qt4 Ruby -oppikurssi |
| Previous | Oppikurssi 6 - Rakennetaan Blocks Galore! |
| What's Next | Oppikurssi 8 - Valmistaudutaan taisteluun |
| Further Reading | n/a |
Yksi asia johtaa toiseen

Tiedostot:
Yleistä
Tässä esimerkissä näytämme, kuinka räätälöityjä käyttöliittymäkomponentteja luodaan signaaleilla ja väleillä, ja kuinka yhdistää ne toisiinsa mutkikkaamilla tavoilla. Ensimmäisen kerran lähdekoodi on jaettu useisiin tiedostoihin.
Läpikäynti rivi riviltä
Tämä tiedosto on pääasiassa nostettu Kappaleesta 6; vain tärkeimmät muutokset on mainittu täällä.
signals 'valueChanged(int)'
slots 'setValue(int)'
def value()
  @slider.value()
end

def setValue(value)
  @slider.setValue(value)
end
Nämä tekevät rajapinnan tämän käyttöliittymäkomponentin ja ohjelman muiden komponenttien välillä. Tähän asti LCDRange-komponentilla ei ollut todella API-sovellusrajapintaa ollenkaan.
value() on julkinen funktio jolla pääsee käsiksi LCDRange-arvoon, setValue() on ensimmäinen räätälöity välimme, ja valueChanged() on ensimmäinen räätälöity signaalimme.
Välit toteutetaan normaalilla tavalla (väli on aina Ruby-jäsenfunktio). Signaalit toteutetaan automaattisesti. Signaalit noudattavat suojattujen Ruby-funktioiden kutsumissääntöjä (ts. vain ne luokat voivat lähettää, jotka on määritelty niissä luokissa, mistä se periytyy).
valueChanged()-signaalia käytetään kun LCDRange's-arvo on muuttunut.
Funktion value() toteuttaminen on suoraviivaista. Se yksinkertaisesti palauttaa liukukytkimen arvon.
Funktion setValue() toteuttaminen on yhtä suoraviivaista. Huomaa, että koska liukukytkin ja nestekidenäyyttö on yhdistetty toisiinsa, liukukytkimen arvon asettaminen päivittää myös nestekidenäytön numeron. Sen lisäksi liukukytkin säätää arvoa automaattisesti, jos laillisen arvoalueen ulkopuolella.
connect(@slider, SIGNAL('valueChanged(int)'),
        lcd, SLOT('display(int)'))
connect(@slider, SIGNAL('valueChanged(int)'),
        self, SIGNAL('valueChanged(int)'))
Ensimmäinen QObject::connect()-kutsu on sama kuin minkä näit edellisessä kappaleessa. Toinen on uusi; se yhdistää liukukytkimen QAbstractSlider::valueChanged()-signaalin tämän objektin valueChanged()-signaaliin. Kyllä, se on oikein. Signaalit voidaan yhdistää muihin signaaleihin. Kun ensimmäinen signaali lähetetänä, myös toinen signaali lähetetään.
Let's look at what happens when the user operates the slider. The slider sees that its value has changed and emits the QAbstractSlider::valueChanged() signal. That signal is connected both to the QLCDNumber::display() slot of the Qt::LCDNumber and to the valueChanged() signal of the LCDRange.
Thus, when the signal is emitted, LCDRange emits its own valueChanged() signal. In addition, QLCDNumber::display() is called and shows the new number.
Note that you're not guaranteed any particular order of execution; LCDRange::valueChanged() may be emitted before or after QLCDNumber::display() is called.
previousRange = nil

for row in 0..2
  for column in 0..2
    lcdRange = LCDRange.new()
    grid.addWidget(lcdRange, row, column)
    unless previousRange.nil?
      connect(lcdRange, SIGNAL('valueChanged(int)'),
              previousRange, SLOT('setValue(int)'))
    end
    previousRange = lcdRange
  end
end
When we create the nine LCDRange objects, we connect them using the signals and slots mechanism. Each has its valueChanged() signal connected to the previous one's setValue() slot. Because LCDRange emits the valueChanged() signal when its value changes, we are here creating a chain of signals and slots.
Running the Application
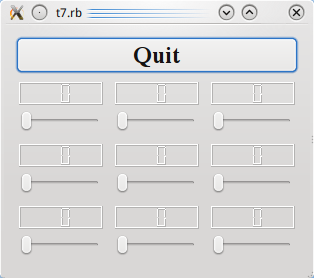
On startup, the program's appearance is identical to the previous one. Try operating the slider to the bottom-right.
Exercises
Use the bottom-right slider to set all LCDs to 50. Then set all but the last LCD to 40 by clicking once to the left of the bottom-middle slider handle. Now, use the bottom-left slider to set the first seven LCDs back to 50.
Click to the left of the handle on the bottom-right slider. What happens? Why is this the correct behavior?
