Development/Tutorials/Qt4 Ruby Tutorial/Chapter 06/ru: Difference between revisions
Aspotashev (talk | contribs) (Created page with "=== Построчный обзор программы ===") |
Aspotashev (talk | contribs) (Created page with "Виджет '''<tt>LCDRange</tt>''' не имеет никакого программного интерфейса (API). У него есть только конструкто...") |
||
| Line 75: | Line 75: | ||
</syntaxhighlight> | </syntaxhighlight> | ||
Виджет '''<tt>LCDRange</tt>''' не имеет никакого программного интерфейса (API). У него есть только конструктор. Такой виджет не очень полезен, поэтому позже мы добавим в него больше возможностей. | |||
<syntaxhighlight lang="ruby"> | <syntaxhighlight lang="ruby"> | ||
Revision as of 17:36, 2 July 2011
Development/Tutorials/Qt4 Ruby Tutorial/Chapter 06
Languages: عربي | Asturianu | Català | Česky | Kaszëbsczi | Dansk | Deutsch | English | Esperanto | Español | Eesti | فارسی | Suomi | Français | Galego | Italiano | 日本語 | 한국어 | Norwegian | Polski | Português Brasileiro | Română | Русский | Svenska | Slovenčina | Slovenščina | српски | Türkçe | Tiếng Việt | Українська | 简体中文 | 繁體中文
| Серия примеров | Введение в программирование на Qt®4 на языке Ruby |
| Необходимо знать | Пример 5: «Кубики» |
| Следующий пример | Пример 7: Одно приводит к другому |
| Литература | нет |
Больше кубиков!

Файлы:
Обзор
Этот пример показывает, как можно упаковать 2 виджета в новый компонент и как можно удобно работать с большим количеством виджетов.
require 'Qt4'

class LCDRange < Qt::Widget
  def initialize(parent = nil)
    super()
    lcd = Qt::LCDNumber.new(2)

    slider = Qt::Slider.new(Qt::Horizontal)
    slider.setRange(0, 99)
    slider.setValue(0)

    connect(slider, SIGNAL('valueChanged(int)'), lcd, SLOT('display(int)'))

    layout = Qt::VBoxLayout.new()
    layout.addWidget(lcd)
    layout.addWidget(slider)
    setLayout(layout)
  end
end

class MyWidget < Qt::Widget
  def initialize(parent = nil)
    super()
    quit = Qt::PushButton.new(tr('Quit'))
    quit.setFont(Qt::Font.new('Times', 18, Qt::Font::Bold))
    connect(quit, SIGNAL('clicked()'), $qApp, SLOT('quit()'))

    grid = Qt::GridLayout.new()

    for row in 0..2
      for column in 0..2
        grid.addWidget(LCDRange.new(), row, column)
      end
    end

    layout = Qt::VBoxLayout.new()
    layout.addWidget(quit)
    layout.addLayout(grid)
    setLayout(layout)
  end
end

app = Qt::Application.new(ARGV)

widget = MyWidget.new()
widget.show()

app.exec()
Построчный обзор программы
class LCDRange < Qt::Widget
Виджет LCDRange не имеет никакого программного интерфейса (API). У него есть только конструктор. Такой виджет не очень полезен, поэтому позже мы добавим в него больше возможностей.
def initialize(parent = nil)
  super()
  lcd = Qt::LCDNumber.new(2)
  slider = Qt::Slider.new(Qt::Horizontal)
  slider.setRange(0, 99)
  slider.setValue(0)

  connect(slider, SIGNAL('valueChanged(int)'), lcd, SLOT('display(int)'))

  layout = Qt::VBoxLayout.new()
  layout.addWidget(lcd)
  layout.addWidget(slider)
  setLayout(layout)
end
This is lifted straight from the MyWidget constructor in Chapter 5. The only differences are that the Quit button is left out and the class is renamed.
class MyWidget < Qt::Widget
MyWidget, too, contains no API except a constructor.
def initialize(parent = nil)
  super()
  quit = Qt::PushButton.new(tr('Quit'))
  quit.setFont(Qt::Font.new('Times', 18, Qt::Font::Bold))
  connect(quit, SIGNAL('clicked()'), $qApp, SLOT('quit()'))
The push button that used to be in what is now LCDRange has been separated so that we can have one Quit button and many LCDRange objects.
grid = Qt::GridLayout.new()
We create a Qt::Widget with a Qt::GridLayout that will contain three columns. The Qt::GridLayout automatically arranges its widgets in rows and columns; you can specify the row and column numbers when adding widgets to the layout, and Qt::GridLayout will fit them into the grid.
for row in 0..2
  for column in 0..2
    grid.addWidget(LCDRange.new(), row, column)
  end
end
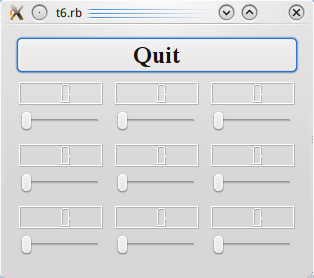
We create nine LCDRange widgets, all of which are children of the grid object, and we arrange them in three rows and three columns.
Running the Application
This program shows how easy it is to use many widgets at a time. Each one behaves like the slider and LCD number in the previous chapter. Again, the difference lies in the implementation.
Exercises
Initialize each slider with a different/random value on startup.
