Разработка/Руководства/Введение в Qt4 на Ruby/Глава 12
| Серия примеров | Введение в программирование на Qt®4 на языке Ruby |
| Необходимо знать | Пример 11: Пробный выстрел |
| Следующий пример | Пример 13: Игра окончена |
| Литература | нет |
Висящий в воздухе

Файлы:
Обзор
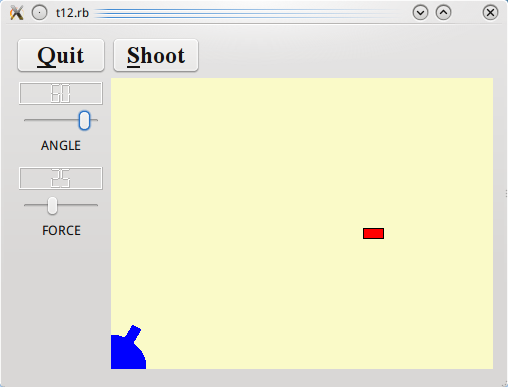
In this example, we extend our LCDRange class to include a text label. We also provide something to shoot at.
Построчный обзор программы
def initialize(s, parent = nil)
  super(parent)
  init()
  setText(s)
end
This constructor first calls init() and then sets the label text. init() is a separate function performing initialization mosty because of function overloading matters in the original C++ version.
def init()
  lcd = Qt::LCDNumber.new(2)
  lcd.setSegmentStyle(Qt::LCDNumber::Filled)

  @slider = Qt::Slider.new(Qt::Horizontal)
  @slider.setRange(0, 99)
  @slider.setValue(0)

  @label = Qt::Label.new()
  @label.setAlignment(Qt::AlignHCenter.to_i | Qt::AlignTop.to_i)

  connect(@slider, SIGNAL('valueChanged(int)'),
  lcd, SLOT('display(int)'))
  connect(@slider, SIGNAL('valueChanged(int)'),
  self, SIGNAL('valueChanged(int)'))

  layout = Qt::VBoxLayout.new()
  layout.addWidget(lcd)
  layout.addWidget(@slider)
  layout.addWidget(@label)
  setLayout(layout)

  setFocusProxy(@slider)
end
The setup of lcd and slider is the same as in the previous chapter. Next we create a Qt::Label and tell it to align the contents centered horizontally and to the top vertically. The Qt::Object::connect() calls have also been taken from the previous chapter.
def setText(s)
  @label.setText(s)
end
This function sets the label text.
The CannonField now has two new signals: hit() and missed(). In addition, it contains a target.
signals 'hit()', 'missed()' #...
The hit() signal is emitted when a shot hits the target. The missed() signal is emitted when the shot moves beyond the right or bottom edge of the widget (i.e., it is certain that it has not and will not hit the target).
newTarget()
This line has been added to the constructor. It creates a "random" position for the target. In fact, the newTarget() function will try to paint the target. Because we are in a constructor, the CannonField widget is invisible. Qt guarantees that no harm is done when calling Qt::Widget::update() on a hidden widget.
@@first_time = true

def newTarget()
  if @@first_time
    @@first_time = false
    midnight = Qt::Time.new(0, 0, 0)
    srand(midnight.secsTo(Qt::Time.currentTime()))
  end

  @target = Qt::Point.new(200 + rand(190), 10 + rand(255))
  update()
end
This function creates a target center point at a new random position.
We create the Qt::Time object midnight, which represents the time 00:00:00. Next we fetch the number of seconds from midnight until now and use it as a random seed. See the documentation for Qt::Date, Qt::Time, and Qt::DateTime for more information.
Finally we calculate the target's center point. We keep it within the rectangle (x = 200, y = 35, width = 190, height = 255), i.e., the possible x and y values are 200 to 389 and 35 to 289, respectively) in a coordinate system where we put y position 0 at the bottom edge of the widget and let y values increase upwards x is as normal, with 0 at the left edge and with x values increasing to the right.
By experimentation we have found this to always be in reach of the shot.
def moveShot()
  region = Qt::Region.new(shotRect())
  @timerCount += 1

  shotR = shotRect()
This part of the timer event has not changed from the previous chapter.
if shotR.intersects(targetRect())
  @autoShootTimer.stop()
  emit hit()
This if statement checks whether the shot rectangle intersects the target rectangle. If it does, the shot has hit the target (ouch!). We stop the shoot timer and emit the hit() signal to tell the outside world that a target was destroyed, and return. Note that we could have created a new target on the spot, but because the CannonField is a component we leave such decisions to the user of the component.
elsif shotR.x() > width() || shotR.y() > height()
  @autoShootTimer.stop()
  emit missed()
This is the same as in the previous chapter, except that it now emits the missed() signal to tell the outside world about the failure.
  else
    region = region.unite(Qt::Region.new(shotR))
  end

  update(region)
end
And the rest of the function is as before.
CannonField::paintEvent() is as before, except that this has been added:
paintTarget(painter)
This line makes sure that the target is also painted when necessary.
def paintTarget(painter)
  painter.setBrush(Qt::Brush.new(Qt::red))
  painter.setPen(Qt::Pen.new(Qt::Color.new(Qt::black)))
  painter.drawRect(targetRect())
end
This function paints the target; a rectangle filled with red and with a black outline.
def targetRect()
  result = Qt::Rect.new(0, 0, 20, 10)
  result.moveCenter(Qt::Point.new(@target.x(), height() - 1 - @target.y()))
  return result
end
This private function returns the enclosing rectangle of the target. Remember from newTarget() that the target point uses y coordinate 0 at the bottom of the widget. We calculate the point in widget coordinates before we call Qt::Rect::moveCenter().
The reason we have chosen this coordinate mapping is to fix the distance between the target and the bottom of the widget. Remember that the widget can be resized by the user or the program at any time.
There are no new members in the MyWidget class, but we have slightly changed the constructor to set the new LCDRange text labels.
angle = LCDRange.new(tr('ANGLE'))
We set the angle text label to "ANGLE".
force = LCDRange.new(tr('FORCE'))
We set the force text label to "FORCE".
Запуск приложения
The LCDRange widgets look a bit strange: When resizing MyWidget, the built-in layout management in Qt::VBoxLayout gives the labels too much space and the rest not enough; making the space between the two LCDRange widgets change size. We'll fix that in the next chapter
Упражнения
Make a cheat button that, when pressed, makes the CannonField display the shot trajectory for five seconds.
If you did the "round shot" exercise from the previous chapter, try changing the shotRect() to a shotRegion() that returns a Qt::Region so you can have really accurate collision detection.
Make a moving target.
Make sure that the target is always created entirely on-screen.
Make sure that the widget cannot be resized so that the target isn't visible. [Hint: Qt::Widget::setMinimumSize() is your friend.]
Not easy; make it possible to have several shots in the air at the same time. [Hint: Make a Shot class.]
