Development/Tutorials/Krita Scripting
Krita Scripting
Intro
Krita and Scripting
Krita is a painting and image editing application for KOffice.
Krita comes with a bunch of plugins where the scripting plugin uses the Kross scripting framework to offer powerful scripting with Python, Ruby and KDE JavaScript.
The plugin consist of following parts;
- The ScriptingPart class which implements a KParts plugin that is loaded by Krita on startup and which is responsible for displaying the ScriptingDocker and the setup of the scripting environment.
- The kritacore module offers an interface to scripting backends to deal with the Krita internals. The Scripting::Module class is the entry point for your script to communicate with Krita.
Scripting Handbook
The Krita Scripting Handbook contains a full reference of all objects and methods accessible from within the scripting backends.
The Handbook is generated from the sourcecode using doxygen and the doxy2doc.py Python script as postprocessor to create visible output from the by doxygen produced XML files.
Links
- Krita Homepage
- Krita Wiki
- Krita Scripting Plugin code
- Krita Scripting Plugin ReadMe
- Kross Homepage
- Kross Wiki Page
- Kross Tutorial
Scripting Extensions
Extensions are used to extend Krita with additional functionality written in Python, Ruby or KDE JavaScript scripts.
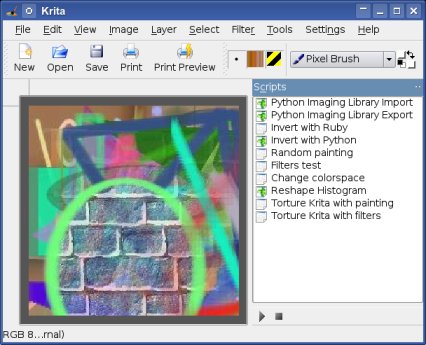
The following screenshot shows Krita running with it's on the right half displayed scripting-docker that is used to display scripts and fastly execute scripts. The image itself was created using the Random painting Ruby script.
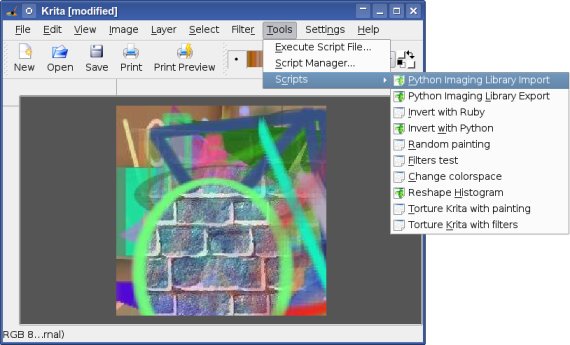
Those extensions are also accessible from within the "Scripts"-menu and are distributed with Krita, so some default extensions are installed together with Krita as part of it, or could be later added and configured on demand using the "Script Manager".
Following sections try to provide an overview of the per default with Krita distributed scripting extensions.
Import and Export
The both scripts pilimport.py and pilexport.py are using the Python Imaging Library to import and export to the by PIL support image-formats.
The following screenshot shows the "Python Imaging Library Import" Python script pilimport.py once executed.
For GUI-related things you are also able to use PyQt4 or Tkinter in your python scripts, Korundum/QtRuby in your Ruby scripts, KjsEmbed4 (KjsEmbded4 is included in kdelibs4 now) in your JavaScript scripts or the more high-level Kross forms in all interpreter-backends.
File:Krita2scripting screeny3.jpg
Most parts of the pilimport.py Python script are related to GUI and preparation of the import-proccess. The core part of that script, so the part that does actualy do the import, looks like;
# import needed modules and initialize PIL
import Krita, Image, ImageFile
Image.init()
# read the imagefile and convert to RGB
pilimage = Image.open("/home/myusername/myimage.jpg")
pilimage = pilimage.convert("RGB")
# fetch the Krita layer we like to import to
krtlayer = Krita.image().activePaintLayer()
# scale the loaded image to fit
pilimage = pilimage.resize((krtlayer.width(), krtlayer.height()))
# let's use the progressbar
Krita.progress().setProgressTotalSteps(krtlayer.width() * krtlayer.height())
# finally do the import
krtlayer.beginPainting("PIL import")
it = krtlayer.createRectIterator(0, 0, krtlayer.width(), krtlayer.height())
while (not it.isDone()):
    data = pilimage.getpixel((it.x(), it.y()))
    it.setPixel(list(data))
    Krita.progress().incProgress()
    it.next()
krtlayer.endPainting()
The pilexport.py Python script which does export a Krita image to a by the Python Imaging Library supported image-format looks then like;
# import needed modules and initialize PIL
import Krita, Image, ImageFile
Image.init()
# fetch the Krita layer we like to export
krtlayer = Krita.image().activePaintLayer()
# let's use the progressbar
Krita.progress().setProgressTotalSteps(krtlayer.width() * krtlayer.height())
# create the PIL image
pilimage = Image.new("RGB", (krtlayer.width(), krtlayer.height()))
# finally do the export
it = krtlayer.createRectIterator(0, 0, krtlayer.width(), krtlayer.height())
finesh = it.isDone()
while (not finesh):
    pilimage.putpixel((it.x(),it.y()), tuple(it.pixel()))
    Krita.progress().incProgress()
    finesh = it.next()
# and save the result
pilimage.save("/home/myusername/myimage.jpg")
Painting
- The randompaint.rb Ruby script demonstrates how to use the Painter scripting API and paints random shape on the screen.
- The torture-painting.rb Ruby script tortures Krita with painting.
- The changecs.rb Ruby script demonstrates how to change the colorspace.
- The invert.rb Ruby script inverts the pixel of an image.
- The invert.py Python script inverts the pixel of an image.
- The invert.js JavaScript script inverts the pixel of an image.
Filters
- The filterstest.rb Ruby script tests the Krita filters.
- The torture-filters.rb Ruby script tortures Krita with filters.
Histogram
- The reshapehisto.py Python script is an experimental script to try to reshape histogram, while the results are far to be convincing yet it is still an example on how to use histogram in a script.


