Development/Tutorials/KDE3/Qt Designer and KDevelop 3.0 for Beginners/ja
cleanup confusing sections and fix sections which contain a todo
はじめに
Qt Designer で何か役立つものを作り始められるように、今からシンプルなプログラムを作って Qt Designer と KDevelop の力を見てみます。貴方が初めての "本当の" KDEアプリケーションを作る手助けとなれば幸いです。
KDevelop は完全な KDE アプリケーションを作成するのを補助するツールです。 KDE プロジェクトは autoconf や automake といったツールを用いているのですが、KDevelop は必要なファイルを全て用意してくれます。(adminディレクトリ, Makefile.cvs, Makefile.am ...)
Requirements
How to Get Qt Designer
From your Distribution
Qt Designer is part of the qt-3.2.x package and above. If you have an older Qt on your system, you should get at least this version. At the time of writing, Qt latest version is 3.3.2.
Please remember to check if you have all the qt-related packages installed. You need the qt headers in order to compile this tutorial application. These headers usually come in the devel package. You also need to be sure you have designer. In some distributions, it comes in a separate package.
To check if you have everything, do a:
locate qstring.h
If you get something like /usr/lib/qt3/include/qstring.h then you can set your QTDIR variable to /usr/lib/qt3/. In bash environment, this is done by typing:
export QTDIR= /usr/lib/qt3
Tarball or Anonymous Subversion
You can download the tarball from the Trolltech website, or get the qt-copy module from SVN. Please note that Qt for Linux is GPL.
For an explanation for how to use anonymous SVN, get the qt-copy and kde modules and compile them, please see a great documentation at Using Subversion with KDE.
You must then set the QTDIR environment variable. This should point to the directory into which you installed Qt. In bash, for example, you would type export QTDIR= /usr/local/qt
provided that /usr/local/qt is the directory into which you installed Qt. Please read the INSTALL file for more details.
You then compile by issuing the following commands, here is the recommended compile line:
./configure -system-zlib -qt-gif -system-libpng -system-libjpeg \
-plugin-imgfmt-mng -thread -no-exceptions -debug -fast
make
The command make install is not needed.
Qt Designer is located in the bin directory of your Qt installation directory. You can run it by typing:
/usr/local/qt/bin/designer
in a console.
To compile Qt from source, please see Trolltech's Qt/X11 Open Source Edition page.
How to get KDevelop 3
From your Distribution
KDevelop 3 should be part of your distribution. Pre 3 versions of KDevelop were nicknamed Gideon, but they are obsolete now.
From Tarball
KDevelop can be downloaded from the KDevelop website, under the Quick download heading.
To compile KDevelop 3, you need qt-3.1.0 or higher and kdelibs-3.1.0 or higher. The environment variables QTDIR and KDEDIR should point to those directories.
Don't forget to set up the KDE and Qt paths. The most common errors while using KDevelop come from the environment variables not set up properly. Check in a console by issuing the command set to see all your environment variables. You should set your PATH variable as follow as well as your LD_LIBRARY_PATH:
export PATH=$QTDIR/bin:$KDEDIR/bin:$PATH
export LD_LIBRARY_PATH=$QTDIR/lib:$LD_LIBRARY_PATH
If you have any problem getting KDevelop running, please refer to the KDevelop Forum to find the answer to your problem.
If you never used KDevelop before, try to create a new project and to compile it to get used to the interface and the icons.
KDevelop 3.4
Please refer to Downloading KDevelop 3.4 and Compiling KDevelop 3.4.
Lexicon
- Widget: a widget is an element of an graphical interface such as a container window, a button or a field for entering text.
- Layout management: this term describes the way in which widgets are arranged in a window. In its simplest form, an element may be placed at a specific position and given a specific height and width. But when the user resizes the window, the widgets should stay in their position and change their size accordingly. Linux allows to do that by using layouts to place the widgets in.
- Signal and Slots: Signals and slots are used for communication between objects. The signal/slot mechanism is a central feature of Qt. Signals are emitted by objects when they change their state in a way that may be interesting to the outside world. Slots can be used for receiving signals, but they are normal member functions. You can connect as many signals as you want to a single slot, and a signal can be connected to as many slots as you desire. Please see the TrollTech documentation on signals and slots for more details. In the excellent online documentation that comes with Qt, you'll find the signals and the public slots that go with each class. You can then implement your own slots.
アプリケーションの作成
プロジェクトの開始
KDevelopを使ってフレームワークを作成
KDevelop を使うとメインウィンドウのようなプログラムの枠組は簡単かつ迅速に生成されます。KDevelop を起動し、Project メニューから を選択して下さい。するとアプリケーションウィザードが表示されます。 を選択して下さい。次に、下部の Project Name SigCreate、Autor、Emailを埋めて下さい。(図参照)

Next をクリックし、CVS オプションとヘッダーのテンプレートに目を通して下さい。最後の画面で Finish をクリックして下さい。すると KDevelop はプロジェクトをコンパイルするために必要なファイルをすべて生成します。以下のように、ファイルセレクターを用いて main.cpp, sigcreate.cpp, sigcreate.h という3つのファイルを見ることができます。

.
アプリケーションウィザードがアプリケーションを生成したら、問題が無いかを確認するためにコンパイルをして下さい。コンパイルをする為にはを選択し、そこから を選んで下さい。次のようなメッセージが表示されれば成功です。
Good - your configure finished. Start make now
*
* *** Success ***
次に を実行します。(もしくは F8 でショートカット) そして し、 (もしくは F9)を実行して下さい。結果は次の図のようになります。


Qt Designer を使う
Qt Designer はユーザーインターフェースをデザインし、実装する為のツールです。フォームに部品を並べたり、正しくリサイズされるように適切なレイアウトを加えるのを補助します。Qt Designer の全てを知ろうとするならば、Qt Designer マニュアルを読むのを勧めます。Qt Designer はコードエディタも含んでいますが、コードを書くのには KDevelop を使うことにします。
今からQt Designer を使用してアプリケーションのインターフェースを作成します。Qt Designer で作成したファイルは .ui という拡張子で保存され、uic によって処理されて .hファイルと .cpp ファイルが自動生成されます。これはKDevelopによって配慮されるので、しなければならないことはフォームを作成することだけです。
KDevelop で を選択し、表示されたダイアログの項目を埋めます。最初にファイル名を入力します。sigcreatedlg と入力し、コンボボックスで作成したいファイルの種類を選択します。今は を選択してください。また、がチェックされていることを確認して下さい。これによって Makefile.am が更新されます。次のスクリーンショットを参照してください。

ボタンをクリックします。すると Automake Manager ダイアログが表示されます。

同様に、 ボタンをクリックします。
もし sigcreatedlg.ui が Qt Designer で新しく開かれ無い場合、 を開いてファイルを右クリックして を選択して下さい。Qt Designer が起動するでしょう。
Qt Designer のインターフェースは3つの部分に分かれています。

左側がツールボックスで、widget を選択したりします。右側には何種類かのダイアログを表示させることができますが、画像ではProperty Editor ダイアログだけを表示しています。(他の二つは表示させていません) ここでは widget を色々と設定する事ができます。例えば、大きさ、背景のカラー (パレット) 等です。真中がインターフェースをデザインするための場所で、作成中のフォームが表示されます。
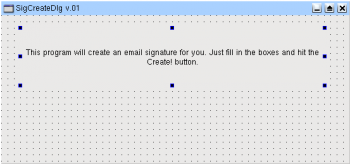
プログラムのデザイン
Qt Designer を使う際には、しっかりとしたインターフェースのイメージを頭の中で持っているべきです。下の画像は今から作るプログラムの外観です。

It is a window with a number of different items (or widgets) on it, designed so that the user puts the right information in the right boxes. You should always design your program from the user's point of view, as it must be easy to use.
このアプリケーションは email signature を作成し、表示するものです。ユーザーは名前とメールアドレスを入力し、3つのコメントから1つを選択します。 ボタンをクリックすると作成された signature が MultiLineEdit に表示されます。 ボタンを押すとプログラムが終了します。
新しいダイアログが開かれている Qt Designer のウィンドウに戻りましょう。右側のプロパティエディタに作成したフォームの詳細が表示されています。Property Editor の最初の行にはフォームの名前が表示されており、最初はForm1となっています。

ここをクリックして SigCreateDlg に変更します。これによってダイアログのクラス名も変わるので、分かりやすい名前にするべきです。
プロパティを変更するには、変更したいプロパティを選択し、右側の設定を変更します。試しに Caption プロパティを "SigCreateDlg v.01" に変更してみて下さい。これから、widget をダイアログに加えていきます。
ウィジェットの追加
まず始めに、以下のようにウィンドウの上部にテキストを挿入してみましょう。
このテキストはユーザーにプログラムの使い方を教えるもので、この種のウィジットは Label と呼ばれており、次のようにして設置することができます。
- 左側の ToolBox で を選択する、もしくはメニューバーから を選択して下さい。
- フォームの上にカーソルを持って行くと十字架になるので、ぺイントプログラムで四角形を描く様にマウスを操作して下さい。(一度クリックしてからサイズを変えても良いです) すると仮のテキストが設定されているラベルが作成されます。
- このテキストを変更する為には、ラベルをダブルクリックして TextLabel1 の代わりに違うテキストを挿入します。ここでは
This program will create an email signature for you. Just fill in the boxes and hit the Create! buton.
と入力して下さい。次にを選択し、テキストが見栄え良く表示されるようにしましょう。以下のスクリーンショットを参考に: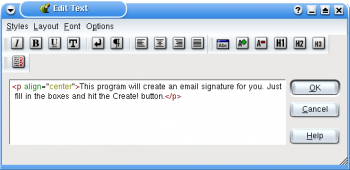
- 最後にきちんとしたサイズになるようにウィジットをリサイズします。一応マウスを使ってラベルが中央に来るようにして下さい。後でもっとエレガントなレイアウトテクニックを見てみることにしましょう。次のスクリーンショットが参考になるでしょう:


"選択、ドラッグ、プロパティとサイズの変更"という操作で Qt Designer でサポートされているどんなウィジットも埋め込む事が出来ます。
Qt Designer の興味深い点は、ウィジットが他のウィジットのコンテナになることができるという事です。これはフレーム内に入力欄を作ると言う次の過程で分かります。下の画像を見てみると、いくつかのラベルとテキストボックスがフレームの中に配置されています。このフレームは Group Box と呼ばれ、ラベルとテキストボックスを内部に持つコンテナの役割を果たします。まず始めに、 もしくはメニューバーの から GroupBox を選択して GroupBox を作成してみましょう。先程作ったラベルのすぐ下に、ドラッグ&
ドロップで GroupBox を作成して下さい。そしてプロパティエディタで title プロパティを Details に変更して下さい。 title プロパティの左側に'+'マークが有るのに気付くでしょう。これはサブプロパティを持っていることを示しています。
GroupBox を作成した後は、今度は GroupBox 内に3つのラベルを配置して下さい。 Object Explorer box () を見ると、ラベルが GroupBox フレームの子オブジェクトと成っていることが確認できます。下の画像を見て下さい。

Change the text of labels by double-clicking on it.
Once you have done this you can then create the text boxes. They will allow the user to type in text like his(her) name and email address. We use the simplest type of text boxes: a widget called QLineEdit which allows the user to enter one line of text only. You have to create two QLineEdit widgets for the name and the email address. You choose the menu and you draw it beside the 'Your Name' Label. Do the same below for the address.
The witty comment will be selected by the user. We use a ComboBox which will present the user with three comments. Click on the ComboBox icon or select it via the menu. Draw it beside the Witty Comment label. Then double-click on it. You will be presented with a box into which you can add the contents of the combo box. Click on the button and type in your comment in the text box at the right. Then click again on for the second and third comments. Click on when you have finished.
Adjust the size of the different widgets so they are nicely placed.

Up to now, we have not named any of the widgets that are being placed in our program. It is useful to set an internal name for widgets so we can call them after in the program. Labels don't perform any action so they don't need to be named but other widgets do. It is the case now for our text boxes. We'll need to manipulate the data from the three input widgets (i.e. read the text) so we should give them a name. Names should be easily recognized later and they should make sense. The names are assigned via the name property on the top of the Property Editor. We name the top LineEdit nameBox and the second one mailBox. We name the ComboBox commBox. This will allow us to access the comments. So click on each and then besides in the Property Editor write nameBox and mailBox. Then click on the and name it commBox.
We finish the graphical design by adding a label with Generated Signature as text. Below it, we put a TextEdit () where the generated signature will be displayed. We name it sigBox. And then we add two PushButtons at the bottom ('Create!' and 'Cancel'). They don't need names but you can give them some if you want.
Save your form. You can now have a quick preview by selecting the menu . This is the form before layout management.
Getting Spaced Out
This section describes the layout management. If you resize the preview window you will then notice that the widgets do not adjust appropriately. They are not resized. To improve things, we need to use a feature in Qt called spacers. Spacers are like virtual springs that push the widgets on each side apart. {{Note|1= Having a good layout is essential for your application, as when the strings are translated, they might be longer than the English ones and they need to fit on your widgets. The geometry of the widgets has to be nice if the user can resize your window application. Layouts are done by trial and error so use to see the result of your layout management and to achieve the best layout.
The use of spacers and layout management is a skill that is developed through trial and error. The main thing to remember when dealing with spacers is that you work horizontally first and then vertically.
We will first use spacers to center the text in the top box. Resize your label so that it is only the size of the text. Then we add two spacers, one at each side. Choose the icon or menu . You adjust each of the spacers horizontally. Click the space to the left of the text and the blue spacer will appear . Repeat the same procedure for the right. Then add a spacer on the right of the "Generated Signature" label, and a last one on the left of the the "Create!" pushbutton. Please use this image as a reference.
Now that we have spacers to fill blank space, we need a proper layout management. This will allow the widgets to be nicely resized whenever the main window is resized. It is really compulsory to have good layout management. Again, try to resize several times to see if everything is in place. We can use Vertical or horizontal layout or grid management. The top row of widget is horizontal (spacer + label + spacer) so we need Horizontal management. We need to select the three widgets alltogether: click on the first spring, then click on the label while holding down Shift, then on the second spring while holding down Shift. Then click on the or menu . You will then see a resizable red line around the three objects to indicate that their layout is being managed. Resize the red box if it needs it.
We can now repeat this procedure for the three labels inside the GroupBox, this time using vertical layout management. The same vertical management is used for the two LineEdit and the ComboBox. It is better to use vertical management to keep the objects aligned. If we use horizontal management for each label + text box then they will not stay aligned and equally sized. Horizontal management is needed for the label with the spacer and another one for the two pushbuttons and the spacer.
To finish the layout, we need to let the form look after the laid-out boxes. We put everything in a grid. This is done by right clicking the form and selecting from the menu. The final design with layout lines should resemble something similar to this image:

Signals and Slots
Signals and Slots are used for communication between Qt objects. The signal/slot mechanism is a central feature of Qt and probably the part that differs most from other toolkits which often use callbacks. In Qt, a signal is emitted by a widget when a particular event occurs, very often triggered by the user like for example pressing a button or writing something in a LineEdit. A slot is simply a function that is called in reponse to a particular signal.
Now the widgets are implemented and the layout is arranged the final thing we need to do in the design stage of the form is to create the signal/slot connections. To do this manually requires a connect() function but Qt Designer provides a simple yet effective solution. To create the signal/slot connections we need to use the connecting tool. To do this either select the icon (it looks like a red arrow going into a green square) or select from the menu (or use the F3 shortcut key). To create a connection, click on the form on the widget that is going to be dealing with the slot, drag the line off the form and release the mouse button.

.
Let's deal first with the Create! button. Click first on the icon or select it from the menu or use the F3 key. Then click on the Create! button with the crosshair and drag the line off the form completely. When you have released the mouse button you will see the connections tool shown in the image.
What we want to do is to create a slot that will create our signature when the user clicks on the Create! button. The signal will be clicked() (you may choose among five signals for a QPushButton) and we need to create the slot then make the connection.
To create the slot we need to click on the button. The slot creation box then appears. Now click on the button and a slot will appear in the box. Instead of new_slot() rename it to slotCreateSig() and leave the access specifier as public. When you click on you will be returned to the connections box and you will see your new slot in the Slots section of the box.
To make a connection you simply select the appropriate signal (which is in our case) and then select the slot (which is our new slot ). When you have selected both signal and slot you will see the connection made at the bottom of the screen. After you are finished click .
Repeat the procedure for the Cancel button by using the clicked() signal and the close() slot. You are now done with the signals and slots.

Generating the Source
In this tutorial, we use KDevelop subclassing tool in Automake Manager. If you have KDevelop version which has not that capability, then please go to Chapter 7 where I explain this step without the subclass tool.
Here we start with the KDE simple project named SigCreate and the sigcreatedlg.ui that we have added in our project. In the , in the section you must have three files: sigcreatedlg.ui, sigcreate.cpp and main.cpp. The project must compile and give the main window as in picture 3 (creating.html).
As the sigcreate class is no use for us, we will remove it and use it for subclassing the sigcreatedlg.ui file. In the , right click on sigcreate.cpp and select and a dialog pops up. Please check . Then do the same with sigcreate.h. This is the way to remove obsolete files from your project and the Makefile.am will be updated. Remember to run and configure before compiling your project again. We will not do it right now because we will make other changes. We will now use the class name SigCreate for the subclass.
In the , right click on sigcreatedlg.ui and choose from the context menu that appears. Then fill in the subclass name which is SigCreate. Check the box: and click on . Say then about adding these files in cvs as we did not enable this in our project.
(The subclass dialog Image)
We have to suppress some lines in main.cpp as the KDE simple project template refers to a KMainWindow which is usually the base class used. But here, SigCreate is based on QWidget. You have to remove all the lines between KApplication app; and return app.exec(); except the ones I keep here:
SigCreate *mainWin = 0;

mainWin = new SigCreate();
app.setMainWidget( mainWin );
mainWin->show();
Implementing the Slot
Then open the sigcreate.cpp source file and then you implement the slot by adding the following lines in the parenthesis of:
void SigCreate::slotCreateSig()
{}
to implement the slot:
	sigBox->append("\n--");
 	sigBox->append(nameBox->text());
 	sigBox->append(mailBox->text());
 	sigBox->append(commBox->currentText());
</
Also, the corresponding headers of course:
 #include <qlineedit.h>
 #include <qcombobox.h>
 #include <qmultilineedit.h>
Run , , , (or ), . That's it! The program is working!
(Picture 20)
A few more words about signals and slots. The signals and slots mechanism is type safe: the signature of a signal must match the signature of the receiving slot (for example, you will connect valueChanged(int) with a slot having an int as argument). And another thing to keep in mind is that all classes that inherit from QObject or one of its subclasses (e.g. QWidget) can contain signals and slots.
All the strings used in KDE program must be wrapped in the i18n() function (klocale.h as header) because all KDE projects are translated. Please see the KDE Translation HowTo to learn more about i18n to make translations for an application.
In Short
This is a short resume on how to work with KDevelop and QtDesigner.
- In the KDevelop menu File->New, select a Widget (.ui) file and give it a name (kprojectdlg for that example), check add to Project. Click OK.
- Qt Designer starts. Work on your form in Qt Designer then save your file and close designer. The designer file appears then in KDevelop under User Interface (kprojectdlg.ui).
- Create a new class (KProject as name for example) (Project menu then New class...) that inherits from your dialog file (kprojectdlg) and is a QWidget-childclass.
- Add your slots and others signals or member functions in the inherited class KProject.
Make the Translations for a Simple KDE Project
When your own project is finished, you may like to have one or several translations for the GUI. Here is how you can do that.
Install gettext Patched for KDE
Install a patched gettext that you can find on developer.kde.org and install it in your home directory. The patched gettext can be found there : http://public.kde.planetmirror.com/pub/kde/devel/gettext-kde/
   $ tar xvzf gettext-0.10.35-kde.tar.gz
 $ cd gettext-0.10.35-kde
 $ ./configure
 $ make
 $ mkdir -p ~/bin
 $ cp src/gettext src/xgettext ~/bin # copy gettext and xgettext into your HOME/bin directory
 $ export PATH=~/bin:$PATH
Prepare the Translations
Then, go into your project directory :
$ cd /path/to/myproject
Set KDEDIR to match your kde installation - on my Mandrake it is /usr This path can also be found by doing kde-config --prefix
$ export KDEDIR=`kde-config --prefix` # or export KDEDIR=/usr
Then create the translations files :
$ make -f admin/Makefile.common package-messages
Make the Translations
Translate the .po files using kbabel These files are in the po directory of your project.
Compile and Install the Translations Files
 $ make package-messages
 $ sudo make install
General Tips
General Hints
Your Application Name
KDE application names generally start with the letter K followed by a name suggesting what the program does. For example, KMail is very simple and tells the user that this is indeed a KDE application and about email. A good practice is to choose an english name for the name that follows the K. Of course, this is just an indication and you are free to do what you want. But a good name can help to get your program known quicker.
Coding Practice
Comments should be in English as it is really easier if someone else has a look at your code.
Class names usually are also in English and the names must indicate what the class does. Good examples: TopLevel, CursorInterface, TaskManager. Note the upper case letters and remember that C++ is case-sensitive.
Function names usually begin with a lower case letter and here are examples of good names:
void activateRaiseOrIconify();
void toDesktop(int);
void windowAdded(WId);
Code indentation can be whatever you like as long as the code is visible for other developers. Always keep in mind that other people will have a look in your code and try to make it easy to read.
Importing your project in KDE CVS
Your program interests people, you feel you have time to really work on it, you need more feedback and help for improving it. You also agree to release it under the GPL license or equivalent. You can ask for a cvs account to import it in kdenonbeta. The kdenonbeta module is quite big and is not distributed with the official KDE. It is not packaged nor translated and feature freeze does not apply to kdenonbeta. Its purpose is to allow other developers to work on your application and to test it. Of course, you will need qt-copy, arts and kdelibs from cvs HEAD at least. Please see a tutorial here on how to get started for compiling KDE from cvs HEAD.
In order to get a cvs account, please follow theses instructions. Send a mail to sysadmin (at) office (dot) kde (dot) org to justify why you need cvs access. Tell that you want to import your application (app_name) in the kdenonbeta module. Make sure to specify your full name and e-mail address, if the From field in your mails doesn't specify them. You can also choose a nickname for your user login. You can currently choose between the standard non-encrypted CVS protocol (pserver) and the encrypted CVS-over-ssh. If you choose pserver, send also an encrypted password (for instance using useradd dummy ; passwd dummy ; grep dummy /etc/passwd /etc/shadow). If you choose CVS-over-ssh, send a public ssh key (e.g. ~/.ssh/id_dsa.pub).
Wait for the answer from a KDE sysadmin.
Once you have compiled at least qt-copy, arts and kdelibs, you need to check out kdenonbeta files. Log in the cvs server with your login user and password.
    $ cvs co -l kdenonbeta
    $ cd kdenonbeta
    $ cvs co admin  (or ln -s ../kde-common/admin .admin)
You copy your project main dir with everything in kdenonbeta and then, in your project main dir, you issue $ make disclean
All the .o files must be gone. You can also remove by hand all Makefile, Makefile.in (not Makefile.am) and all kdevelop related files. Remove the admin, autom4te.cache, debug, doc, po and templates folders. You must just keep some files and the src subdir. Then, you cd .. to go back in kdenonbeta and you type:
    $ make -f Makefile.cvs
    $ ./configure --prefix=$KDEDIR
    $ cd your_project_name
    $ make
    $ su -c 'make install'
All these steps must go well. If there are errors, you should be able to correct them by carefully reading the error message. If you are really stuck, please go to IRC and ask on #kde or #kde-devel, someone will help you.
then, in kdenonbeta dir:
    $ cvs add your_project_name
    $ cvs add your_project_name/*
    $ cvs add your_project_name/src
    $ cvs add your_project_name/src/*
    $ cvs commit
You get the window (vi editor as default) where you can log your message. It's a good practice to note what your commit is about. In your case, you will say (type i first if you are in vi to get in edit mode):
First import of your_app_name which does this and that.
Check if all the files are added correctly. If not, cvs add filename and cvs commit.
Each time you want to work on your project, don't forget to log in the kde server with your user login and password and, to be sure you have the latest version, do a:
$ cvs up
Finished!