Archive:Development/Tutorials/First program (zh TW): Difference between revisions
No edit summary |
No edit summary |
||
| Line 8: | Line 8: | ||
pre=[http://mindview.net/Books/TICPP/ThinkingInCPP2e.html C++]、[http://www.qt.nokia.com/products/qt/ Qt]、[[Getting_Started/Build/KDE4|KDE 4 開發環境]]| | pre=[http://mindview.net/Books/TICPP/ThinkingInCPP2e.html C++]、[http://www.qt.nokia.com/products/qt/ Qt]、[[Getting_Started/Build/KDE4|KDE 4 開發環境]]| | ||
next=[[Development/Tutorials/Using_KXmlGuiWindow|教學 2 - KXmlGuiWindow]]| | next=[[Development/Tutorials/Using_KXmlGuiWindow (zh TW)|教學 2 - KXmlGuiWindow]]| | ||
reading=[[Development/Tutorials/CMake|CMake]] | reading=[[Development/Tutorials/CMake|CMake]] | ||
| Line 82: | Line 82: | ||
現在我們有了 item,可以開始創建我們的彈出框了。在這裡我們呼叫 <tt>{{class|KMessageBox}}::questionYesNo()</tt> 函數,它在預設的條件下會創建一個有「Yes」和「No」按鈕的消息框。第二個參數是顯示在彈出框中間,按鈕上方的文字。第三個參數是視窗的標題。最後,我們使用我們創建的 <tt>KGuiItem yesButton</tt> 來設定「Yes」按鈕的 KGuiItem(一般情況下是)。 | 現在我們有了 item,可以開始創建我們的彈出框了。在這裡我們呼叫 <tt>{{class|KMessageBox}}::questionYesNo()</tt> 函數,它在預設的條件下會創建一個有「Yes」和「No」按鈕的消息框。第二個參數是顯示在彈出框中間,按鈕上方的文字。第三個參數是視窗的標題。最後,我們使用我們創建的 <tt>KGuiItem yesButton</tt> 來設定「Yes」按鈕的 KGuiItem(一般情況下是)。 | ||
請注意,所有使用者可見的文字都透過了 i18n() 函數,這對翻譯 UI 是必要的。更多本地化資訊可以在[[Development/Tutorials/Localization/i18n|本地化教學]]找到 。 | |||
程式碼相關的工作我們已經全部完成了。現在我們要建構並嘗試運行它。 | 程式碼相關的工作我們已經全部完成了。現在我們要建構並嘗試運行它。 | ||
== 建構 == | == 建構 == | ||
你需要[[Development/Tutorials/CMake|使用 CMake]]作為您的建構環境。你要提供一個 CMakeLists.txt 檔案,CMake 會使用這個檔案來生成所有的 Makefile 。 | |||
=== CMakeLists.txt === | === CMakeLists.txt === | ||
| Line 110: | Line 110: | ||
=== Make 與執行 === | === Make 與執行 === | ||
您可以手動使用 CMake 和 make: | |||
mkdir build && cd build | mkdir build && cd build | ||
| Line 116: | Line 116: | ||
make | make | ||
或則,如果你已經按照[[Getting_Started/Build/KDE4| | 或則,如果你已經按照[[Getting_Started/Build/KDE4|建構 KDE 4]]中的說明設定好你的環境,可以使用下面的指令來編譯程式碼: | ||
cmakekde | cmakekde | ||
| Line 125: | Line 125: | ||
==繼續前進== | ==繼續前進== | ||
現在你可以開始學習下一課:[[Development/Tutorials/Using_KXmlGuiWindow (zh TW)|使用 KXmlGuiWindow]]。 | |||
[[Category:C++]] | [[Category:C++]] | ||
Revision as of 03:46, 25 September 2009
Development/Tutorials/First_program
Languages: عربي | Asturianu | Català | Česky | Kaszëbsczi | Dansk | Deutsch | English | Esperanto | Español | Eesti | فارسی | Suomi | Français | Galego | Italiano | 日本語 | 한국어 | Norwegian | Polski | Português Brasileiro | Română | Русский | Svenska | Slovenčina | Slovenščina | српски | Türkçe | Tiếng Việt | Українська | 简体中文 | 繁體中文
Template:TutorialBrowser (zh TW)
摘要
你的第一個程式將會用一句 「Hello World」 來向這個世界問好。為了實現它,我們將使用 KMessageBox,並自定其中的一個按鈕。

閱讀此教學以正確設定 KDevelop。你可以先用 KDevelop 打開一個已存在的 KDE 4 應用程式來檢驗設定是否正確。
不過,你仍然需要手動編輯 CMake 檔案。
程式碼
我們需要的全部程式碼都放在一個 main.cpp 檔案中。使用下列程式碼創建立檔案:
- include <KApplication>
- include <KAboutData>
- include <KCmdLineArgs>
- include <KMessageBox>
- include <KLocale>
int main (int argc, char *argv[])
{
   KAboutData aboutData(
                        // 內部使用的程式名稱。
                        "tutorial1",
                        // 消息登記名稱
                        // 如果為 null,則使用程式名稱。
                        0,
                        // 顯示使用的程式名稱字串。
                        ki18n("Tutorial 1"),
                        // 程式版本號字串。
                        "1.0",
                        // 對程式功能的簡要描述。
                        ki18n("Displays a KMessageBox popup"),
                        // 程式碼發布授權
                        KAboutData::License_GPL,
                        // 版權聲明
                        ki18n("(c) 2007"),
                        // 顯示在關於對話框的選擇性文字。
                        // 可以包含任意要求的資訊。
                        ki18n("Some text..."),
                        // 程式首頁字串。
                        "http://tutorial.com/",
                        // 回報 bug 的 email 地址
                        "[email protected]");
   KCmdLineArgs::init( argc, argv, &aboutData );
   KApplication app;
   KGuiItem yesButton( i18n( "Hello" ), QString(),
                       i18n( "This is a tooltip" ),
                       i18n( "This is a WhatsThis help text." ) );
   KMessageBox::questionYesNo( 0, i18n( "Hello World" ),
                               i18n( "Hello" ), yesButton );
   return 0;
}
我們在此程式中遇到的第一個 KDE 類別是 KAboutData 。這個類別用來儲存各種的程式相關資訊,如功能的簡單描述、作者或版權資訊等。幾乎所有的 KDE 應用程式都會使用該類別。
然後我們遇到了 KCmdLineArgs。這個類別可以用來處理命令列開關。例如,開啟程式並讀入一個特定的檔案。在本例中,我們只使用之前創建的KAboutData物件來初始化它,因此我們可以使用 --version 或 --author 開關。
接下來我們創建 KApplication 和 KLocale 物件。這在每個程式中都必須實作,因為KDE中的很多功能都需要他們,如i18n等。
現在我們已經完成了全部必須的KDE設定,接下來就可以讓我們的程式做一些有趣的事情了。我們將要創建一個彈出框,並將自定其中的一個按鈕。為了實現自定化,我們需要使用 KGuiItem 物件。KGuiItem 建構子的第一個參數是要顯示在 item(在本例中是一個按鈕)中的文字。下一個參數讓我們可以為該按鈕設定一個圖示,但這裡我們並不需要圖示,所以只需要傳遞 QString() 給它就行。最後,我們設定工具提示(tooltip)(當游標放在一個 item 上顯示的文字)和「這是什麼?」(用鼠標右擊 item 或按下Shift+F1時顯示)文字。
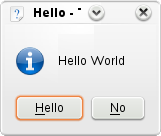
現在我們有了 item,可以開始創建我們的彈出框了。在這裡我們呼叫 KMessageBox::questionYesNo() 函數,它在預設的條件下會創建一個有「Yes」和「No」按鈕的消息框。第二個參數是顯示在彈出框中間,按鈕上方的文字。第三個參數是視窗的標題。最後,我們使用我們創建的 KGuiItem yesButton 來設定「Yes」按鈕的 KGuiItem(一般情況下是)。
請注意,所有使用者可見的文字都透過了 i18n() 函數,這對翻譯 UI 是必要的。更多本地化資訊可以在本地化教學找到 。
程式碼相關的工作我們已經全部完成了。現在我們要建構並嘗試運行它。
建構
你需要使用 CMake作為您的建構環境。你要提供一個 CMakeLists.txt 檔案,CMake 會使用這個檔案來生成所有的 Makefile 。
CMakeLists.txt
在 main.cpp 所在的目錄中創建一個名為 CMakeLists.txt 的檔案,其內容如下:
project (tutorial1)
find_package(KDE4 REQUIRED)
include (KDE4Defaults)
include_directories(${KDE4_INCLUDES})
set(tutorial1_SRCS main.cpp)
kde4_add_executable(tutorial1 ${tutorial1_SRCS})
target_link_libraries(tutorial1 ${KDE4_KDEUI_LIBS})
install(TARGETS tutorial1  ${INSTALL_TARGETS_DEFAULT_ARGS})
The find_package() function locates the package that you ask it for (in this case KDE4) and sets some variables describing the location of the package's headers and libraries. In this case we will use the KDE4_INCLUDES variable which contains the path to the KDE4 header files.
In order to allow the compiler to find these files, we pass that variable to the include_directories() function which adds the KDE4 headers to the header search path.
Next we create a variable called tutorial1_SRCS using the set() function. In this case we simply set it to the name of our only source file.
Then we use kde4_add_executable() to create an executable called tutorial1 from the source files listed in our tutorial1_SRCS variable. Afterwards, we link our executable to the KDE4 kdeui library using target_link_libraries() and the KDE4_KDEUI_LIBS variable which was set by the find_package() function. The line starting with install writes a default "install" target into the Makefile.
Make 與執行
您可以手動使用 CMake 和 make:
mkdir build && cd build
cmake .. # 注意有兩個點,這不是省略,而是代表「父目錄」。
make
或則,如果你已經按照建構 KDE 4中的說明設定好你的環境,可以使用下面的指令來編譯程式碼:
cmakekde
然後使用下面的指令來啟動它:
./tutorial1
繼續前進
現在你可以開始學習下一課:使用 KXmlGuiWindow。
