Development/Tutorials/Plasma4/WallpaperConfiguration
Plama Wallpaper Tutorial 2 - Configuration
Introduction
In the previous tutorial we made a simple wallpaper where we had some blue text saying 'Hello World'. In this tutorial we will add some configuration options to our wallpaper so that the user can change the colors, text and font of the wallpaper.
Adding Configuration Options
There are 4 steps to adding configuration options to our wallpaper:
- Decide what should be configurable.
- Add code to load and save configurations.
- Design the interface of the configuration dialog.
- Add code to show the configuration interface.
Step 1: Decide what should be configurable
As we said above we want the user to be able to change:
- The text and background color
- The font of the text
- The text itself
So we will need to add variables to our Tutorial class to keep track of these. So change tutorial.h to look like the following:
#ifndef PLASMA_WALLPAPER_TUTORIAL
#define PLASMA_WALLPAPER_TUTORIAL

#include <Plasma/Wallpaper>

class Tutorial : public Plasma::Wallpaper
{
    Q_OBJECT
    public:
        Tutorial(QObject* parent, const QVariantList& args);

        void paint(QPainter* painter, const QRectF& exposedRect);

    private:
        QColor backgroundColor; // New
        QColor textColor;       // New
        QFont textFont;         // New
        QString textString;     // New

};

K_EXPORT_PLASMA_WALLPAPER(tutorial, Tutorial)

#endif
We will also need to change our paint() function in tutorial.cpp so that it uses these variables now:
void Tutorial::paint(QPainter *painter, const QRectF& exposedRect)
{
    painter->setPen(backgroundColor);
    painter->setBrush(backgroundColor);
    painter->drawRect(boundingRect());

    painter->setPen(textColor);
    painter->setFont(textFont);
    painter->drawText(boundingRect(), Qt::AlignCenter, textString);
}
Step 2: Add code to load and save configurations
To load and save our configurations we need 2 functions called init() and save(). Add the following lines to our tutorial.h:
class Tutorial : public Plasma::Wallpaper
{
    Q_OBJECT
    public:
        Tutorial(QObject* parent, const QVariantList& args);

        virtual void save(KConfigGroup &config);	// New
        void paint(QPainter* painter, const QRectF& exposedRect);

    protected:						// New
        virtual void init(const KConfigGroup &config);	// New

    private:
        QColor backgroundColor;
        QColor textColor;
        QFont textFont;
        QString textString;
};
Now we need to implement these functions in tutorial.cpp:
void Tutorial::init(const KConfigGroup &config)
{
    backgroundColor = config.readEntry("backgroundColor", QColor(Qt::white));
    textColor = config.readEntry("textColor", QColor(Qt::black));
    textFont = config.readEntry("textFont", QFont("Arial", 50));
    textString = config.readEntry("textString", QString("Hello World!"));

    emit update(boundingRect());
}

void Tutorial::save(KConfigGroup &config)
{
    config.writeEntry("backgroundColor", backgroundColor);
    config.writeEntry("textColor", textColor);
    config.writeEntry("textFont", textFont);
    config.writeEntry("textString", textString);
}
Tutorial::init(), gets called whenever the wallpaper needs to reload it's configurations. In there we use config.readEntry() to read each entry from our configuration file. The first argument of config.readEntry() is the name of the configuration entry. The second argument is the initial value for when we do not have that entry. config.readEntry() will try to read the value for the entry in our config file, if it can't it will use the initial value, and return it.
After we finish loading our config options, we repaint the screen by emitting the update() signal on our entire wallpaper.
In Tutorial::save() we write our variables back into the config file.
Note that we did not have to specify a location or name for our config file. Plasma will automatically handle that for us. All we need to worry about is reading and writing the entries we are interested in. If you are curious you can see what these configuration files look like at $HOME/.kde4/share/config/plasma-desktop-appletsrc.
Step 3: Design the interface of the configuration dialog
We will now design the interface that will be presented to the user when they try to configure our wallpaper. We can do this using Qt Designer. I will not go into the details of how to make interfaces in this tutorial. For help you can refer to the Qt Designer Manual.
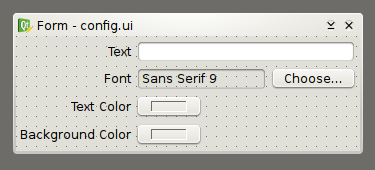
When creating a new form in Designer, choose the 'Widget' option. Change the name of the form/QWidget to 'Config'. Now we can make labels and widgets for each of our configuration options. Make sure to give meaningful names to the widgets, for example textString for the line edit.
Also we will need to lay it out nicely. The end result might look something like this:
Save the interface in our wallpaper directory as 'config.ui'.
We also need to add our config file to our CMakeLists.txt. Add the following line to CMakeLists.txt:
project(plasma-wallpaper-tutorial)

find_package(KDE4 REQUIRED)
find_package(KDE4Workspace REQUIRED)
include(KDE4Defaults)

add_definitions(${KDE4_DEFINITIONS})
include_directories(${CMAKE_SOURCE_DIR} ${CMAKE_BINARY_DIR} ${KDE4_INCLUDES})

set(tutorial_SRCS
    tutorial.cpp
)

kde4_add_ui_files(tutorial_SRCS config.ui) 	# New

kde4_add_plugin(plasma_wallpaper_tutorial ${tutorial_SRCS})
target_link_libraries(plasma_wallpaper_tutorial ${KDE4_PLASMA_LIBS})

install(TARGETS plasma_wallpaper_tutorial DESTINATION ${PLUGIN_INSTALL_DIR})
install(FILES plasma-wallpaper-tutorial.desktop DESTINATION ${SERVICES_INSTALL_DIR})
Step 4: Add code to show the configuration interface
Now we will need to change our code so that when the user tries to configure the wallpaper our interface that we just designed shows up.
When compiling, our 'config.ui' file will turn into a file called 'ui_config.h'. This header file contains a class called Ui::Config which is our config interface.
We will have to create a function called createConfigurationInterface() that returns a widget containing our configuration interface.
Also we will need to make a signal called settingsChanged(bool) and a slot called settingsModified() so that the configuration dialog and our wallpaper react to changes in the configuration interface.
So add these lines to our tutorial.h:
#ifndef PLASMA_WALLPAPER_TUTORIAL
#define PLASMA_WALLPAPER_TUTORIAL

#include <Plasma/Wallpaper>
#include "ui_config.h"  			// New

class Tutorial : public Plasma::Wallpaper
{
    Q_OBJECT
    public:
        Tutorial(QObject* parent, const QVariantList& args);

        virtual void save(KConfigGroup &config);
        void paint(QPainter* painter, const QRectF& exposedRect);
        virtual QWidget* createConfigurationInterface(QWidget* parent); // New

    Q_SIGNALS:
        void settingsChanged(bool modified);    // New

    protected:
        virtual void init(const KConfigGroup &config);

    protected slots:                            // New
        void settingsModified();                // New

    private:
        Ui::Config configWidget;                // New
        QColor backgroundColor;
        QColor textColor;
        QFont textFont;
        QString textString;
};

K_EXPORT_PLASMA_WALLPAPER(tutorial, Tutorial)

#endif
Now we will implement createConfigurationInterface() and settingsModified() in our tutorial.cpp:
QWidget* Tutorial::createConfigurationInterface(QWidget* parent)
{
    QWidget *widget = new QWidget(parent);
    configWidget.setupUi(widget);

    configWidget.textString->setText(textString);
    configWidget.textFont->setFont(textFont);
    configWidget.textColor->setColor(textColor);
    configWidget.backgroundColor->setColor(backgroundColor);

    connect(configWidget.textString, SIGNAL(textChanged(QString)), this, SLOT(settingsModified()));
    connect(configWidget.textFont, SIGNAL(fontSelected(QFont)), this, SLOT(settingsModified()));
    connect(configWidget.textColor, SIGNAL(changed(const QColor&)), this, SLOT(settingsModified()));
    connect(configWidget.backgroundColor, SIGNAL(changed(const QColor&)), this, SLOT(settingsModified()));

    connect(this, SIGNAL(settingsChanged(bool)), parent, SLOT(settingsChanged(bool)));

    return widget;
}

void Tutorial::settingsModified()
{
    textString = configWidget.textString->text();
    textFont = configWidget.textFont->font();
    textColor = configWidget.textColor->color();
    backgroundColor = configWidget.backgroundColor->color();

    emit settingsChanged(true);
    emit update(boundingRect());
}
In createConfigurationInterface() we put our configuration interface on a new QWidget. Then we set each of the widgets in the interface to their appropriate values. Then we connect each widget's change signal to our settingsModified() slot. This will cause settingsModified() to be called whenever any widget's value is changed in our interface. Next we connect our settingsChanged(bool) signal to our parents settingsChanged(bool) so that the dialog containing our interface can react to the change (by enabling it's 'Apply' button for example). Finally we return the widget so that it can be displayed in the dialog.
In settingsModified() we get the values from our widgets and put them in our variables. We then call settingsChanged(bool) so that the parent dialog can react. Then we repaint our entire wallpaper.
Compiling
To compile we follow the same steps as last time:
mkdir -p build
cd build
cmake .. -DCMAKE_INSTALL_PREFIX=`kde4-config --prefix`
make
sudo make install
Testing
Again we can test using the Plasma wallpaper viewer:
plasmawallpaperviewer -p tutorial
Or we can test it directly on our desktop. Restart plasma using:
kquitapp plasma-desktop; sleep 1; plasma-desktop
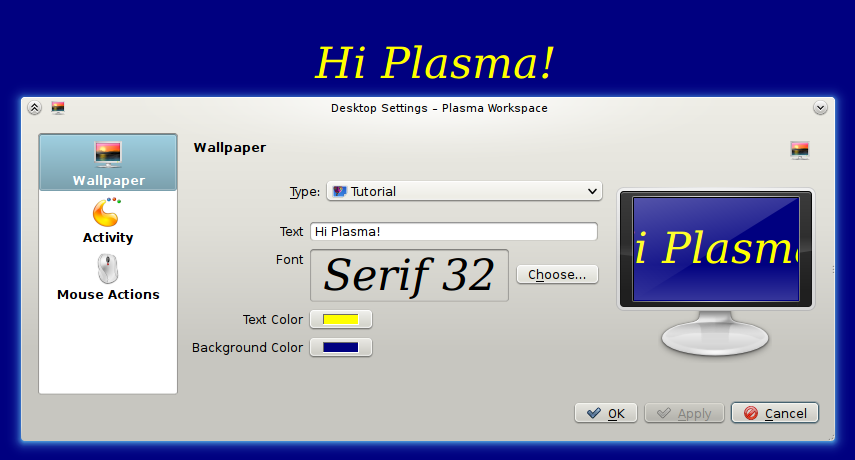
Then right click on your desktop, go to Desktop Settings>Wallpaper>Type and select 'Tutorial'.
Conclusion
When adding configuration options to our wallpaper, Plasma takes care of a lot of things for us. We just need to follow the 4 steps shown above.
If you want more practice, you can try adding a configurable background image to our wallpaper.
In the next tutorial we will look at how we can use mouse input to interact with our wallpaper.


