Archive:Development/Tutorials/Qt4 Ruby Tutorial/Chapter 10 (zh CN)
Template:I18n/Language Navigation Bar (zh CN)
Template:TutorialBrowser (zh CN)
Smooth as Silk

档案:
概览
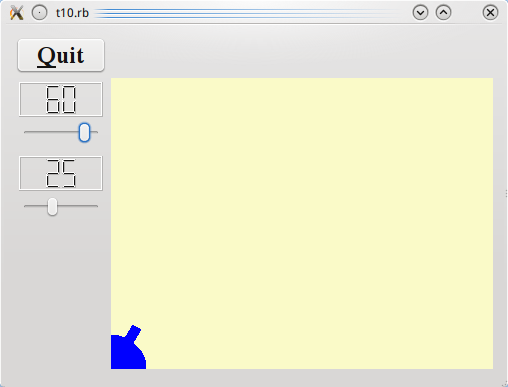
在这个范例中,我们增加了力量(force)控制。
一行一行的浏览
CannonField 现在除了角度外,又加入力量值。
signals 'angleChanged(int)', 'forceChanged(int)'
slots 'setAngle(int)', 'setForce(int)'
</syntaxhighlight>
力量的接口遵循和角度相同的写法。
def initialize(parent = nil)
super()
 @currentAngle = 45
 @currentForce = 0
 setPalette(Qt::Palette.new(Qt::Color.new(250, 250, 200)))
 setAutoFillBackground(true)
end
</syntaxhighlight>
力量 @currentForce 初始化为零。

def setAngle(angle)
 if angle < 5
   angle = 5
 elsif angle > 70
   angle = 70
 end
 if @currentAngle == angle
   return
 end
 @currentAngle = angle
 update(cannonRect())
 emit angleChanged(@currentAngle)
end
</syntaxhighlight>
我们在 setAngle() 函式作了一点轻微的改变。它只有重画 widget 中包含加农炮的部分。

def setForce(force)
 if force < 0
   force = 0
 end
 if @currentForce == force
   return
 end
 @currentForce = force
 emit forceChanged(@currentForce)
end
</syntaxhighlight>
setForce() 的实现相当类似 setAngle()。唯一的差别是,因为我们没有显示力量值,所以不需要重绘 widget。

def paintEvent(event)
painter = Qt::Painter.new(self)
 painter.setPen(Qt::NoPen)
 painter.setBrush(Qt::Brush.new(Qt::blue))
 painter.translate(0, height())
 painter.drawPie(Qt::Rect.new(-35, -35, 70, 70), 0, 90 * 16)
 painter.rotate(-@currentAngle)
 painter.drawRect(Qt::Rect.new(30, -5, 20, 10))
 painter.end()
end
</syntaxhighlight>
我们像第9章一样绘制。

def cannonRect()
 result = Qt::Rect.new(0, 0, 50, 50)
 result.moveBottomLeft(rect().bottomLeft())
 return result
end
</syntaxhighlight>
cannonRect() 函式返回 widget 坐标中封装加农炮的矩形。首先,我们建立一个大小50×50的矩形。然后移动它,所以它的左下角等同于 widget 自己的左下角。
Qt::Widget::rect() 函式返回在 widget 坐标中封装 widget 自己矩形。矩形的左上角永远是(0,0)。
建构子大部分相同,但新增了一些东西。
force = LCDRange.new()
force.setRange(10, 50)
</syntaxhighlight>
我们加入第二个 LCDRange,用来设定力量。
connect(force, SIGNAL('valueChanged(int)'),
cannonField, SLOT('setForce(int)'))
connect(cannonField, SIGNAL('forceChanged(int)'),
force, SLOT('setValue(int)'))
</syntaxhighlight>
我们连接 force widget 和 cannonField widget,就像我们为 angle widget 所作的。

leftLayout = Qt::VBoxLayout.new()
leftLayout.addWidget(angle)
leftLayout.addWidget(force)
gridLayout = Qt::GridLayout.new()
gridLayout.addWidget(quit, 0, 0)
gridLayout.addLayout(leftLayout, 1, 0)
gridLayout.addWidget(cannonField, 1, 1, 2, 1)
gridLayout.setColumnStretch(1, 10)
</syntaxhighlight>
在第9章中,我们把 angle 放在布局的左下格。现在,我们想有两个 widget在该格中,所以我们做一个 vertical box,把 vertical box 放在网格中,并且把 angle 和 range 放入 vertical box。

force.setValue(25)
</syntaxhighlight>
我们初始化力量值为25。
执行应用程序
我们现在有力量控制了。
练习
使炮管的大小依据力量的变化。
把加农炮放在右下角。
尝试增加一个更好的键盘接口。例如,用+和-来增加和减少力量,并用 enter 发射。如果你对左和右箭头键的运作的方式感到困扰,也更改它吧。[提示:重新实作 Qt::Widget::keyPressEvent()。]
