Development/Tutorials/Qt4 Ruby Tutorial/Chapter 05
Appearance
Development/Tutorials/Qt4 Ruby Tutorial/Chapter 05
Languages: عربي | Asturianu | Català | Česky | Kaszëbsczi | Dansk | Deutsch | English | Esperanto | Español | Eesti | فارسی | Suomi | Français | Galego | Italiano | 日本語 | 한국어 | Norwegian | Polski | Português Brasileiro | Română | Русский | Svenska | Slovenčina | Slovenščina | српски | Türkçe | Tiếng Việt | Українська | 简体中文 | 繁體中文
Building Blocks
| Tutorial Series | Qt4 Ruby Tutorial |
| Previous | Tutorial 4 -Calling it Quits |
| What's Next | Tutorial 6 - Let There Be Widgets |
| Further Reading | n/a |
Building Blocks

Files:
Overview
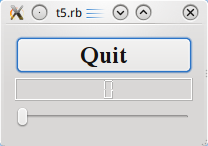
This example shows how to create and connect together several widgets by using signals and slots, and how to handle resizes.
require 'Qt4'
class MyWidget < Qt::Widget
 def initialize()
   super()
   quit = Qt::PushButton.new('Quit')
   quit.setFont(Qt::Font.new('Times', 18, Qt::Font::Bold))

   lcd = Qt::LCDNumber.new(2)
   slider = Qt::Slider.new(Qt::Horizontal)
   slider.setRange(0, 99)
   slider.setValue(0)
   connect(quit, SIGNAL('clicked()'), $qApp, SLOT('quit()'))
   connect(slider, SIGNAL('valueChanged(int)'), lcd, SLOT('display(int)'))
   layout = Qt::VBoxLayout.new()
   layout.addWidget(quit)
   layout.addWidget(lcd)
   layout.addWidget(slider)
   setLayout(layout)
 end
end
app = Qt::Application.new(ARGV)
widget = MyWidget.new()
widget.show()
app.exec()
