Archive:Development/Tutorials/Qt4 Ruby Tutorial/Chapter 08 (zh TW)
Template:I18n/Language Navigation Bar (zh TW)
Template:TutorialBrowser (zh TW)
Preparing for Battle

檔案:
概覽
在這個範例中,我們介紹第一個可以描繪本身的自定 widget。我們還增加一個有用的鍵盤介面(用兩行程式碼)。
一行一行的瀏覽
這個檔案非常類似第7章的 lcdrange.rb。但我們新增了一個槽:setRange()。
我們現在加入設定 LCDRange 範圍的可能性。到目前為止,它都被固定在0到99之間。
def setRange(minVal, maxVal)
 if minVal < 0 || maxVal > 99 || minVal > maxVal
   qWarning("LCDRange::setRange(#{minVal}, #{maxVal})\n" +
              "\tRange must be 0..99\n" +
              "\tand minVal must not be greater than maxVal")
   return
 end
@slider.setRange(minVal, maxVal)
end
setRange() 槽設定了 LCDRange 中 slider 的範圍。因為我們已經設立了 QLCDNumber 是顯示兩位數。所以我們希望盡可能限制 minVal 和 maxVal 的範圍,避免QLCDNumber 的溢位。(我們也可以允許值下限至-9,但我們沒有選擇這麼做。)如果參數是非法的,我們使用 Qt 的 QtGlobal::qWarning() 函式對使用者發出警告並立即返回。QtGlobal::qWarning() 是一個類似 printf 的函式,預設情況下它會輸出至 $stderr。如果您願意,您可以使用 QtGlobal::qInstallMsgHandler() 安裝自己的處理函式。
lcd.setSegmentStyle(Qt::LCDNumber::Filled)
這使得我們的 lcd 數字顯示方式更好。我不敢肯定,但我相信做到這一點是因為設定一個調色板(請見下一節)。我所知道的是,我在前面的章節嘗試時,這條線不會生效,但在這裡可以運作。
@currentAngle = 45
setPalette(Qt::Palette.new(Qt::Color.new(250, 250, 200)))
setAutoFillBackground(true)
建構子初始化角度為45度,並為這個 widget 設定一個自定調色板(palette)。
這個調色板使用指定的顏色作為背景,並挑選其他適當的顏色。(對這個 widget 而言,只有背景和文字顏色會真正用到。)然後,我們呼叫 setAutoFillBackground(true) 告訴 Qt 自動填充背景。
Qt::Color 用來指定一組 RGB(紅-綠-藍),每個值介於0(暗)和255(亮)之間。我們也可以使用一個預先定義的顏色,例如 Qt::yellow,來代替指定RGB值。
def setAngle(angle)
 if angle < 5
   angle = 5
 elsif angle > 70
   angle = 70
 end
 if @currentAngle == angle
   return
 end
 @currentAngle = angle
 update()
 emit angleChanged(@currentAngle)
end def setAngle(degrees)
這個函式設定角度值。我們選擇了5到70的合法範圍,並依此調整給予的角度數值。如果新的角度超出範圍,我們選擇了不發出警告。
如果新的角度和舊的相等,我們立即返回。重要的是,只有當角度真的發生變化,才發出angleChanged() 訊號。
然後我們設定新的角度值,並重繪我們的 widget。Qt::Widget::update() 函式會清空這個 widget(通常用它的背景顏色填滿),並發送一個繪圖(paint)事件給這個 widget。結果就是呼叫了這個 widget 的繪圖事件函式。
最後,我們發出 angleChanged() 訊號來告訴外界角度改變了。emit 關鍵字是 Qt 特有的,並不是標準的 Ruby 語法。
def paintEvent(event)
 painter = Qt::Painter.new(self)
 painter.drawText(200, 200, tr("Angle = #{@currentAngle}"))
 painter.end()
end
這是我們第一次嘗試寫繪圖事件處理器。事件參數包含了繪畫事件的描述。Qt::PaintEvent contains the region in the widget that must be updated. For the time being, we will be lazy and just paint everything.
Our code displays the angle value in the widget at a fixed position. We create a Qt::Painter operating on this widget and use it to paint a string. We'll come back to Qt::Painter later; it can do a great many things.
angle = LCDRange.new()
angle.setRange(5, 70)
In the constructor, we create and set up the LCDRange widget. We set the LCDRange to accept angles from 5 to 70 degrees.
cannonField = CannonField.new()
We create our CannonField widget.
connect(angle, SIGNAL('valueChanged(int)'),
cannonField, SLOT('setAngle(int)'))
connect(cannonField, SIGNAL('angleChanged(int)'),
angle, SLOT('setValue(int)'))
Here we connect the valueChanged() signal of the LCDRange to the setValue() slot of the CannonField. This will update CannonField's angle value whenever the user operates the LCDRange. We also make the reverse connection so that changing the angle in the CannonField will update the LCDRange value. In our example we never change the angle of the CannonField directly; but by doing the last connect() we ensure that no future changes will disrupt the synchronization between those two values.
This illustrates the power of component programming and proper encapsulation.
Notice how important it is to emit the angleChanged() signal only when the angle actually changes. If both the LCDRange and the CannonField had omitted this check, the program would have entered an infinite loop upon the first change of one of the values.
gridLayout = Qt::GridLayout.new()
So far, we have used Qt::VBoxLayout for geometry management. Now, however, we want to have a little more control over the layout, and we switch to the more powerful Qt::GridLayout class. Qt::GridLayout isn't a widget; it is a different class that can manage the children of any widget.
We don't need to specify any dimensions to the Qt::GridLayout constructor. The Qt::GridLayout will determine the number of rows and columns based on the grid cells we populate.
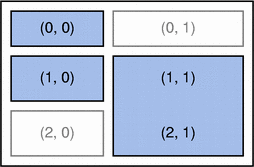
The diagram above shows the layout we're trying to achieve. The left side shows a schematic view of the layout; the right side is an actual screenshot of the program. (These two images are copyrighted/owned by Nokia.)
gridLayout.addWidget(quit, 0, 0)
We add the Quit button in the top-left cell of the grid, i.e., the cell with coordinates (0, 0).
gridLayout.addWidget(angle, 1, 0)
We put the angle LCDRange cell (1, 0).
gridLayout.addWidget(cannonField, 1, 1, 2, 1)
We let the CannonField object occupy cells (1, 1) and (2, 1).
gridLayout.setColumnStretch(1, 10)
We tell Qt::GridLayout that the right column (column 1) is stretchable, with a stretch factor of 10. Because the left column isn't (its stretch factor is 0, the default value), Qt::GridLayout will try to let the left-hand widgets' sizes be unchanged and will resize just the CannonField when the MyWidget is resized.
In this particular example, any stretch factor greater than 0 for column 1 would have the same effect. In more complex layouts, you can use the stretch factors to tell that a particular column or row should stretch twice as fast as another by assigning appropriate stretch factors.
angle.setValue(60)
We set an initial angle value. Note that this will trigger the connection from LCDRange to CannonField.
angle.setFocus()
Our last action is to set angle to have keyboard focus so that keyboard input will go to the LCDRange widget by default.
執行應用程式
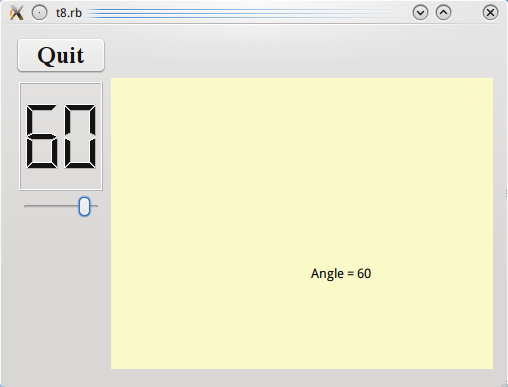
When the slider is operated, the CannonField displays the new angle value. Upon resizing, CannonField is given as much space as possible.
練習
Try to resize the window. What happens if you make it really narrow or really squat?
If you give the left-hand column a non-zero stretch factor, what happens when you resize the window?
Try to change "Quit" to "&Quit". How does the button's look change? ( Whether it does change or not depends on the platform.) What happens if you press Alt+Q while the program is running?
Center the text in the CannonField.


