Development/Tutorials/Qt4 Ruby Tutorial/Chapter 3/fi: Difference between revisions
Centerlink (talk | contribs) Created page with "Qt4 Ruby -oppikurssi" |
Centerlink (talk | contribs) Created page with "Perhearvot" |
||
| Line 5: | Line 5: | ||
{{TutorialBrowser| | {{TutorialBrowser| | ||
series=[[Special:myLanguage/Development/Tutorials/Qt4_Ruby_Tutorial|Qt4 Ruby -oppikurssi]]| | series=[[Special:myLanguage/Development/Tutorials/Qt4_Ruby_Tutorial|Qt4 Ruby -oppikurssi]]| | ||
name= | name=Perhearvot| | ||
pre=[[Special:myLanguage/Development/Tutorials/Qt4_Ruby_Tutorial/Chapter_2|Tutorial 2 - Calling it Quits]]| | pre=[[Special:myLanguage/Development/Tutorials/Qt4_Ruby_Tutorial/Chapter_2|Tutorial 2 - Calling it Quits]]| | ||
next=[[Special:myLanguage/Development/Tutorials/Qt4_Ruby_Tutorial/Chapter_04|Tutorial 4 - Let There Be Widgets]] | next=[[Special:myLanguage/Development/Tutorials/Qt4_Ruby_Tutorial/Chapter_04|Tutorial 4 - Let There Be Widgets]] | ||
Revision as of 15:17, 25 September 2011
Development/Tutorials/Qt4 Ruby Tutorial/Chapter 3
Languages: عربي | Asturianu | Català | Česky | Kaszëbsczi | Dansk | Deutsch | English | Esperanto | Español | Eesti | فارسی | Suomi | Français | Galego | Italiano | 日本語 | 한국어 | Norwegian | Polski | Português Brasileiro | Română | Русский | Svenska | Slovenčina | Slovenščina | српски | Türkçe | Tiếng Việt | Українська | 简体中文 | 繁體中文
| Tutorial Series | Qt4 Ruby -oppikurssi |
| Previous | Tutorial 2 - Calling it Quits |
| What's Next | Tutorial 4 - Let There Be Widgets |
| Further Reading | n/a |
Family Values

Files:
Overview
This example shows how to create parent and child widgets.
We'll keep it simple and use just a single parent and a lone child.
require 'Qt4'

app = Qt::Application.new(ARGV)

window = Qt::Widget.new()
window.resize(200, 120)

quit = Qt::PushButton.new('Quit', window)
quit.font = Qt::Font.new('Times', 18, Qt::Font::Bold)
quit.setGeometry(10, 40, 180, 40)
Qt::Object.connect(quit, SIGNAL('clicked()'), app, SLOT('quit()'))

window.show()
app.exec()
Line by Line Walkthrough
window = Qt::Widget.new()
Here we simply create a plain widget object. The Qt::Widget class is the base class of all user interface objects. The widget is the atom of the user interface: It receives mouse, keyboard and other events from the window system, and paints a representation of itself on the screen. A widget is clipped by its parent and by the widgets in front of it.
A widget that isn't embedded in a parent widget, like this particular widget, is called a window. Usually, windows have their own window frame and taskbar entry, provided by the window system. A widget without a parent widget is always an independent window. Its initial position on the screen is controlled by the window system.
window.resize(200, 120)
We set the window's width to 200 pixels and its height to 120 pixels.
quit = Qt::PushButton.new('Quit', window)
A child is born. This Qt::PushButton is created with a parent widget (window). A child widget is always displayed within its parent's area. When displayed, it is clipped by its parent's bounds. By default, it is rooted at the top-left corner of its parent, at position (0, 0).
quit.setGeometry(10, 40, 180, 40)
The Qt::Widget::setGeometry() function takes four arguments: The first two arguments are the x and y coordinates of the button's top-left corner. The coordinates are relative to the parent widget. The last two arguments are the button's width and height. The result is a button that extends from position (10, 40) to position (190, 80).
window.show()
When a parent widget is shown, it will call show for all its children (except those that were explicitly hidden using Qt::Widget::hide()).
Running the Application
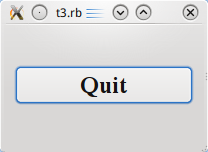
The button no longer fills the entire window. Instead, it stays at position (10, 40) within the window and with a size of (180, 40), because of the Qt::Widget::setGeometry() call.
Exercises
Try resizing the window. How does the button change? What happens to the button's height if you run the program with a bigger font? What happens if you try to make the window really small?
