Development/Tutorials/Using KXmlGuiWindow: Difference between revisions
m →Kompile it: Spelling |
|||
| Line 107: | Line 107: | ||
</code> | </code> | ||
=== | ===Compile it=== | ||
To compile, link and run it, use: | To compile, link and run it, use: | ||
cmake . && make && ./tutorial2 | cmake . && make && ./tutorial2 | ||
Revision as of 14:40, 28 June 2007
| Tutorial Series | Beginner Tutorial |
| Previous | Tutorial 1 - Hello World |
| What's Next | Tutorial 3 - KActions and XmlGui |
| Further Reading | KMainWindow |
Abstract
This tutorial carries on from First Program Tutorial and will introduce the KXmlGuiWindow class.
In the previous tutorial, the program caused a dialog box to pop up but we're going to take steps towards a functioning application.

Using KXmlGuiWindow
In order to have a useful KXmlGuiWindow, we must subclass it. So we create two files, a mainwindow.cpp and a mainwindow.h which will contain our code. Our class inherits from KXmlGuiWindow because it uses XML e.g. to define the application's menu structure.
mainwindow.h
- ifndef MAINWINDOW_H
- define MAINWINDOW_H
- include <KXmlGuiWindow>
- include <KTextEdit>
class MainWindow : public KXmlGuiWindow
{
 public:
   MainWindow(QWidget *parent=0);
 private:
   KTextEdit* textArea;
};
- endif
First we Subclass KXmlGuiWindow on line 7 with with class MainWindow : public KXmlGuiWindow.
Then we declare the constructor with MainWindow(QWidget *parent=0);.
And finally we declare a pointer to the object that will make up the bulk of our program. KTextEdit is a generic richtext editor with some KDE niceties like cursor auto-hiding.
mainwindow.cpp
- include "mainwindow.h"
MainWindow::MainWindow(QWidget *parent) : KXmlGuiWindow(parent)
{
 textArea = new KTextEdit;
 setCentralWidget(textArea);
 setupGUI();
}
First, of course, on line 1 we have to include the header file containing the class declaration.
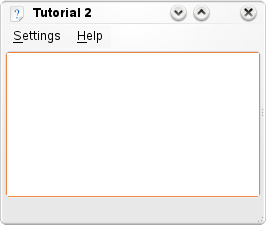
On line 5, we initialise our text editor with an object. Then on line 6 we use the built-in setCentralWidget() function which tells the KXmlGuiWindow what should appear in the central section of the window.
Finally, KXmlGuiWindow::setupGUI() is called which does a lot of behind-the-scenes stuff and creates the default menu bars (Settings, Help).
Back to main.cpp
In order to actually run this window, we need to add a few lines in main.cpp:
main.cpp
- include <KApplication>
- include <KAboutData>
- include <KCmdLineArgs>
- include "mainwindow.h"
int main (int argc, char *argv[])
{
 KAboutData aboutData( "tutorial2",
     "Tutorial2", "1.0", "A simple text area",
     KAboutData::License_GPL, "(c) 2006" );
 KCmdLineArgs::init( argc, argv, &aboutData );

 KApplication app;

 MainWindow* window = new MainWindow();
 window->show();
return app.exec();
}
The only new lines here (compared to Tutorial 1) are 16 and 17. On line 16, we create our MainWindow object and then on line 17, we display it.
CMake
The best way to build the program is to use CMake. All that's changed since tutorial 1 is that mainwindow.cpp has been added to the sources list and any tutorial1 has become tutorial2.
CMakeLists.txt
project (tutorial2)
find_package(KDE4 REQUIRED)
include_directories( ${KDE4_INCLUDES} )
set(tutorial2_SRCS
	main.cpp
	mainwindow.cpp
)
kde4_add_executable(tutorial2 ${tutorial2_SRCS})
target_link_libraries( tutorial2 ${KDE4_KDEUI_LIBS})
Compile it
To compile, link and run it, use:
cmake . && make && ./tutorial2
Moving On
Now you can move on to using KActions.
