Development/Tutorials/Qt4 Ruby Tutorial/Chapter 10/fi: Difference between revisions
Centerlink (talk | contribs) Created page with "Piirrämme kuin kappaleessa 9." |
Centerlink (talk | contribs) Created page with "Funktio '''<tt>cannonRect()</tt>''' palauttaa nelikulmion, joka sisältää kanuunan sisältävän käyttöliittymäkomponentin. Luomme aluksi nelikulmion, jonka koko on 50 x 50 ..." |
||
| Line 107: | Line 107: | ||
</syntaxhighlight> | </syntaxhighlight> | ||
Funktio '''<tt>cannonRect()</tt>''' palauttaa nelikulmion, joka sisältää kanuunan sisältävän käyttöliittymäkomponentin. Luomme aluksi nelikulmion, jonka koko on 50 x 50 ja siirrämme sen niin, että sen vasen alakulma on sama kuin käyttöliittymäkomponentin vasen alakulma. | |||
The [http://doc.qt.nokia.com/latest/qwidget.html#rect-prop Qt::Widget::rect()] function returns the widget's enclosing rectangle in the widget's own coordinates. The top-left corner of the rectangle is always (0, 0). | The [http://doc.qt.nokia.com/latest/qwidget.html#rect-prop Qt::Widget::rect()] function returns the widget's enclosing rectangle in the widget's own coordinates. The top-left corner of the rectangle is always (0, 0). | ||
Revision as of 12:14, 29 October 2011
Development/Tutorials/Qt4 Ruby Tutorial/Chapter 10
Languages: عربي | Asturianu | Català | Česky | Kaszëbsczi | Dansk | Deutsch | English | Esperanto | Español | Eesti | فارسی | Suomi | Français | Galego | Italiano | 日本語 | 한국어 | Norwegian | Polski | Português Brasileiro | Română | Русский | Svenska | Slovenčina | Slovenščina | српски | Türkçe | Tiếng Việt | Українська | 简体中文 | 繁體中文
| Tutorial Series | Qt4 Ruby -oppikurssi |
| Previous | Oppikurssi 9 - Kanuunalla onnistuu |
| What's Next | Oppikurssi 11 - Annetaan sille laukaus |
| Further Reading | n/a |
Sileää kuin silkki

Tiedostot:
Yleiskuva
Tässä esimerkissä lisäämme voimaa ohjaimeen.
Läpikäynti rivi riviltä
Kentällä CannonField on nyt voima-arvo kulman lisäksi.
signals 'angleChanged(int)', 'forceChanged(int)'
slots 'setAngle(int)', 'setForce(int)'
Voiman rajapinta noudattaa samaa käytäntöä kuin kulma.
def initialize(parent = nil)
  super()

  @currentAngle = 45
  @currentForce = 0

  setPalette(Qt::Palette.new(Qt::Color.new(250, 250, 200)))
  setAutoFillBackground(true)
end
Voima @currentForce on alustettu nollaksi.
def setAngle(angle)
  if angle < 5
    angle = 5
  elsif angle > 70
    angle = 70
  end

  if @currentAngle == angle
    return
  end

  @currentAngle = angle
  update(cannonRect())
  emit angleChanged(@currentAngle)
end
Teimme pienen muutoksen setAngle()-funktioon. Se piirtää uudelleen käyttöliittymän osan, joka sisältää kanuunan.
def setForce(force)
  if force < 0
    force = 0
  end
  if @currentForce == force
    return
  end

  @currentForce = force
  emit forceChanged(@currentForce)
end
setForce()-toteutus on aika samanlainen kuin setAngle(). Ainoa erilaisuus on, että koska emme näytä voima-arvoa, käyttöliittymäkomponenttia ei tarvitse piirtää uudelleen.
def paintEvent(event)
  painter = Qt::Painter.new(self)

  painter.setPen(Qt::NoPen)
  painter.setBrush(Qt::Brush.new(Qt::blue))

  painter.translate(0, height())
  painter.drawPie(Qt::Rect.new(-35, -35, 70, 70), 0, 90 * 16)
  painter.rotate(-@currentAngle)
  painter.drawRect(Qt::Rect.new(30, -5, 20, 10))
  painter.end()
end
Piirrämme kuin kappaleessa 9.
def cannonRect()
  result = Qt::Rect.new(0, 0, 50, 50)
  result.moveBottomLeft(rect().bottomLeft())
  return result
end
Funktio cannonRect() palauttaa nelikulmion, joka sisältää kanuunan sisältävän käyttöliittymäkomponentin. Luomme aluksi nelikulmion, jonka koko on 50 x 50 ja siirrämme sen niin, että sen vasen alakulma on sama kuin käyttöliittymäkomponentin vasen alakulma.
The Qt::Widget::rect() function returns the widget's enclosing rectangle in the widget's own coordinates. The top-left corner of the rectangle is always (0, 0).
The constructor is mostly the same, but some new bits have been added.
force = LCDRange.new()
force.setRange(10, 50)
We add a second LCDRange, which will be used to set the force.
connect(force, SIGNAL('valueChanged(int)'),
         cannonField, SLOT('setForce(int)'))
connect(cannonField, SIGNAL('forceChanged(int)'),
         force, SLOT('setValue(int)'))
We connect the force widget and the cannonField widget, just like we did for the angle widget.
leftLayout = Qt::VBoxLayout.new()
leftLayout.addWidget(angle)
leftLayout.addWidget(force)

gridLayout = Qt::GridLayout.new()
gridLayout.addWidget(quit, 0, 0)
gridLayout.addLayout(leftLayout, 1, 0)
gridLayout.addWidget(cannonField, 1, 1, 2, 1)
gridLayout.setColumnStretch(1, 10)
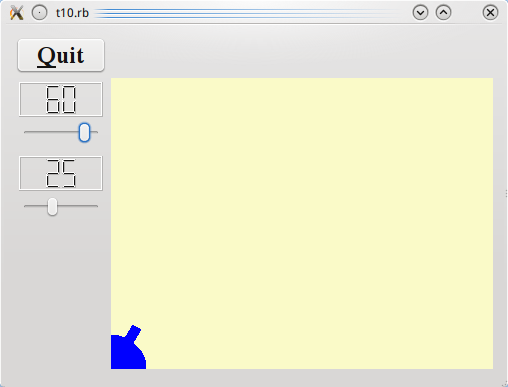
In Chapter 9, we put angle in the lower-left cell of the layout. Now we want to have two widgets in that cell, so we make a vertical box, put the vertical box in the grid cell, and put each of angle and range in the vertical box.
force.setValue(25)
We initialize the force value to 25.
Running the Application
We now have a force control.
Exercises
Make the size of the cannon barrel be dependent on the force.
Put the cannon in the bottom-right corner.
Try adding a better keyboard interface. For example, make + and - increase and decrease the force and enter shoot. If you're bothered by the way the Left and Right keys work, change that too. [Hint: Reimplement Qt::Widget::keyPressEvent().]
