Archive:Development/Tutorials/First program (zh CN): Difference between revisions
| Line 60: | Line 60: | ||
我们在此程序中遇到的第一个KDE类是{{class|KAboutData}}。这个类被用来保存关于程序的各种信息,如功能的简单描述、作者和版权信息等。几乎所有的KDE应用程序都会使用该类。 | 我们在此程序中遇到的第一个KDE类是{{class|KAboutData}}。这个类被用来保存关于程序的各种信息,如功能的简单描述、作者和版权信息等。几乎所有的KDE应用程序都会使用该类。 | ||
然后我们遇到了{{class|KCmdLineArgs}}。这个类可以用来处理命令行开关。例如,可以让某个开关指定使用一个特定的文件来打开程序。在本例中,我们只使用之前创建的{{class|KAboutData}}对象来初始化它,这使我们在运行程序时可以使用<tt>--version</tt>或<tt>--author</tt>开关。 | |||
接下来我们创建了一个{{class|KApplication}}对象。这在每个程序中都必须做一次,因为KDE中的很多功能都依赖于该对象,如[[Development/Tutorials/Localization/i18n|i18n]]等。 | |||
现在我们已经完成了全部必须的KDE设置工作,接下来就可以让我们的程序做一些有趣的事情了。我们将要创建一个弹出框,并将定制其中的一个按钮。要实现该定制,我们需要一个{{class|KGuiItem}}对象。{{class|KGuiItem}}构造函数的第一个参数是要显示在该item(在本例中,是一个按钮)中的文字。接下来的参数让我们可以为该按钮设定一个图标,但这里我们并不需要图标,因此只需要将<tt>QString()</tt>传递给它就行。最后,我们设定tooltip(当鼠标在一个item上徘徊时显示的文字)和“这是什么?”(用鼠标右击item或按下Shift+F1时显示)文本。 | |||
现在有了需要的item,我们就可以创建弹出框了。访问<tt>KMessageBox::questionYesNo()</tt>函数,它在缺省参数的条件下会创建一个有"Yes"和"No"按钮的消息框。函数的第二个参数是将要显示栽弹出框中间的文字。第三个参数是窗口的标题。最后,我们使用我们创建的<tt>KGuiItem</tt>对象来设定(通常情况下将会是)"Yes"按钮的KGuiItem。 | |||
现在,代码相关的工作我们已经全部完成了。接下来我们要构建并尝试运行它。 | |||
== 构建 == | == 构建 == | ||
Revision as of 13:38, 24 September 2007
Template:I18n/Language Navigation Bar (zh CN)
| Tutorial Series | 初学者教程 |
| Previous | C++, Qt, KDE4 开发环境 |
| What's Next | 教程2 - 创建主窗口 |
| Further Reading | CMake |
摘要
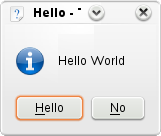
你的第一个程序将会用一句"Hello World"来向这个世界问好。为了实现它,我们将使用KMessageBox,并定制其中的一个按钮。


阅读此教程以正确设置KDevelop。你可以通过先用KDevelop试验打开一个已存在的KDE4应用程序来检验设置是否正确。
不过,你仍然需要手动编辑CMake文件。
代码
我们需要的全部代码都在一个文件main.cpp中。使用下列代码创建该文件:
- include <QString>
- include <KApplication>
- include <KAboutData>
- include <KMessageBox>
- include <KCmdLineArgs>
- include <KLocalizedString>
int main (int argc, char *argv[])
{
   KAboutData aboutData("tutorial1",                  // 内部使用的程序名
                        0,                            // 消息编目名。如果为null,则使用程序名
                        ki18n("Tutorial 1"),          // 显示用的程序名称字符串
                        "1.0",                        // 程序版本号字符串
                        ki18n("KMessageBox popup"),   // 对程序实现功能的简要描述
                        KAboutData::License_GPL,      // 授权标识符
                        ki18n("(c) 2007"),            // 版权声明
                        ki18n("Some text..."),        // 任意格式的文本,可以包含任意类型的信息
                        "http://tutorial.com",        // 程序主页字符串
                        "[email protected]");       // 报告bug用的邮件地址字符串
   KCmdLineArgs::init( argc, argv, &aboutData );
   KApplication app;
   KGuiItem guiItem( QString( "Hello" ), QString(),
                     QString( "this is a tooltip" ),
                     QString( "this is a whatsthis" ) );
   KMessageBox::questionYesNo( 0, "Hello World", "Hello", guiItem );
}
我们在此程序中遇到的第一个KDE类是KAboutData。这个类被用来保存关于程序的各种信息,如功能的简单描述、作者和版权信息等。几乎所有的KDE应用程序都会使用该类。
然后我们遇到了KCmdLineArgs。这个类可以用来处理命令行开关。例如,可以让某个开关指定使用一个特定的文件来打开程序。在本例中,我们只使用之前创建的KAboutData对象来初始化它,这使我们在运行程序时可以使用--version或--author开关。
接下来我们创建了一个KApplication对象。这在每个程序中都必须做一次,因为KDE中的很多功能都依赖于该对象,如i18n等。
现在我们已经完成了全部必须的KDE设置工作,接下来就可以让我们的程序做一些有趣的事情了。我们将要创建一个弹出框,并将定制其中的一个按钮。要实现该定制,我们需要一个KGuiItem对象。KGuiItem构造函数的第一个参数是要显示在该item(在本例中,是一个按钮)中的文字。接下来的参数让我们可以为该按钮设定一个图标,但这里我们并不需要图标,因此只需要将QString()传递给它就行。最后,我们设定tooltip(当鼠标在一个item上徘徊时显示的文字)和“这是什么?”(用鼠标右击item或按下Shift+F1时显示)文本。
现在有了需要的item,我们就可以创建弹出框了。访问KMessageBox::questionYesNo()函数,它在缺省参数的条件下会创建一个有"Yes"和"No"按钮的消息框。函数的第二个参数是将要显示栽弹出框中间的文字。第三个参数是窗口的标题。最后,我们使用我们创建的KGuiItem对象来设定(通常情况下将会是)"Yes"按钮的KGuiItem。
现在,代码相关的工作我们已经全部完成了。接下来我们要构建并尝试运行它。
构建
If you set up your environment as described in Getting_Started/Build/Unstable_Version, you can compile this code with
g++ main.cpp -o tutorial1 \
-I$QTDIR/include/Qt \
-I$QTDIR/include/QtCore \
-I$QTDIR/include \
-I$KDEDIR/include/KDE \
-I$KDEDIR/include \
-L$KDEDIR/lib \
-L$QTDIR/lib -lQtCore -lQtGui -lkdeui -lkdecore
and then run it with
dbus-launch ./tutorial1
使用CMake
If that worked, you may want to use CMake, just like the rest of KDE. This will automatically locate the libraries and headers for KDE, Qt etc. and will allow you to easily build your applications on other computers.
CMakeLists.txt
Create a file named CMakeLists.txt in the same directory as main.cpp with this content:
project (tutorial1)
find_package(KDE4 REQUIRED)
include_directories( ${KDE4_INCLUDES} )
set(tutorial1_SRCS main.cpp)
kde4_add_executable(tutorial1 ${tutorial1_SRCS})
target_link_libraries(tutorial1 ${KDE4_KDEUI_LIBS})
The find_package() function locates the package that you ask it for (in this case KDE4) and sets some variables describing the location of the package's headers and libraries. In this case we will use the KDE4_INCLUDES variable which contains the path to the KDE4 header files.
In order to allow the compiler to find these files, we pass that variable to the include_directories() function which adds the KDE4 headers to the header search path.
Next we create a variable called tutorial1_SRCS using the set() function. In this case we simply set it to the name of our only source file.
Then we use kde4_add_executable() to create an executable called tutorial1 from the source files listed in our tutorial1_SRCS variable. Finally we link our executable to the KDE4 kdeui library using target_link_libraries() and the KDE4_KDEUI_LIBS variable which was set by the find_package() function.
Make与运行
Again, if you set up your environment as described in Getting Started/Build/KDE4, you can compile this code with:
cmakekde
And launch it as:
./tutorial1.shell
继续前进
Now you can move on to 创建主窗口.
