Development/Tutorials/Using KXmlGuiWindow/fr: Difference between revisions
Created page with "Dans le tutoriel précédant, le programme faisait apparaître une boite de dialogue, mais nous allons faire un pas en avant vers une application fonctionnelle." |
Updating to match new version of source page |
||
| Line 142: | Line 142: | ||
find_package(ECM 1.0.0 REQUIRED NO_MODULE) | find_package(ECM 1.0.0 REQUIRED NO_MODULE) | ||
set(CMAKE_MODULE_PATH ${ECM_MODULE_PATH | set(CMAKE_MODULE_PATH ${ECM_MODULE_PATH} ${CMAKE_CURRENT_SOURCE_DIR}/cmake) | ||
include(KDEInstallDirs) | include(KDEInstallDirs) | ||
| Line 177: | Line 177: | ||
install(TARGETS tutorial2 ${KDE_INSTALL_TARGETS_DEFAULT_ARGS}) | install(TARGETS tutorial2 ${KDE_INSTALL_TARGETS_DEFAULT_ARGS}) | ||
</syntaxhighlight> | </syntaxhighlight> | ||
=== Compile and run === | === Compile and run === | ||
The best way to compile, link and run it is to [[Getting_Started/Build|set up a correct build environment]]. But for a simple tutorial like this, it's enough to just create a build directory and build from there. This command takes | The best way to compile, link and run it is to [[Getting_Started/Build|set up a correct build environment]]. But for a simple tutorial like this, it's enough to just create a build directory and build from there. This command takes care of all of that in one line: | ||
<syntaxhighlight lang="bash"> | <syntaxhighlight lang="bash"> | ||
mkdir build && cd build && cmake .. && make && ./tutorial2 | mkdir build && cd build && cmake .. && make && ./tutorial2 | ||
Latest revision as of 16:43, 24 August 2020
| Tutorial Series | Beginner Tutorial |
| Previous | Tutorial 1 - Hello World |
| What's Next | Tutorial 3 - QActions and XMLGUI |
| Further Reading | KXmlGuiWindow |
Abstract
Ce tutoriel suit Tutoriel: premier programme et introduit la classe KXmlGuiWindow.
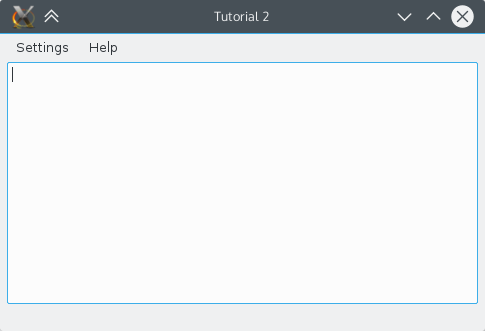
Dans le tutoriel précédant, le programme faisait apparaître une boite de dialogue, mais nous allons faire un pas en avant vers une application fonctionnelle.

KXmlGuiWindow
KXmlGuiWindow provides a full main window view with menubars, toolbars, a statusbar and a main area in the centre for a large widget. For example, the help-menu is predefined. Most KDE applications will derive from this class as it provides an easy way to define menu and toolbar layouts through XML files (this technology is called XMLGUI and is part of the KF5::XmlGui framework). While we will not be using XMLGUI in this tutorial, we will use it in the next.
In order to have a useful KXmlGuiWindow, we must subclass it. So we create two files, a mainwindow.cpp and a mainwindow.h which will contain our code.
mainwindow.h
#ifndef MAINWINDOW_H
#define MAINWINDOW_H

#include <KXmlGuiWindow>

class KTextEdit;

class MainWindow : public KXmlGuiWindow
{
  public:
    explicit MainWindow(QWidget *parent = nullptr);

  private:
    KTextEdit* textArea;
};

#endif
First we subclass KXmlGuiWindow with class MainWindow : public KXmlGuiWindow then we declare the constructor with MainWindow(QWidget *parent = nullptr);.
And finally, we declare a pointer to the object that will make up the bulk of our program. KTextEdit is a generic rich text editing widget with some niceties like cursor auto-hiding.
mainwindow.cpp
#include "mainwindow.h"

#include <KTextEdit>

MainWindow::MainWindow(QWidget *parent) : KXmlGuiWindow(parent)
{
  textArea = new KTextEdit();
  setCentralWidget(textArea);
  setupGUI();
}
First, of course, we have to include the header file containing the class declaration.
We initialise our text editor with an object and use KXmlGuiWindow's built-in setCentralWidget() function on it which tells the KXmlGuiWindow what should appear in the central section of the window.
Finally, KXmlGuiWindow::setupGUI() is called which does a lot of behind-the-scenes stuff and creates the default menu bars (Settings, Help).
Back to main.cpp
In order to actually run this window, we need to add a few lines in main.cpp:
main.cpp
#include <cstdlib>
#include <QApplication>
#include <QCommandLineParser>
#include <KAboutData>
#include <KLocalizedString>
#include "mainwindow.h"

int main (int argc, char *argv[])
{
    QApplication app(argc, argv);
    KLocalizedString::setApplicationDomain("tutorial2");

    KAboutData aboutData(
                         // The program name used internally. (componentName)
                         QStringLiteral("tutorial2"),
                         // A displayable program name string. (displayName)
                         i18n("Tutorial 2"),
                         // The program version string. (version)
                         QStringLiteral("1.0"),
                         // Short description of what the app does. (shortDescription)
                         i18n("A simple text area"),
                         // The license this code is released under
                         KAboutLicense::GPL,
                         // Copyright Statement (copyrightStatement = QString())
                         i18n("(c) 2015"),
                         // Optional text shown in the About box.
                         // Can contain any information desired. (otherText)
                         i18n("Some text..."),
                         // The program homepage string. (homePageAddress = QString())
                         QStringLiteral("http://example.com/"),
                         // The bug report email address
                         // (bugsEmailAddress = QLatin1String("[email protected]")
                         QStringLiteral("[email protected]"));
    aboutData.addAuthor(i18n("Name"), i18n("Task"), QStringLiteral("[email protected]"),
                         QStringLiteral("http://your.website.com"), QStringLiteral("OSC Username"));
    KAboutData::setApplicationData(aboutData);

    QCommandLineParser parser;
    aboutData.setupCommandLine(&parser);
    parser.process(app);
    aboutData.processCommandLine(&parser);

    MainWindow* window = new MainWindow();
    window->show();

    return app.exec();
}
Again, we include our new header file in order to create our MainWindow object which we then display.
CMake
The best way to build the program is to use CMake. We add mainwindow.cpp to the sources list, include the XmlGui and TextWidgets (for KTextEdit) frameworks, and replace all tutorial1 text to tutorial2.
CMakeLists.txt
cmake_minimum_required(VERSION 3.0)

project (tutorial2)

set(QT_MIN_VERSION "5.3.0")
set(KF5_MIN_VERSION "5.2.0")

find_package(ECM 1.0.0 REQUIRED NO_MODULE)
set(CMAKE_MODULE_PATH ${ECM_MODULE_PATH} ${CMAKE_CURRENT_SOURCE_DIR}/cmake)

include(KDEInstallDirs)
include(KDECMakeSettings)
include(KDECompilerSettings NO_POLICY_SCOPE)
include(FeatureSummary)

find_package(Qt5 ${QT_MIN_VERSION} CONFIG REQUIRED COMPONENTS
    Core    # QCommandLineParser, QStringLiteral
    Widgets # QApplication
)

find_package(KF5 ${KF5_MIN_VERSION} REQUIRED COMPONENTS
    CoreAddons      # KAboutData
    I18n            # KLocalizedString
    XmlGui          # KXmlGuiWindow
    TextWidgets     # KTextEdit
)

feature_summary(WHAT ALL INCLUDE_QUIET_PACKAGES FATAL_ON_MISSING_REQUIRED_PACKAGES)

set(tutorial2_SRCS main.cpp mainwindow.cpp)

add_executable(tutorial2 ${tutorial2_SRCS})

target_link_libraries(tutorial2
    Qt5::Widgets
    KF5::CoreAddons
    KF5::I18n
    KF5::XmlGui
    KF5::TextWidgets
)

install(TARGETS tutorial2  ${KDE_INSTALL_TARGETS_DEFAULT_ARGS})
Compile and run
The best way to compile, link and run it is to set up a correct build environment. But for a simple tutorial like this, it's enough to just create a build directory and build from there. This command takes care of all of that in one line:
mkdir build && cd build && cmake .. && make && ./tutorial2
Moving On
Now you can move on to Using Actions.
