Development/Tutorials/Using Qt Creator/fr: Difference between revisions
Created page with "== Créer un nouveau programme ==" |
Aspotashev (talk | contribs) No edit summary |
||
| (14 intermediate revisions by 2 users not shown) | |||
| Line 2: | Line 2: | ||
__TOC__ | __TOC__ | ||
Qt creator est un IDE développé par Nokia pour Qt. Il contient Qt designer pour le design d'Interfaces Utilisateur. Cet article décrit : | |||
* | * pourquoi utiliser Qt Creator | ||
* | * comment créer une nouvelle application | ||
* | * comment charger une application déjà existante | ||
== Pourquoi utiliser Qt Creator == | == Pourquoi utiliser Qt Creator == | ||
| Line 12: | Line 12: | ||
|[[image:Snapshot-qtcreator.png|right|thumb|200px|KDE4's ktimetracker loaded as QtCreator project]] | |[[image:Snapshot-qtcreator.png|right|thumb|200px|KDE4's ktimetracker loaded as QtCreator project]] | ||
|} | |} | ||
Pour créer votre application C++ vous pourriez utiliser n'importe quel éditeur de texte. Mais les possibilités de Qt Creator vont grandement vous faciliter la vie. Par exemple | |||
* | * vous pouvez charger un code sauvegardé, compiler et executer en un clic | ||
* | * vous aurez la completion de code | ||
* | * vous pouvez retrouver tous les endroits dans votre code ou vous appelez une fonction (e.g. "où est-ce que j'appelle la fonction refresh()") | ||
* | *vous pouvez retourner à une position de curseur plus récente avec votre éditeur, même dans un autre fichier | ||
* | * vous pouez checkout et commit vers des dépots Subversion or Git sans même quitter votre environnement | ||
== Créer un nouveau programme == | == Créer un nouveau programme == | ||
Voici un exemple simple de création d'un "Hello World". | |||
Pour plus d'informations lire [http://qt.nokia.com/doc/designer-manual.html user documentation]. | |||
; | ;Étape 0: | ||
Lancer QtCreator | |||
<syntaxhighlight lang="bash"> | <syntaxhighlight lang="bash"> | ||
qtcreator | qtcreator | ||
</syntaxhighlight> | </syntaxhighlight> | ||
Puis sélectionnez Nouveau fichier ou projet -> Applications -> Application graphique Qt -> Nom = helloworld -> Suivant -> Suivant -> Terminer | |||
;Step 1: | ;Step 1: | ||
| Line 45: | Line 46: | ||
[[File:Designer-step3.png|200px]] | [[File:Designer-step3.png|200px]] | ||
; | ;Résultat: | ||
Vous obtenez un aspect convenable , et si vous redimensionnez la fenêtre, les widgets seront redimensionnés aussi. | |||
[[File:Designer-result.png|200px]] | [[File:Designer-result.png|200px]] | ||
=== | === Utiliser les librairies KDE === | ||
To use KDE classes like KMessageBox, you need to tell QtCreator to use the KDE libraries when building. Go to your home directory, change into ''yourproject'' and modify ''yourproject.pro''. Add the line | To use KDE classes like KMessageBox, you need to tell QtCreator to use the KDE libraries when building. Go to your home directory, change into ''yourproject'' and modify ''yourproject.pro''. Add the line | ||
| Line 58: | Line 59: | ||
Then you can start using KDE classes in your code. | Then you can start using KDE classes in your code. | ||
=== | === Ajouter une barre d'outils === | ||
To add a toolbar, right-click on the UI and choose "Add Toolbar". Then you can set icons and text in your mainwindow's constructor with code like this: | To add a toolbar, right-click on the UI and choose "Add Toolbar". Then you can set icons and text in your mainwindow's constructor with code like this: | ||
| Line 66: | Line 67: | ||
[[Development/Tutorials/Using_Qt_Designer|More Info...]] | [[Development/Tutorials/Using_Qt_Designer|More Info...]] | ||
== | == Charger un projet existant == | ||
This describes how to use QtCreator to integrate existing KDE 4 applications. It has been tested with QtCreator 1.2.80 and SUSE Linux 11.1 but should work same or similar with every combination. As an example KDE application we use [http://userbase.kde.org/ | This describes how to use QtCreator to integrate existing KDE 4 applications. It has been tested with QtCreator 1.2.80 and SUSE Linux 11.1 but should work same or similar with every combination. As an example KDE application we use [http://userbase.kde.org/KTimeTracker ktimetracker] from the kdepim module, other applications should work likewise. | ||
You can either work with code on your disk or have QtCreator do the repository checkout. | You can either work with code on your disk or have QtCreator do the repository checkout. | ||
=== | === Utiliser un code local === | ||
* import the CMakeLists.txt file (File -> Open -> kdepim/CMakeLists.txt) | * import the CMakeLists.txt file (File -> Open -> kdepim/CMakeLists.txt) | ||
| Line 79: | Line 80: | ||
* continue with the step "Run cmake" | * continue with the step "Run cmake" | ||
=== | === Utiliser QtCreator pour faire un checkout d'un dépôt Git === | ||
* choose File -> New File or Project -> Project | * choose File -> New File or Project -> Import Project -> Git Repository Clone. | ||
* enter a Git URL like [email protected]:/kdepim | * enter a Git URL like [email protected]:/kdepim | ||
* accept kdepim as checkout directory | * accept kdepim as checkout directory | ||
| Line 89: | Line 90: | ||
* continue with the step "Run cmake" | * continue with the step "Run cmake" | ||
=== | === Utiliser QtCreator pour faire un checkout d'un dépôt subversion === | ||
* choose File -> New File or Project -> | * choose File -> New File or Project -> Import Project -> Subversion Checkout. | ||
* enter a Subversion URL like svn://anonsvn.kde.org/home/kde/trunk/KDE/kdepim | * enter a Subversion URL like svn://anonsvn.kde.org/home/kde/trunk/KDE/kdepim | ||
* enter a checkout directory, i.e. the local directory where the code will be checked-out to | * enter a checkout directory, i.e. the local directory where the code will be checked-out to | ||
| Line 98: | Line 99: | ||
* continue with the step "Run cmake" | * continue with the step "Run cmake" | ||
=== | === Lancer cmake === | ||
* enter arguments for CMake like | * enter arguments for CMake like | ||
<syntaxhighlight lang="bash"> | <syntaxhighlight lang="bash"> | ||
/ | /path/to/kdepim -DCMAKE_INSTALL_PREFIX=/usr/local -DLIB_SUFFIX=64 -DCMAKE_BUILD_TYPE=debugfull | ||
</syntaxhighlight> | </syntaxhighlight> | ||
<tt>DLIB_SUFFIX=64</tt> means that you want to install your libraries into directories named <tt>lib64</tt>, not <tt>lib</tt>. ''/ | <tt>DLIB_SUFFIX=64</tt> means that you want to install your libraries into directories named <tt>lib64</tt>, not <tt>lib</tt>. ''/path/to/kdepim'' is where your source code is. | ||
* click "Run cmake" | * click "Run cmake" | ||
* note: a .cbp file is created containing many information about the build | * note: a .cbp file is created containing many information about the build | ||
| Line 117: | Line 118: | ||
* choose Build -> Build All | * choose Build -> Build All | ||
== | == Voir aussi == | ||
* [[Development/Tutorials/Using Qt Designer]] | * [[Development/Tutorials/Using Qt Designer]] | ||
* [[Getting_Started/Using_an_IDE_with_KDE4#QtCreator]] | * [[Getting_Started/Using_an_IDE_with_KDE4#QtCreator]] | ||
[[Category:KDE4]] | [[Category:KDE4]] | ||
Latest revision as of 11:36, 26 May 2019
Qt creator est un IDE développé par Nokia pour Qt. Il contient Qt designer pour le design d'Interfaces Utilisateur. Cet article décrit :
- pourquoi utiliser Qt Creator
- comment créer une nouvelle application
- comment charger une application déjà existante
Pourquoi utiliser Qt Creator
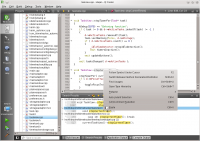 |
Pour créer votre application C++ vous pourriez utiliser n'importe quel éditeur de texte. Mais les possibilités de Qt Creator vont grandement vous faciliter la vie. Par exemple
- vous pouvez charger un code sauvegardé, compiler et executer en un clic
- vous aurez la completion de code
- vous pouvez retrouver tous les endroits dans votre code ou vous appelez une fonction (e.g. "où est-ce que j'appelle la fonction refresh()")
- vous pouvez retourner à une position de curseur plus récente avec votre éditeur, même dans un autre fichier
- vous pouez checkout et commit vers des dépots Subversion or Git sans même quitter votre environnement
Créer un nouveau programme
Voici un exemple simple de création d'un "Hello World". Pour plus d'informations lire user documentation.
- Étape 0
Lancer QtCreator
qtcreator
Puis sélectionnez Nouveau fichier ou projet -> Applications -> Application graphique Qt -> Nom = helloworld -> Suivant -> Suivant -> Terminer
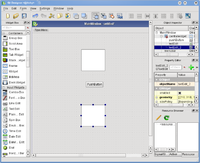
- Step 1
Select Edit -> Forms -> mainwindow.ui. Add the widgets you want by drag-and-drop:
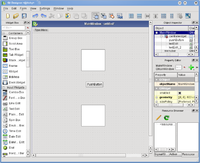
- Step 2
Select the mainwindow. This is the one un-intuitive step. To lay out the objects in the mainwindow, you do not select the objects in the mainwindow, but the mainwindow itself.
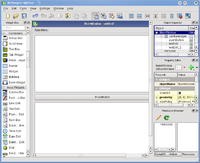
- Step 3
Select Form -> Lay Out in a Grid
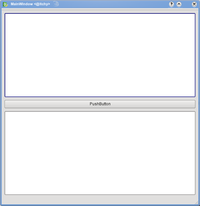
- Résultat
Vous obtenez un aspect convenable , et si vous redimensionnez la fenêtre, les widgets seront redimensionnés aussi.
Utiliser les librairies KDE
To use KDE classes like KMessageBox, you need to tell QtCreator to use the KDE libraries when building. Go to your home directory, change into yourproject and modify yourproject.pro. Add the line
LIBS += -lkdeui
Then you can start using KDE classes in your code.
Ajouter une barre d'outils
To add a toolbar, right-click on the UI and choose "Add Toolbar". Then you can set icons and text in your mainwindow's constructor with code like this:
ui->toolBar->addAction(QIcon("/usr/share/icons/oxygen/22x22/apps/ktip.png"),"hello world");
Charger un projet existant
This describes how to use QtCreator to integrate existing KDE 4 applications. It has been tested with QtCreator 1.2.80 and SUSE Linux 11.1 but should work same or similar with every combination. As an example KDE application we use ktimetracker from the kdepim module, other applications should work likewise.
You can either work with code on your disk or have QtCreator do the repository checkout.
Utiliser un code local
- import the CMakeLists.txt file (File -> Open -> kdepim/CMakeLists.txt)
- as build directory choose kdepim
- you will automatically come to a screen where you can run CMake
- continue with the step "Run cmake"
Utiliser QtCreator pour faire un checkout d'un dépôt Git
- choose File -> New File or Project -> Import Project -> Git Repository Clone.
- enter a Git URL like [email protected]:/kdepim
- accept kdepim as checkout directory
- type finish, see how the checkout starts

- you will automatically come to a screen where you can run CMake
- continue with the step "Run cmake"
Utiliser QtCreator pour faire un checkout d'un dépôt subversion
- choose File -> New File or Project -> Import Project -> Subversion Checkout.
- enter a Subversion URL like svn://anonsvn.kde.org/home/kde/trunk/KDE/kdepim
- enter a checkout directory, i.e. the local directory where the code will be checked-out to
- type finish, see how the checkout starts
- you will automatically come to a screen where you can run CMake
- continue with the step "Run cmake"
Lancer cmake
- enter arguments for CMake like
/path/to/kdepim -DCMAKE_INSTALL_PREFIX=/usr/local -DLIB_SUFFIX=64 -DCMAKE_BUILD_TYPE=debugfull
DLIB_SUFFIX=64 means that you want to install your libraries into directories named lib64, not lib. /path/to/kdepim is where your source code is.
- click "Run cmake"
- note: a .cbp file is created containing many information about the build
- click "Finish"
Build it
- configure QtCreator to build only ktimetracker:
Projects -> Active run configuration=ktimetracker -> build settings -> build steps -> make -> show details -> activate ktimetracker.
- configure QtCreator to use 8 logical processors:
Projects -> Active run configuration=ktimetracker -> build settings -> build steps -> make -> show details -> addtional Arguments = -j8
- choose Build -> Build All

