Archive:Development/Tutorials/Qt4 Ruby Tutorial/Chapter 09 (zh TW): Difference between revisions
No edit summary |
m AnneW moved page Development/Tutorials/Qt4 Ruby Tutorial/Chapter 09 (zh TW) to Archive:Development/Tutorials/Qt4 Ruby Tutorial/Chapter 09 (zh TW) without leaving a redirect: Obsolete |
||
| (4 intermediate revisions by 2 users not shown) | |||
| Line 9: | Line 9: | ||
pre=[[Development/Tutorials/Qt4_Ruby_Tutorial/Chapter_08_(zh_TW)|教學 8 - Preparing for Battle]]| | pre=[[Development/Tutorials/Qt4_Ruby_Tutorial/Chapter_08_(zh_TW)|教學 8 - Preparing for Battle]]| | ||
next=[[Development/Tutorials/Qt4_Ruby_Tutorial/ | next=[[Development/Tutorials/Qt4_Ruby_Tutorial/Chapter_10_(zh_TW)|教學 10 - Smooth as Silk]] | ||
}} | }} | ||
== With Cannon You Can == | == With Cannon You Can == | ||
| Line 24: | Line 24: | ||
'''[http://www.darshancomputing.com/qt4-qtruby-tutorial/tutorial/t9/cannon.rb cannon.rb]''' | '''[http://www.darshancomputing.com/qt4-qtruby-tutorial/tutorial/t9/cannon.rb cannon.rb]''' | ||
< | <syntaxhighlight lang="ruby"> | ||
def paintEvent(event) | def paintEvent(event) | ||
painter = Qt::Painter.new(self) | painter = Qt::Painter.new(self) | ||
</ | </syntaxhighlight> | ||
我們現在開始要認真的使用 [http://doc.qt.nokia.com/latest/qpainter.html Qt::Painter]。我們建立了一個操作這個 widget 的 painter。 | 我們現在開始要認真的使用 [http://doc.qt.nokia.com/latest/qpainter.html Qt::Painter]。我們建立了一個操作這個 widget 的 painter。 | ||
< | <syntaxhighlight lang="ruby"> | ||
painter.setPen(Qt::NoPen) | painter.setPen(Qt::NoPen) | ||
</ | </syntaxhighlight> | ||
[http://doc.qt.nokia.com/latest/qpainter.html Qt::Painter] 使用筆觸(pen)來繪製出邊緣(edge)。這裡我們將它設定為 [http://doc.qt.nokia.com/latest/qt.html#PenStyle-enum Qt::NoPen]。這意味著當我們繪製東西時,將不會有明確的邊緣。 | [http://doc.qt.nokia.com/latest/qpainter.html Qt::Painter] 使用筆觸(pen)來繪製出邊緣(edge)。這裡我們將它設定為 [http://doc.qt.nokia.com/latest/qt.html#PenStyle-enum Qt::NoPen]。這意味著當我們繪製東西時,將不會有明確的邊緣。 | ||
< | <syntaxhighlight lang="ruby"> | ||
painter.setBrush(Qt::Brush.new(Qt::blue)) | painter.setBrush(Qt::Brush.new(Qt::blue)) | ||
</ | </syntaxhighlight> | ||
當 [http://doc.qt.nokia.com/latest/qpainter.html Qt::Painter] 要填充矩形、圓形,或其他圖形時,它會使用筆刷(Brush)來填充形狀。這裡我們把它設定為使用純藍色筆刷。(我們也可以用調色盤。)藍色的畫筆會填滿直到我們畫出東西的邊緣。 | 當 [http://doc.qt.nokia.com/latest/qpainter.html Qt::Painter] 要填充矩形、圓形,或其他圖形時,它會使用筆刷(Brush)來填充形狀。這裡我們把它設定為使用純藍色筆刷。(我們也可以用調色盤。)藍色的畫筆會填滿直到我們畫出東西的邊緣。 | ||
< | <syntaxhighlight lang="ruby"> | ||
painter.translate(0, rect().height()) | painter.translate(0, rect().height()) | ||
</ | </syntaxhighlight> | ||
[http://doc.qt.nokia.com/latest/qpainter.html#translate Qt::Painter::translate()] | [http://doc.qt.nokia.com/latest/qpainter.html#translate Qt::Painter::translate()] 函式轉移(translate)了 [http://doc.qt.nokia.com/latest/qpainter.html Qt::Painter] 的坐標系統(也就是說,藉由偏移量(offset)移動它)。在這裡,我們設定 widget 的左下角為(0,0)。x 和 y 的方向維持不變,即所有在 widget 內的 y 坐標現在都是負的。(更多關於 Qt 坐標系統的資訊,請見[http://doc.qt.nokia.com/latest/coordsys.html 坐標系統]。) | ||
< | <syntaxhighlight lang="ruby"> | ||
painter.drawPie(Qt::Rect.new(-35, -35, 70, 70), 0, 90 * 16) | painter.drawPie(Qt::Rect.new(-35, -35, 70, 70), 0, 90 * 16) | ||
</ | </syntaxhighlight> | ||
[http://doc.qt.nokia.com/latest/qpainter.html#drawPie Qt::Painter::drawPie()] 函式使用起始角度以及弧長,在指定的矩形內畫出圓餅的形狀。角度單位為十六分之一度。零度位在3點鐘方向。繪畫方向是逆時針。這裡我們在 widget 的左下角畫出四分之一圓。圓餅填充了藍色,而且沒有邊框。 | [http://doc.qt.nokia.com/latest/qpainter.html#drawPie Qt::Painter::drawPie()] 函式使用起始角度以及弧長,在指定的矩形內畫出圓餅的形狀。角度單位為十六分之一度。零度位在3點鐘方向。繪畫方向是逆時針。這裡我們在 widget 的左下角畫出四分之一圓。圓餅填充了藍色,而且沒有邊框。 | ||
< | <syntaxhighlight lang="ruby"> | ||
painter.rotate(-@currentAngle) | painter.rotate(-@currentAngle) | ||
</ | </syntaxhighlight> | ||
[http://doc.qt.nokia.com/latest/qpainter.html#rotate Qt::Painter::rotate()] 函式繞著原點旋轉 [http://doc.qt.nokia.com/latest/qpainter.html Qt::Painter] 的坐標系統的。旋轉參數要給出度數(不是上面的十六分之一度),並且是順時針方向。這裡我們逆時針旋轉坐標系統 '''<tt>@currentAngle</tt>''' 度。 | |||
< | <syntaxhighlight lang="ruby"> | ||
painter.drawRect(Qt::Rect.new(30, -5, 20, 10)) | painter.drawRect(Qt::Rect.new(30, -5, 20, 10)) | ||
</ | </syntaxhighlight> | ||
[http://doc.qt.nokia.com/latest/qpainter.html#drawRect Qt::Painter::drawRect()] 函式畫出指定的矩形。這裡我們畫出加農砲的砲管。 | |||
當坐標系統像上面這樣經過轉換(轉移、旋轉、縮放,或修剪)後,通常很難想像畫出的結果。 | |||
在這種情況下,坐標系統首先是轉移和旋轉。如果矩形 [http://doc.qt.nokia.com/latest/qrect.html Qt::Rect].new(30, -5, 20, 10) 被畫在轉移過的坐標系統,它看起來像是這樣: | |||
[[Image:Qt4_Ruby_Tutorial_Screenshot_9-incorrect.png|center]] | [[Image:Qt4_Ruby_Tutorial_Screenshot_9-incorrect.png|center]] | ||
請注意,矩形會被 '''<tt>CannonField</tt>''' widget 的邊界修剪。當我們旋轉坐標系統,例如60度,矩形將繞著(0,0),也就是左下角旋轉。因為我們已經轉移了坐標系統。結果看起來像這樣: | |||
[[Image:Qt4_Ruby_Tutorial_Screenshot_9-correct.png|center]] | [[Image:Qt4_Ruby_Tutorial_Screenshot_9-correct.png|center]] | ||
Latest revision as of 15:51, 23 June 2013
Template:I18n/Language Navigation Bar (zh TW)
Template:TutorialBrowser (zh TW)
With Cannon You Can

檔案:
概覽
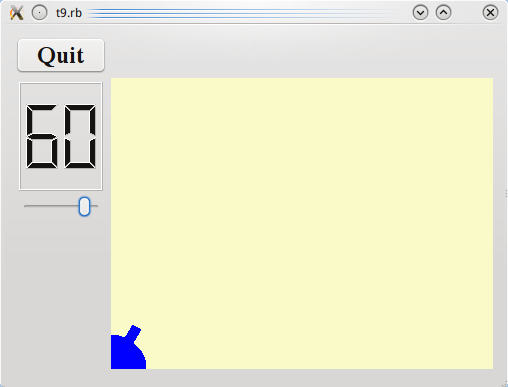
在這個範例中,我們來繪製一個可愛小巧的藍色加農砲。只有 cannon.rb 不同於前面的章節。
一行一行的瀏覽
def paintEvent(event)
  painter = Qt::Painter.new(self)
我們現在開始要認真的使用 Qt::Painter。我們建立了一個操作這個 widget 的 painter。
painter.setPen(Qt::NoPen)
Qt::Painter 使用筆觸(pen)來繪製出邊緣(edge)。這裡我們將它設定為 Qt::NoPen。這意味著當我們繪製東西時,將不會有明確的邊緣。
painter.setBrush(Qt::Brush.new(Qt::blue))
當 Qt::Painter 要填充矩形、圓形,或其他圖形時,它會使用筆刷(Brush)來填充形狀。這裡我們把它設定為使用純藍色筆刷。(我們也可以用調色盤。)藍色的畫筆會填滿直到我們畫出東西的邊緣。
painter.translate(0, rect().height())
Qt::Painter::translate() 函式轉移(translate)了 Qt::Painter 的坐標系統(也就是說,藉由偏移量(offset)移動它)。在這裡,我們設定 widget 的左下角為(0,0)。x 和 y 的方向維持不變,即所有在 widget 內的 y 坐標現在都是負的。(更多關於 Qt 坐標系統的資訊,請見坐標系統。)
painter.drawPie(Qt::Rect.new(-35, -35, 70, 70), 0, 90 * 16)
Qt::Painter::drawPie() 函式使用起始角度以及弧長,在指定的矩形內畫出圓餅的形狀。角度單位為十六分之一度。零度位在3點鐘方向。繪畫方向是逆時針。這裡我們在 widget 的左下角畫出四分之一圓。圓餅填充了藍色,而且沒有邊框。
painter.rotate(-@currentAngle)
Qt::Painter::rotate() 函式繞著原點旋轉 Qt::Painter 的坐標系統的。旋轉參數要給出度數(不是上面的十六分之一度),並且是順時針方向。這裡我們逆時針旋轉坐標系統 @currentAngle 度。
painter.drawRect(Qt::Rect.new(30, -5, 20, 10))
Qt::Painter::drawRect() 函式畫出指定的矩形。這裡我們畫出加農砲的砲管。
當坐標系統像上面這樣經過轉換(轉移、旋轉、縮放,或修剪)後,通常很難想像畫出的結果。
在這種情況下,坐標系統首先是轉移和旋轉。如果矩形 Qt::Rect.new(30, -5, 20, 10) 被畫在轉移過的坐標系統,它看起來像是這樣:

請注意,矩形會被 CannonField widget 的邊界修剪。當我們旋轉坐標系統,例如60度,矩形將繞著(0,0),也就是左下角旋轉。因為我們已經轉移了坐標系統。結果看起來像這樣:

執行應用程式
當 slider 操作時,畫出的加農砲角度也會跟著改變。
練習
設定一枝不同的筆觸,代替 Qt::NoPen。設定一枝調色盤筆刷。
