Archive:Development/Tutorials/Qt4 Ruby Tutorial/Chapter 07 (zh TW): Difference between revisions
Created page with '{{Template:I18n/Language Navigation Bar_(zh_TW)|Development/Tutorials/Qt4 Ruby Tutorial/Chapter 07}} {{TutorialBrowser_(zh_TW)| series=[[Development/Tutorials/Qt4_Ruby_Tutorial...' |
m AnneW moved page Development/Tutorials/Qt4 Ruby Tutorial/Chapter 07 (zh TW) to Archive:Development/Tutorials/Qt4 Ruby Tutorial/Chapter 07 (zh TW) without leaving a redirect: Obsolete |
||
| (4 intermediate revisions by 2 users not shown) | |||
| Line 9: | Line 9: | ||
pre=[[Development/Tutorials/Qt4_Ruby_Tutorial/Chapter_06_(zh_TW)|教學 6 - Building Blocks Galore!]]| | pre=[[Development/Tutorials/Qt4_Ruby_Tutorial/Chapter_06_(zh_TW)|教學 6 - Building Blocks Galore!]]| | ||
next=[[Development/Tutorials/Qt4_Ruby_Tutorial/ | next=[[Development/Tutorials/Qt4_Ruby_Tutorial/Chapter_08_(zh_TW)|教學 8 - Preparing for Battle]] | ||
}} | }} | ||
== One Thing Leads to Another == | == One Thing Leads to Another == | ||
| Line 18: | Line 18: | ||
===概覽=== | ===概覽=== | ||
這個範例展示如何建立具有訊號和槽的自訂 widget,以及如何用更複雜的方式將它們連接起來。這是第一次,原始碼被分割在幾個檔案中。 | |||
===一行一行的瀏覽=== | ===一行一行的瀏覽=== | ||
'''[http://www.darshancomputing.com/qt4-qtruby-tutorial/tutorial/t7/lcdrange.rb lcdrange.rb]''' | '''[http://www.darshancomputing.com/qt4-qtruby-tutorial/tutorial/t7/lcdrange.rb lcdrange.rb]''' | ||
這個檔案主要是抄襲自第6章,這裡只提出比較特別的改變。 | |||
< | <syntaxhighlight lang="ruby"> | ||
signals 'valueChanged(int)' | signals 'valueChanged(int)' | ||
slots 'setValue(int)' | slots 'setValue(int)' | ||
</ | </syntaxhighlight> | ||
< | <syntaxhighlight lang="ruby"> | ||
def value() | def value() | ||
@slider.value() | @slider.value() | ||
| Line 37: | Line 37: | ||
@slider.setValue(value) | @slider.setValue(value) | ||
end | end | ||
</ | </syntaxhighlight> | ||
這些構成了這個 widget 和程式中其他組件之間的介面。到目前為止,'''<tt>LCDRange</tt>''' 還沒真的擁有一個 API。 | |||
'''<tt>value()</tt>''' | '''<tt>value()</tt>''' 是一個存取 '''<tt>LCDRange</tt>''' 值的公開(public)函式、'''<tt>setValue()</tt>''' 是我們第一個自訂槽,而 '''<tt>valueChanged()</tt>'''是我們第一個自訂訊號。 | ||
Slot 必須用正規方式實作(槽也是一個 Ruby 成員函式)。訊號會被自動實作。訊號遵循 Ruby 保護(protected)函式的存取規則(換言之,只有定義他們的類別或繼承的類別可以發出它們)。 | |||
當 '''<tt>LCDRange</tt>''' 的值發生改變時,'''<tt>valueChanged()</tt>''' 訊號就會被使用。 | |||
'''<tt>value()</tt>''' 的實作非常簡單。它只是返回 slider 的值。 | |||
'''<tt>setValue()</tt>''' 的實作也同樣簡單。請注意,因為 slider 和 LCD number 連接,設定 slider 的值時,LCD number 也會自動更新。此外,如果超出規定範圍,slider 會自動調整值。 | |||
< | <syntaxhighlight lang="ruby"> | ||
connect(@slider, SIGNAL('valueChanged(int)'), | connect(@slider, SIGNAL('valueChanged(int)'), | ||
lcd, SLOT('display(int)')) | lcd, SLOT('display(int)')) | ||
connect(@slider, SIGNAL('valueChanged(int)'), | connect(@slider, SIGNAL('valueChanged(int)'), | ||
self, SIGNAL('valueChanged(int)')) | self, SIGNAL('valueChanged(int)')) | ||
</ | </syntaxhighlight> | ||
第一個 [http://doc.qt.nokia.com/latest/qobject.html#connect QObject::connect()] 呼叫與前幾章看到的相同。第二個是新的,它連接 [http://doc.qt.nokia.com/latest/qabstractslider.html#valueChanged QAbstractSlider::valueChanged()] 訊號到這個物件的 '''<tt>valueChanged()</tt>''' 訊號。是的,沒錯。訊號也可以連接到其他的訊號。當第一個訊號被發出時,第二個訊號也被發出。 | |||
讓我們看看當使用者操作 slider 時,會發生什麼事。當 slider 發現它的值已經改變,就會發出[http://doc.qt.nokia.com/latest/qabstractslider.html#valueChanged QAbstractSlider::valueChanged()] 訊號。這個訊號連接到 [http://doc.qt.nokia.com/latest/qlcdnumber.html Qt::LCDNumber] 的 [http://doc.qt.nokia.com/latest/qlcdnumber.html#intValue-prop QLCDNumber::display()] 槽和 '''<tt>LCDRange</tt>''' 的 '''<tt>valueChanged()</tt>''' 訊號。 | |||
因此,當這個訊號發出時,'''<tt>LCDRange</tt>''' 也發出自己的 '''<tt>valueChanged()</tt>''' 訊號。此外,[http://doc.qt.nokia.com/latest/qlcdnumber.html#intValue-prop QLCDNumber::display()] 被呼叫並顯示新的數字。 | |||
請注意,你不能確定任何執行的特定順序,'''<tt>LCDRange::valueChanged()</tt>''' 可能會在[http://doc.qt.nokia.com/latest/qlcdnumber.html#intValue-prop QLCDNumber::display()] 被呼叫之前或之後發出。 | |||
'''[http://www.darshancomputing.com/qt4-qtruby-tutorial/tutorial/t7/t7.rb t7.rb]''' | '''[http://www.darshancomputing.com/qt4-qtruby-tutorial/tutorial/t7/t7.rb t7.rb]''' | ||
< | <syntaxhighlight lang="ruby"> | ||
previousRange = nil | previousRange = nil | ||
| Line 81: | Line 81: | ||
end | end | ||
end | end | ||
</ | </syntaxhighlight> | ||
當我們建立9個 '''<tt>LCDRange</tt>''' 物件時,我們使用[http://doc.qt.nokia.com/latest/signalsandslots.html 訊號與槽]機制將它們連接在一起。每一個 '''<tt>LCDRange</tt>''' 的 '''<tt>valueChanged()</tt>''' 訊號都會連接到前一個的 '''<tt>setValue()</tt>''' 槽。因為每當 '''<tt>LCDRange</tt>''' 的值改變時,都會發出 '''<tt>valueChanged()</tt>''' 訊號,所以我們在這裡建立一個訊號與槽的連鎖反應。 | |||
===執行應用程式=== | ===執行應用程式=== | ||
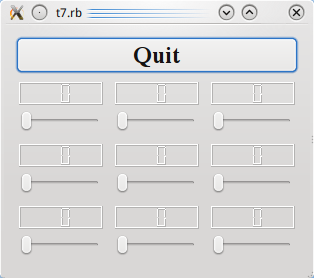
在啟動時,這支程式的外觀和前一章的一模一樣。嘗試操作右下角的 slider。 | |||
===練習=== | ===練習=== | ||
使用右下角的 slider 來設定所有 LCD 為50。然後按一下底部中間 slider 把手的左側,設定除了最後一個所有的 LCD 為40。現在,使用左下角的 slider 來設定前七個 LCD 回到50。 | |||
按下右下角 slider 把手的左側。會發生什麼事?為什麼這是正確的行為? | |||
[[Category:Ruby]] | |||
Latest revision as of 15:42, 23 June 2013
Template:I18n/Language Navigation Bar (zh TW)
Template:TutorialBrowser (zh TW)
One Thing Leads to Another

檔案:
概覽
這個範例展示如何建立具有訊號和槽的自訂 widget,以及如何用更複雜的方式將它們連接起來。這是第一次,原始碼被分割在幾個檔案中。
一行一行的瀏覽
這個檔案主要是抄襲自第6章,這裡只提出比較特別的改變。
signals 'valueChanged(int)'
slots 'setValue(int)'
def value()
  @slider.value()
end

def setValue(value)
  @slider.setValue(value)
end
這些構成了這個 widget 和程式中其他組件之間的介面。到目前為止,LCDRange 還沒真的擁有一個 API。
value() 是一個存取 LCDRange 值的公開(public)函式、setValue() 是我們第一個自訂槽,而 valueChanged()是我們第一個自訂訊號。
Slot 必須用正規方式實作(槽也是一個 Ruby 成員函式)。訊號會被自動實作。訊號遵循 Ruby 保護(protected)函式的存取規則(換言之,只有定義他們的類別或繼承的類別可以發出它們)。
當 LCDRange 的值發生改變時,valueChanged() 訊號就會被使用。
value() 的實作非常簡單。它只是返回 slider 的值。
setValue() 的實作也同樣簡單。請注意,因為 slider 和 LCD number 連接,設定 slider 的值時,LCD number 也會自動更新。此外,如果超出規定範圍,slider 會自動調整值。
connect(@slider, SIGNAL('valueChanged(int)'),
        lcd, SLOT('display(int)'))
connect(@slider, SIGNAL('valueChanged(int)'),
        self, SIGNAL('valueChanged(int)'))
第一個 QObject::connect() 呼叫與前幾章看到的相同。第二個是新的,它連接 QAbstractSlider::valueChanged() 訊號到這個物件的 valueChanged() 訊號。是的,沒錯。訊號也可以連接到其他的訊號。當第一個訊號被發出時,第二個訊號也被發出。
讓我們看看當使用者操作 slider 時,會發生什麼事。當 slider 發現它的值已經改變,就會發出QAbstractSlider::valueChanged() 訊號。這個訊號連接到 Qt::LCDNumber 的 QLCDNumber::display() 槽和 LCDRange 的 valueChanged() 訊號。
因此,當這個訊號發出時,LCDRange 也發出自己的 valueChanged() 訊號。此外,QLCDNumber::display() 被呼叫並顯示新的數字。
請注意,你不能確定任何執行的特定順序,LCDRange::valueChanged() 可能會在QLCDNumber::display() 被呼叫之前或之後發出。
previousRange = nil

for row in 0..2
  for column in 0..2
    lcdRange = LCDRange.new()
    grid.addWidget(lcdRange, row, column)
    unless previousRange.nil?
      connect(lcdRange, SIGNAL('valueChanged(int)'),
              previousRange, SLOT('setValue(int)'))
    end
    previousRange = lcdRange
  end
end
當我們建立9個 LCDRange 物件時,我們使用訊號與槽機制將它們連接在一起。每一個 LCDRange 的 valueChanged() 訊號都會連接到前一個的 setValue() 槽。因為每當 LCDRange 的值改變時,都會發出 valueChanged() 訊號,所以我們在這裡建立一個訊號與槽的連鎖反應。
執行應用程式
在啟動時,這支程式的外觀和前一章的一模一樣。嘗試操作右下角的 slider。
練習
使用右下角的 slider 來設定所有 LCD 為50。然後按一下底部中間 slider 把手的左側,設定除了最後一個所有的 LCD 為40。現在,使用左下角的 slider 來設定前七個 LCD 回到50。
按下右下角 slider 把手的左側。會發生什麼事?為什麼這是正確的行為?
