Archive:Development/Tutorials/Qt4 Ruby Tutorial/Chapter 06 (zh TW): Difference between revisions
Appearance
Created page with '{{Template:I18n/Language Navigation Bar_(zh_TW)|Development/Tutorials/Qt4 Ruby Tutorial/Chapter 06}} {{TutorialBrowser_(zh_TW)| series=[[Development/Tutorials/Qt4_Ruby_Tutorial...' |
m AnneW moved page Development/Tutorials/Qt4 Ruby Tutorial/Chapter 06 (zh TW) to Archive:Development/Tutorials/Qt4 Ruby Tutorial/Chapter 06 (zh TW) without leaving a redirect: Obsolete |
||
| (6 intermediate revisions by 2 users not shown) | |||
| Line 5: | Line 5: | ||
series=[[Development/Tutorials/Qt4_Ruby_Tutorial_(zh_TW)|Qt4 Ruby 教學]]| | series=[[Development/Tutorials/Qt4_Ruby_Tutorial_(zh_TW)|Qt4 Ruby 教學]]| | ||
name=Building Blocks | name=Building Blocks Galore!| | ||
pre=[[Development/Tutorials/Qt4_Ruby_Tutorial/Chapter_05_(zh_TW)|教學 5 - Building Blocks]]| | pre=[[Development/Tutorials/Qt4_Ruby_Tutorial/Chapter_05_(zh_TW)|教學 5 - Building Blocks]]| | ||
next=[[Development/Tutorials/Qt4_Ruby_Tutorial/ | next=[[Development/Tutorials/Qt4_Ruby_Tutorial/Chapter_07_(zh_TW)|教學 7 - One Thing Leads to Another]] | ||
}} | }} | ||
== Building Blocks Galore! == | == Building Blocks Galore! == | ||
| Line 17: | Line 17: | ||
===概覽=== | ===概覽=== | ||
這個範例展示如何封裝兩個 widget 為一個新的組件,以及使用在多量 widget 時是多麼容易。這是第一次,我們使用自訂的 widget 作為子 widget。 | |||
< | <syntaxhighlight lang="ruby"> | ||
require 'Qt4' | require 'Qt4' | ||
| Line 66: | Line 66: | ||
widget = MyWidget.new() | widget = MyWidget.new() | ||
widget.show() | widget.show() | ||
</ | </syntaxhighlight> | ||
===一行一行的瀏覽=== | ===一行一行的瀏覽=== | ||
< | <syntaxhighlight lang="ruby"> | ||
class LCDRange < Qt::Widget | class LCDRange < Qt::Widget | ||
</ | </syntaxhighlight> | ||
'''<tt>LCDRange</tt>''' widget 是一個沒有任何 API 的 widget。它只有一個建構子。這種 widget 並不是非常有用,所以稍後我們將會加入一些 API。 | |||
< | <syntaxhighlight lang="ruby"> | ||
def initialize(parent = nil) | def initialize(parent = nil) | ||
super() | super() | ||
| Line 90: | Line 90: | ||
setLayout(layout) | setLayout(layout) | ||
end | end | ||
</ | </syntaxhighlight> | ||
這是直接抄襲第5章的 '''<tt>MyWidget</tt>''' 建構子。唯一的差別是,拿掉了 <strong>Quit</strong> 按鈕和重新命名這個類別。 | |||
< | <syntaxhighlight lang="ruby"> | ||
class MyWidget < Qt::Widget | class MyWidget < Qt::Widget | ||
</ | </syntaxhighlight> | ||
'''<tt>MyWidget</tt>''' | '''<tt>MyWidget</tt>''' 同樣除了一個建構子外,沒有其他 API。 | ||
< | <syntaxhighlight lang="ruby"> | ||
def initialize(parent = nil) | def initialize(parent = nil) | ||
super() | super() | ||
| Line 106: | Line 106: | ||
quit.setFont(Qt::Font.new('Times', 18, Qt::Font::Bold)) | quit.setFont(Qt::Font.new('Times', 18, Qt::Font::Bold)) | ||
connect(quit, SIGNAL('clicked()'), $qApp, SLOT('quit()')) | connect(quit, SIGNAL('clicked()'), $qApp, SLOT('quit()')) | ||
</ | </syntaxhighlight> | ||
這個過去在改名為 '''<tt>LCDRange</tt>''' 類別裡的按鈕,被分離出來。這樣我們能有一個 <strong>Quit</strong> 按鈕,和許多 '''<tt>LCDRange</tt>''' 物件。 | |||
< | <syntaxhighlight lang="ruby"> | ||
grid = Qt::GridLayout.new() | |||
</ | </syntaxhighlight> | ||
我們在 [http://doc.qt.nokia.com/latest/qwidget.html Qt::Widget] 中建立一個包含三行(column)的 [http://doc.qt.nokia.com/latest/qgridlayout.html Qt::GridLayout]。 | |||
[http://doc.qt.nokia.com/latest/qgridlayout.html Qt::GridLayout] 會自動排列在其中 widget 的行和列。在 widget 加入佈局時, 您可以指定行和列的數字,[http://doc.qt.nokia.com/latest/qgridlayout.html Qt::GridLayout] 會填入他們到網格(grid)中。 | |||
< | <syntaxhighlight lang="ruby"> | ||
for row in 0..2 | for row in 0..2 | ||
for column in 0..2 | for column in 0..2 | ||
| Line 122: | Line 124: | ||
end | end | ||
end | end | ||
</ | </syntaxhighlight> | ||
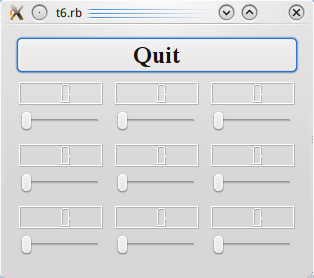
所有我們建立的9個 '''<tt>LCDRange</tt>''' widget,它們都是網格物件的子 widget。我們排列他們成3列3行。 | |||
===執行應用程式=== | ===執行應用程式=== | ||
這支程式展示如何能夠非常容易地一次使用許多 widget。每個 widget 的行為都像是前一章的 slider 和 LCD number。同樣的,不同之處在於實現。 | |||
===練習=== | ===練習=== | ||
在啟動時,初始化每一個 slider 為不同/隨機值。 | |||
[[Category:Ruby]] | |||
Latest revision as of 15:40, 23 June 2013
Template:I18n/Language Navigation Bar (zh TW)
Template:TutorialBrowser (zh TW)
Building Blocks Galore!

檔案:
概覽
這個範例展示如何封裝兩個 widget 為一個新的組件,以及使用在多量 widget 時是多麼容易。這是第一次,我們使用自訂的 widget 作為子 widget。
require 'Qt4'

class LCDRange < Qt::Widget
  def initialize(parent = nil)
    super()
    lcd = Qt::LCDNumber.new(2)

    slider = Qt::Slider.new(Qt::Horizontal)
    slider.setRange(0, 99)
    slider.setValue(0)

    connect(slider, SIGNAL('valueChanged(int)'), lcd, SLOT('display(int)'))

    layout = Qt::VBoxLayout.new()
    layout.addWidget(lcd)
    layout.addWidget(slider)
    setLayout(layout)
  end
end

class MyWidget < Qt::Widget
  def initialize(parent = nil)
    super()
    quit = Qt::PushButton.new(tr('Quit'))
    quit.setFont(Qt::Font.new('Times', 18, Qt::Font::Bold))
    connect(quit, SIGNAL('clicked()'), $qApp, SLOT('quit()'))

    grid = Qt::GridLayout.new()

    for row in 0..2
      for column in 0..2
        grid.addWidget(LCDRange.new(), row, column)
      end
    end

    layout = Qt::VBoxLayout.new()
    layout.addWidget(quit)
    layout.addLayout(grid)
    setLayout(layout)
  end
end

app = Qt::Application.new(ARGV)

widget = MyWidget.new()
widget.show()
一行一行的瀏覽
class LCDRange < Qt::Widget
LCDRange widget 是一個沒有任何 API 的 widget。它只有一個建構子。這種 widget 並不是非常有用,所以稍後我們將會加入一些 API。
def initialize(parent = nil)
  super()
  lcd = Qt::LCDNumber.new(2)
  slider = Qt::Slider.new(Qt::Horizontal)
  slider.setRange(0, 99)
  slider.setValue(0)

  connect(slider, SIGNAL('valueChanged(int)'), lcd, SLOT('display(int)'))

  layout = Qt::VBoxLayout.new()
  layout.addWidget(lcd)
  layout.addWidget(slider)
  setLayout(layout)
end
這是直接抄襲第5章的 MyWidget 建構子。唯一的差別是,拿掉了 Quit 按鈕和重新命名這個類別。
class MyWidget < Qt::Widget
MyWidget 同樣除了一個建構子外,沒有其他 API。
def initialize(parent = nil)
  super()
  quit = Qt::PushButton.new(tr('Quit'))
  quit.setFont(Qt::Font.new('Times', 18, Qt::Font::Bold))
  connect(quit, SIGNAL('clicked()'), $qApp, SLOT('quit()'))
這個過去在改名為 LCDRange 類別裡的按鈕,被分離出來。這樣我們能有一個 Quit 按鈕,和許多 LCDRange 物件。
grid = Qt::GridLayout.new()
我們在 Qt::Widget 中建立一個包含三行(column)的 Qt::GridLayout。
Qt::GridLayout 會自動排列在其中 widget 的行和列。在 widget 加入佈局時, 您可以指定行和列的數字,Qt::GridLayout 會填入他們到網格(grid)中。
for row in 0..2
  for column in 0..2
    grid.addWidget(LCDRange.new(), row, column)
  end
end
所有我們建立的9個 LCDRange widget,它們都是網格物件的子 widget。我們排列他們成3列3行。
執行應用程式
這支程式展示如何能夠非常容易地一次使用許多 widget。每個 widget 的行為都像是前一章的 slider 和 LCD number。同樣的,不同之處在於實現。
練習
在啟動時,初始化每一個 slider 為不同/隨機值。
