Archive:Development/Tutorials/Plasma/GettingStarted (zh CN): Difference between revisions
No edit summary |
m AnneW moved page Development/Tutorials/Plasma/GettingStarted (zh CN) to Archive:Development/Tutorials/Plasma/GettingStarted (zh CN) without leaving a redirect: Obsolete |
||
| (5 intermediate revisions by 2 users not shown) | |||
| Line 1: | Line 1: | ||
{{TutorialBrowser| | {{TutorialBrowser| | ||
| Line 29: | Line 29: | ||
'''plasma-applet-tutorial1.desktop''' | '''plasma-applet-tutorial1.desktop''' | ||
< | <syntaxhighlight lang="ini"> | ||
[Desktop Entry] | [Desktop Entry] | ||
Name=Tutorial 1 | Name=Tutorial 1 | ||
| Line 46: | Line 46: | ||
X-KDE-PluginInfo-License=GPL | X-KDE-PluginInfo-License=GPL | ||
X-KDE-PluginInfo-EnabledByDefault=true | X-KDE-PluginInfo-EnabledByDefault=true | ||
</ | </syntaxhighlight> | ||
最重要的字段就是 '''X-KDE-Library'''和'''X-KDE-PluginInfo-Name''', 它们是Plasma和你那些类之间的"胶水",没有他们,什么都启动不了。对'''X-KDE-PluginInfo-Category''', 详见[[Projects/Plasma/PIG | PIG]]. | 最重要的字段就是 '''X-KDE-Library'''和'''X-KDE-PluginInfo-Name''', 它们是Plasma和你那些类之间的"胶水",没有他们,什么都启动不了。对'''X-KDE-PluginInfo-Category''', 详见[[Projects/Plasma/PIG | PIG]]. | ||
| Line 54: | Line 54: | ||
'''plasma-tutorial1.h''' | '''plasma-tutorial1.h''' | ||
< | <syntaxhighlight lang="cpp-qt"> | ||
//避免多次加载 | //避免多次加载 | ||
#ifndef Tutorial1_HEADER | #ifndef Tutorial1_HEADER | ||
| Line 87: | Line 87: | ||
#endif | #endif | ||
</ | </syntaxhighlight> | ||
==== QRectF boundingRect() ==== | ==== QRectF boundingRect() ==== | ||
| Line 104: | Line 104: | ||
'''plasma-tutorial1.cpp''' | '''plasma-tutorial1.cpp''' | ||
< | <syntaxhighlight lang="cpp-qt"> | ||
#include "plasma-tutorial1.h" | #include "plasma-tutorial1.h" | ||
#include <QPainter> | #include <QPainter> | ||
| Line 169: | Line 169: | ||
#include "plasma-tutorial1.moc" | #include "plasma-tutorial1.moc" | ||
</ | </syntaxhighlight> | ||
==== K_EXPORT_PLASMA_APPLET ( <name>, <class> ) ==== | ==== K_EXPORT_PLASMA_APPLET ( <name>, <class> ) ==== | ||
| Line 209: | Line 209: | ||
更多关于CMake请参见[[Development/Tutorials/CMake]] | 更多关于CMake请参见[[Development/Tutorials/CMake]] | ||
< | <syntaxhighlight lang="bash"> | ||
#项目命名 | #项目命名 | ||
project(plasma-tutorial1) | project(plasma-tutorial1) | ||
| Line 237: | Line 237: | ||
install(FILES plasma-applet-tutorial1.desktop | install(FILES plasma-applet-tutorial1.desktop | ||
DESTINATION ${SERVICES_INSTALL_DIR}) | DESTINATION ${SERVICES_INSTALL_DIR}) | ||
</ | </syntaxhighlight> | ||
== 测试小程序 == | == 测试小程序 == | ||
| Line 246: | Line 246: | ||
可以在'''plasmoidviewer'''测试你的小程序: | 可以在'''plasmoidviewer'''测试你的小程序: | ||
< | <syntaxhighlight lang="bash"> | ||
plasmoidviewer applet_name | plasmoidviewer applet_name | ||
</ | </syntaxhighlight> | ||
可以用plasmoidviewer看看小程序的效果: | 可以用plasmoidviewer看看小程序的效果: | ||
< | <syntaxhighlight lang="bash"> | ||
plasmoidviewer -c desktop applet_name | plasmoidviewer -c desktop applet_name | ||
</ | </syntaxhighlight> | ||
这里'''applet_name'''就是在.desktop文件里'''X-KDE-PluginInfo-Name'''的值。 | 这里'''applet_name'''就是在.desktop文件里'''X-KDE-PluginInfo-Name'''的值。 | ||
Latest revision as of 13:29, 23 June 2013
概述
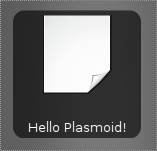
本教程是基于KDE 4.2 (主干)的。 这里我们准备介绍如何创建一个简单的Plasmoid。简单起见,我们创建一个包含下列物品的Plasmoid:
- 一个SVG图像
- 图标
- 一些文字

代码
.desktop文件
每个Plasmoid都需要一个.desktop文件,这会告诉Plasma他该如何启动并叫什么名字。
plasma-applet-tutorial1.desktop
[Desktop Entry]
Name=Tutorial 1
Comment=Plasma Tutorial 1
Type=Service
ServiceTypes=Plasma/Applet

X-KDE-Library=plasma_applet_tutorial1
X-KDE-PluginInfo-Author=Bas Grolleman
X-KDE-PluginInfo-Email=[email protected]
X-KDE-PluginInfo-Name=plasma_applet_tutorial1
X-KDE-PluginInfo-Version=0.1
X-KDE-PluginInfo-Website=http://plasma.kde.org/
X-KDE-PluginInfo-Category=Examples
X-KDE-PluginInfo-Depends=
X-KDE-PluginInfo-License=GPL
X-KDE-PluginInfo-EnabledByDefault=true
最重要的字段就是 X-KDE-Library和X-KDE-PluginInfo-Name, 它们是Plasma和你那些类之间的"胶水",没有他们,什么都启动不了。对X-KDE-PluginInfo-Category, 详见 PIG.
头文件
这里有一个头文件的例子。代码加上注释,应该比较清楚了。
plasma-tutorial1.h
//避免多次加载
#ifndef Tutorial1_HEADER
#define Tutorial1_HEADER
//添加Plasma Applet头文件
#include <KIcon>

#include <Plasma/Applet>
#include <Plasma/Svg>

class QSizeF;

//定义自己的Plasma Applet
class PlasmaTutorial1 : public Plasma::Applet
{
    Q_OBJECT
    public:
        // 构造函数/析构函数
        PlasmaTutorial1(QObject *parent, const QVariantList &args);
        ~PlasmaTutorial1();

        // paintInterface:画出屏幕
        void paintInterface(QPainter *painter,
                const QStyleOptionGraphicsItem *option,
                const QRect& contentsRect);
	void init();

    private:
        Plasma::Svg m_svg;
        KIcon m_icon;
};

#endif
QRectF boundingRect()
boundingRect() 函数告诉Plasma这Plasmoid的实际大小。我们要知道他在屏幕上有多大。

void paintInterface(QRectF contentsRect)
这可以算是个主函数了,他把Plasmoid画在屏幕上。也是在这里,你把你想要的效果显出来。 画边界是,应该使用contentsRect规定的边界,同时避免使用geometry()。如果Plasmoid没有标准背景时,例如在setBackgroundHints()调用中被禁了或者是个面板,geometry()和boundingRect()有相同的行为。然而,当标准背景激活时(通常情况),那小程序会有些不该画出的边框。
实际文件
函数体,有很多注释。
plasma-tutorial1.cpp
#include "plasma-tutorial1.h"
#include <QPainter>
#include <QFontMetrics>
#include <QSizeF>

#include <plasma/svg.h>
#include <plasma/theme.h>

// 把.desktop文件与你的小程序相连的命令行
K_EXPORT_PLASMA_APPLET(tutorial1, PlasmaTutorial1)


PlasmaTutorial1::PlasmaTutorial1(QObject *parent, const QVariantList &args)
    : Plasma::Applet(parent, args),
    m_svg(this),
    m_icon("document")
{
    m_svg.setImagePath("widgets/background");
    // 有缺省标准背景,免费
    setBackgroundHints(DefaultBackground);
    resize(200, 200);
}


PlasmaTutorial1::~PlasmaTutorial1()
{
    if (hasFailedToLaunch()) {
        // 清除工作
    } else {
        // 保存设置
    }
}

void PlasmaTutorial1::init()
{

    //演示setFailedToLaunch函数的用法
    if (m_icon.isNull()) {
        setFailedToLaunch(true, "没地方说你好!");
    }
}


void PlasmaTutorial1::paintInterface(QPainter *p,
        const QStyleOptionGraphicsItem *option, const QRect &contentsRect)
{
    p->setRenderHint(QPainter::SmoothPixmapTransform);
    p->setRenderHint(QPainter::Antialiasing);

    //画出小程序,从SVG开始
    m_svg.resize((int)contentsRect.width(), (int)contentsRect.height());
    m_svg.paint(p, (int)contentsRect.left(), (int)contentsRect.top());

    // 放置图表和文字
    p->drawPixmap(7, 0, m_icon.pixmap((int)contentsRect.width(),(int)contentsRect.width()-14));
    p->save();
    p->setPen(Qt::white);
    p->drawText(contentsRect,
                Qt::AlignBottom | Qt::AlignHCenter,
                "Plasmoid,你好!");
    p->restore();
}

#include "plasma-tutorial1.moc"
K_EXPORT_PLASMA_APPLET ( <name>, <class> )
这是个很小但是很重要的部分,它把你的小程序名字和路径跟.desktop文件中的连接起来。 如果你的小程序没有加载,那也许你的申明和.desktop文件有差异。

Plasma/SVG
如你所见,代码中我们使用了Plasma::Svg对象,这里我们还有些要说的。
我们使相对路径 widgets/background,这样就会Plasma::Svg运用{运行(KDE应用就知道新的桌面文件了)。 {class|Plasma::Theme|主题}}来定位SVG数据。在Plasma::SVG中,我们可以传入一个文件的绝对地址,随时使用主题中的相对路径,这让Plasma看上去像一系列的应用而非互不相关的东西了。可以在Plasma主题页面找到系列可用图像组件。
各种模式, Plasma::Svg可以只画出SVG文件中的一部分,根据SVG文件中的一个元素。举例来说,如果打开主题自带的clock.svg文件,里面有好些东西,3个指针(小时,分,秒) 和表面(玻璃框)。SVG文件可以把所有的内容都放在一个文件里,这远比用五个单独文件一个个叠加要好得多,而且渲染一个SVG文件的性能远比从系统中读取多个文件要好得多。
setBackgroundHints(DefaultBackground)
画背景是个常用函数,有许多更快更好的办法可以做到。代码中加上setBackgroundHints(DefaultBackground),可以给你的Plasmoid后面加上缺省Plasma背景。这不仅节省了时间和代码量,还给用户一个稳定的界面。
init()方法
构造函数中,我们只是给出Plasma的背景和配置文件。我们还可以设置初始大小。之后,Plasma会负责变形相关事宜,我们就不操心了。在init()函数中,我们把一切都初始化了,例如读取配置文件等等。
hasFailedToLaunch()
如果因为某些原因,小程序没能正常启动 (类库每家在,硬件不支持等..),这个方法就会返回真。用这个方法可以在推出前清理现场。
setFailedToLaunch(bool, QString)
当程序不能启动时,,这个函数通知Plasma并可以给出一个原因(可选)。Plasma会给出一个标准错误界面,告诉用户当前情况:这个小程序不会再运行了。如果你的Plasmoid变得复杂起来并依赖与很多因素,这是个很好的退出机制。
dataUpdated
如果你想连接到数据引擎,你就要实现这个方法-dataUpdated。数据引擎给你发数据时,这个函数就会被调用,,例如,Plasma要重新计算内容了等。
确定小程序的大小和位置:geometry()和contentsRect()
如果在小程序里要知道当前的大小和位置,调用contentsRect()和contentsRect().size()。避免使用geometry()和size(),因为他们没有把背景边框计算在内。同样要避免使用小程序的绝对值,如避免用QPoint(0, 0)表示左上角,可以用contentsRect().topLeft()。
全部联编,CMakeLists.txt文件
最后,把所有的都汇总一起,准备联编。所有cmake要知道的内容都在CMakeLists.txt文件里了。
更多关于CMake请参见Development/Tutorials/CMake
#项目命名
project(plasma-tutorial1)

#所需类库
find_package(KDE4 REQUIRED)
include(KDE4Defaults)

add_definitions (${QT_DEFINITIONS} ${KDE4_DEFINITIONS})
include_directories(
   ${CMAKE_SOURCE_DIR}
   ${CMAKE_BINARY_DIR}
   ${KDE4_INCLUDES}
   )

#我们的代码
set(tutorial1_SRCS plasma-tutorial1.cpp)

# 确保所有文件都个就其位
kde4_add_plugin(plasma_applet_tutorial1 ${tutorial1_SRCS})
target_link_libraries(plasma_applet_tutorial1
                      ${KDE4_PLASMA_LIBS} ${KDE4_KDEUI_LIBS})

install(TARGETS plasma_applet_tutorial1
        DESTINATION ${PLUGIN_INSTALL_DIR})

install(FILES plasma-applet-tutorial1.desktop
        DESTINATION ${SERVICES_INSTALL_DIR})
测试小程序
如果你的开发环境和你的测试环境不一致,,运行cmake时要加上 -DCMAKE_INSTALL_PREFIX=/usr/lib/kde4/ (或用你的$KDEDIR替换掉)。然后执行。成功的话,这个小程序就可以用"sudo make install"安装运行了,或
- cp ./lib/plasma_applet_tutorial1.so $KDEDIR/lib
- cp ./plaand run kbuildsycoca4 a-applet-tutorial1.desktop $KDEDIR/share/kde4/services/
可以在plasmoidviewer测试你的小程序:
plasmoidviewer applet_name
可以用plasmoidviewer看看小程序的效果:
plasmoidviewer -c desktop applet_name
这里applet_name就是在.desktop文件里X-KDE-PluginInfo-Name的值。
如果遇到问题,重启Plasma,小程序就会在Applet浏览器中显示了。
kbuildsycoca4
kquitapp plasma # in trunk (KDE4.3): kquitapp plasma-desktop
plasma          # in trunk (KDE4.3): plasma-desktop
如果还不行的话,重启KDE会话。或者设置"export KDEDIRS=/usr/local:'kde4-config --prefix'"再重新运行kbuildsycoca4。
