Archive:Development/Tutorials/Using KXmlGuiWindow (zh TW): Difference between revisions
No edit summary |
m AnneW moved page Development/Tutorials/Using KXmlGuiWindow (zh TW) to Archive:Development/Tutorials/Using KXmlGuiWindow (zh TW) without leaving a redirect: Obsolete |
||
| (8 intermediate revisions by 2 users not shown) | |||
| Line 1: | Line 1: | ||
{{Template:I18n/Language Navigation | {{Template:I18n/Language Navigation Bar_(zh_TW)|Development/Tutorials/Using_KXmlGuiWindow}} | ||
{{TutorialBrowser (zh TW)| | {{TutorialBrowser (zh TW)| | ||
| Line 8: | Line 8: | ||
pre=[[Development/Tutorials/First_program (zh TW)|教學1 - Hello World]]| | pre=[[Development/Tutorials/First_program (zh TW)|教學1 - Hello World]]| | ||
next=[[Development/Tutorials/Using_KActions|教學3 - KActions 和 XMLGUI]]| | next=[[Development/Tutorials/Using_KActions (zh TW)|教學3 - KActions 和 XMLGUI]]| | ||
reading={{class|KXmlGuiWindow}} | reading={{class|KXmlGuiWindow}} | ||
| Line 14: | Line 14: | ||
==摘要== | ==摘要== | ||
本教學承接上一講[[Development/Tutorials/First_program (zh TW)| | 本教學承接上一講[[Development/Tutorials/First_program (zh TW)|第一支程式教學]],進一步介紹 {{class|KXmlGuiWindow}} 類別的使用。 | ||
在上一講中,程式只是彈出了一個對話框。在本講中,我們要讓我們的程式具備更加實際功能。 | 在上一講中,程式只是彈出了一個對話框。在本講中,我們要讓我們的程式具備更加實際功能。 | ||
| Line 22: | Line 22: | ||
==KXmlGuiWindow== | ==KXmlGuiWindow== | ||
{{class|KXmlGuiWindow}} | {{class|KXmlGuiWindow}} 提供完整的主視窗檢視包含選單列、工具列、狀態列和中央的主區域。大多數 KDE 應用程式會衍生此類別,因為它提供了一個簡單的方法,透過 XML 檔案定義選單和工具列的排版(這種技術稱為XMLGUI)。雖然我們不會使用 XMLGUI 在''本''教學中,但下一課我們會用到它。 | ||
為了使用 | 為了使用 KXmlGuiWindow,我們必須對它子類別化。因此,我們建立兩個檔案, <tt>mainwindow.cpp</tt> 和 <tt>mainwindow.h</tt> 放置我們的程式碼。 | ||
===mainwindow.h=== | ===mainwindow.h=== | ||
< | <syntaxhighlight lang="cpp-qt" line> | ||
#ifndef MAINWINDOW_H | #ifndef MAINWINDOW_H | ||
#define MAINWINDOW_H | #define MAINWINDOW_H | ||
| Line 44: | Line 44: | ||
#endif | #endif | ||
</ | </syntaxhighlight> | ||
首先,我們在第7行宣告 KXmlGuiWindow 的子類別:<tt>class MainWindow : public KXmlGuiWindow</tt>。 | |||
接下來我們宣告一個建構子 <tt>MainWindow(QWidget *parent=0);</tt> 。 | |||
最後我們宣告了一個指標,它指向構成我們程式主體的物件。{{class|KTextEdit}} 是一個通用的文字編輯器,並具有很多 KDE 特有的優點,如游標自動隱藏等。 | |||
===mainwindow.cpp=== | ===mainwindow.cpp=== | ||
< | <syntaxhighlight lang="cpp-qt" line> | ||
#include "mainwindow.h" | #include "mainwindow.h" | ||
| Line 61: | Line 61: | ||
setupGUI(); | setupGUI(); | ||
} | } | ||
</ | </syntaxhighlight> | ||
首先,很自然的,我們在第一行含入(include)有類別宣告的標頭檔(header file)。 | |||
在第五行,我們初始化了文字編輯器物件。接下來在第6行,我們使用 KXmlGuiWindow 內建的 setCentralWidget() 函式,它告訴 KXmlGuiWindow 什麼東西應該顯示在視窗的中央。 | |||
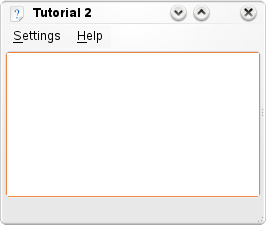
最後,呼叫 KXmlGuiWindow::setupGUI(),它會替我們完成很多底層的工作,並建立一個預設的選單列(包含 Settings 和 Help)。 | |||
==回到 main.cpp== | ==回到 main.cpp== | ||
為了能夠實際運行前面定義的視窗,我們還需要在 main.cpp 中增加幾行: | |||
===main.cpp=== | ===main.cpp=== | ||
< | <syntaxhighlight lang="cpp-qt" line> | ||
#include <KApplication> | #include <KApplication> | ||
#include <KAboutData> | #include <KAboutData> | ||
| Line 95: | Line 95: | ||
return app.exec(); | return app.exec(); | ||
} | } | ||
</ | </syntaxhighlight> | ||
與教學1相比,唯一新增的就是第6、18和19行。在第18行,我們生成了一個 MainWindow 物件實例,然後在第19行顯示它。 | |||
==CMake== | ==CMake== | ||
建構此程式的最好方法是使用 CMake。與教學1相比,改變包含增加 <tt>mainwindow.cpp</tt> 到原始碼列表中,以及 <tt>tutorial1</tt> 變成了 <tt>tutorial2</tt>。 | |||
===CMakeLists.txt=== | ===CMakeLists.txt=== | ||
< | <syntaxhighlight lang="make" line> | ||
project (tutorial2) | project (tutorial2) | ||
| Line 114: | Line 114: | ||
kde4_add_executable(tutorial2 ${tutorial2_SRCS}) | kde4_add_executable(tutorial2 ${tutorial2_SRCS}) | ||
target_link_libraries(tutorial2 ${KDE4_KDEUI_LIBS}) | target_link_libraries(tutorial2 ${KDE4_KDEUI_LIBS}) | ||
</ | </syntaxhighlight> | ||
=== | ===編譯=== | ||
使用下面的指令編譯、連結以及運行程式: | |||
mkdir build && cd build | mkdir build && cd build | ||
cmake .. | cmake .. | ||
| Line 124: | Line 124: | ||
==繼續前進== | ==繼續前進== | ||
現在你可以開始學習下一課:[[Development/Tutorials/Using_KActions|使用 KActions]]。 | 現在你可以開始學習下一課:[[Development/Tutorials/Using_KActions (zh TW)|使用 KActions]]。 | ||
[[Category:C++]] | [[Category:C++]] | ||
Latest revision as of 13:25, 23 June 2013
Template:I18n/Language Navigation Bar (zh TW) Template:TutorialBrowser (zh TW)
摘要
本教學承接上一講第一支程式教學,進一步介紹 KXmlGuiWindow 類別的使用。
在上一講中,程式只是彈出了一個對話框。在本講中,我們要讓我們的程式具備更加實際功能。

KXmlGuiWindow
KXmlGuiWindow 提供完整的主視窗檢視包含選單列、工具列、狀態列和中央的主區域。大多數 KDE 應用程式會衍生此類別,因為它提供了一個簡單的方法,透過 XML 檔案定義選單和工具列的排版(這種技術稱為XMLGUI)。雖然我們不會使用 XMLGUI 在本教學中,但下一課我們會用到它。
為了使用 KXmlGuiWindow,我們必須對它子類別化。因此,我們建立兩個檔案, mainwindow.cpp 和 mainwindow.h 放置我們的程式碼。
mainwindow.h
#ifndef MAINWINDOW_H
#define MAINWINDOW_H

#include <KXmlGuiWindow>
#include <KTextEdit>

class MainWindow : public KXmlGuiWindow
{
  public:
    MainWindow(QWidget *parent=0);

  private:
    KTextEdit* textArea;
};

#endif
首先,我們在第7行宣告 KXmlGuiWindow 的子類別:class MainWindow : public KXmlGuiWindow。
接下來我們宣告一個建構子 MainWindow(QWidget *parent=0); 。
最後我們宣告了一個指標,它指向構成我們程式主體的物件。KTextEdit 是一個通用的文字編輯器,並具有很多 KDE 特有的優點,如游標自動隱藏等。
mainwindow.cpp
#include "mainwindow.h"

MainWindow::MainWindow(QWidget *parent) : KXmlGuiWindow(parent)
{
  textArea = new KTextEdit();
  setCentralWidget(textArea);
  setupGUI();
}
首先,很自然的,我們在第一行含入(include)有類別宣告的標頭檔(header file)。
在第五行,我們初始化了文字編輯器物件。接下來在第6行,我們使用 KXmlGuiWindow 內建的 setCentralWidget() 函式,它告訴 KXmlGuiWindow 什麼東西應該顯示在視窗的中央。
最後,呼叫 KXmlGuiWindow::setupGUI(),它會替我們完成很多底層的工作,並建立一個預設的選單列(包含 Settings 和 Help)。
回到 main.cpp
為了能夠實際運行前面定義的視窗,我們還需要在 main.cpp 中增加幾行:
main.cpp
#include <KApplication>
#include <KAboutData>
#include <KCmdLineArgs>
#include <KLocale>

#include "mainwindow.h"

int main (int argc, char *argv[])
{
  KAboutData aboutData( "tutorial2", 0,
      ki18n("Tutorial 2"), "1.0",
      ki18n("A simple text area"),
      KAboutData::License_GPL,
      ki18n("Copyright (c) 2007 Developer") );
  KCmdLineArgs::init( argc, argv, &aboutData );

  KApplication app;

  MainWindow* window = new MainWindow();
  window->show();

  return app.exec();
}
與教學1相比,唯一新增的就是第6、18和19行。在第18行,我們生成了一個 MainWindow 物件實例,然後在第19行顯示它。
CMake
建構此程式的最好方法是使用 CMake。與教學1相比,改變包含增加 mainwindow.cpp 到原始碼列表中,以及 tutorial1 變成了 tutorial2。
CMakeLists.txt
project (tutorial2)

find_package(KDE4 REQUIRED)
include_directories(${KDE4_INCLUDES})

set(tutorial2_SRCS
  main.cpp
  mainwindow.cpp
)

kde4_add_executable(tutorial2 ${tutorial2_SRCS})
target_link_libraries(tutorial2 ${KDE4_KDEUI_LIBS})
編譯
使用下面的指令編譯、連結以及運行程式:
mkdir build && cd build
cmake ..
make
./tutorial2
繼續前進
現在你可以開始學習下一課:使用 KActions。
