Languages/Python/PyKDE DBus Tutorial: Difference between revisions
Added Python Code |
Mark for archiving |
||
| (10 intermediate revisions by 4 users not shown) | |||
| Line 1: | Line 1: | ||
The aim of this tutorial is to give an overview of DBus in the context of python. By the end, the goal is to understand how to find DBus methods in existing applications and how to use them in PyQt4/PyKDE4. It assumes a basic working knowledge of Python and PyKDE4. | {{Archived}} | ||
{{Warning|This tutorial uses Qt4, PyQt4, and PyKDE4.}} | |||
{{TutorialBrowser| | |||
series=Python| | |||
name=PyKDE DBus Tutorial| | |||
next=| | |||
reading=[http://techbase.kde.org/Development/Tutorials/Python_introduction_to_signals_and_slots Qt Signals and Slots in python], [http://www.learningpython.com/2008/09/20/an-introduction-to-pyqt/ Introduction to PyQT4], [http://doc.trolltech.com/intro-to-dbus.html Qt DBus Intro] | |||
}} | |||
== Abstract == | |||
The aim of this tutorial is to give an overview of DBus in the context of python. By the end, the goal is to understand how to find DBus methods in existing applications and how to use them in PyQt4/PyKDE4. It assumes a basic working knowledge of Python and PyKDE4. | |||
=== Future Plans === | |||
Later additions to this tutorial may cover creating and emitting dbus signals. | Later additions to this tutorial may cover creating and emitting dbus signals. | ||
== Introduction == | |||
=== DBus === | |||
First off, a small introduction to DBus. DBus is an inter-process communication framework. In other words, it allows different applications to talk to each other. DBus uses the concept of signals and methods, which are similar to the Signals and Slots in Qt. (For more information on Signals and Slots in python, suggested reading at the top) You can connect signals to methods, or call methods directly. | |||
=== Bus Types === | |||
Everything sent or received in dbus is transferred over a bus. There are two main buses available, the Session Bus and the System Bus. The former handles per-session (per-user) information while the System Bus handles systemwide notification and settings. For example, the hal subsystem provides a number of interfaces on the System Bus, while Amarok or PowerDevil provides session-specific interfaces for control over music and power options, respectively. | Everything sent or received in dbus is transferred over a bus. There are two main buses available, the Session Bus and the System Bus. The former handles per-session (per-user) information while the System Bus handles systemwide notification and settings. For example, the hal subsystem provides a number of interfaces on the System Bus, while Amarok or PowerDevil provides session-specific interfaces for control over music and power options, respectively. | ||
=== Interfaces === | |||
A DBus path is made up of three parts, the Service Name, the Object Path and the Interface. The following table (taken from the Qt intro to dbus) provides some ways to distinguish between the three parts. | A DBus path is made up of three parts, the Service Name, the Object Path and the Interface. The following table (taken from the Qt intro to dbus) provides some ways to distinguish between the three parts. | ||
=== DBus Cheat Sheet === | |||
D-Bus Concept | |||
Analogy Name format | {| | ||
Service name | |- | ||
! D-Bus Concept !! Analogy !! Name format | |||
|- | |||
| Service name || Network hostnames || Dot-separated ("looks like a hostname") | |||
|- | |||
| Object path || URL path component || Slash-separated ("looks like a path") | |||
|- | |||
| Interface || Plugin identifier || Dot-separated | |||
|} | |||
== Exploring DBus Interfaces == | |||
One of the easiest ways to discover a DBus method is by browsing for it using qdbusviewer. Run this program from your command line or KRunner (alt+f2) prompt. | One of the easiest ways to discover a DBus method is by browsing for it using qdbusviewer. Run this program from your command line or KRunner (alt+f2) prompt. | ||
=== QDBusViewer === | |||
You should see the following screen: | You should see the following screen: | ||
[ | [[Image:QDBusViewer-InitialScreen.png|400px|thumb|left|Initial QDBusViewer Screen]] | ||
The two tabs available are the Session Bus and the System Bus. | The two tabs available are the Session Bus and the System Bus. | ||
=== Services === | |||
Within each bus, the left pane shows Service Names. If you click on a service, the right pane shows information about that service. | Within each bus, the left pane shows Service Names. If you click on a service, the right pane shows information about that service. | ||
Find the org.freedesktop.PowerManagement service and select it. You show now see the following: | Find the org.freedesktop.PowerManagement service and select it. You show now see the following: | ||
[ | [[Image:QDBusViewer-PowerManagement.png|400px|thumb|left|org.freedesktop.PowerManagement screen]] | ||
=== Object Paths === | |||
Everything you see on the right pane is the start of an Object Path. Try expanding down the modules/powerdevil/ path. You should now see the following: | Everything you see on the right pane is the start of an Object Path. Try expanding down the modules/powerdevil/ path. You should now see the following: | ||
[ | [[Image:QDBusViewer-powerdevilPath.png|400px|thumb|left|modules/powerdevil/ path screen]] | ||
=== Interfaces === | |||
org.kde.PowerDevil | org.kde.PowerDevil | ||
| Line 38: | Line 78: | ||
The above entries are Interfaces. They are the things that you can actually interact with. When you expand the org.kde.PowerDevil interface, you see a number of Methods and Signals: | The above entries are Interfaces. They are the things that you can actually interact with. When you expand the org.kde.PowerDevil interface, you see a number of Methods and Signals: | ||
[ | [[Image:QDBusViewer-powerdevilPath-expanded.png|400px|thumb|left|powerdevil expanded screen]] | ||
=== Calling Methods === | |||
Clicking on a Method will call it. Try clicking on the "turnOffScreen" method. Your screen should go blank. Note: You can get your display back by wiggling your mouse. | Clicking on a Method will call it. Try clicking on the "turnOffScreen" method. Your screen should go blank. Note: You can get your display back by wiggling your mouse. | ||
When your display comes back, you should see some information in the bottom pane. | When your display comes back, you should see some information in the bottom pane. | ||
[ | [[Image:QDBusViewer-turnOffScreen.png|400px|thumb|left|turnOffScreen screen]] | ||
Since the method returned nothing, qdbusviewer told us that. | Since the method returned nothing, qdbusviewer told us that. | ||
== PyKDE4 == | |||
Now, for working with methods in python and PyKDE4. | Now, for working with methods in python and PyKDE4. | ||
=== Code Example === | |||
First I'm going to throw a whole bunch of code at you. This example contains the basics for setting up a KDE application gui and connecting a button to a dbus method. | |||
<syntaxhighlight lang="python"> | |||
#! /usr/bin/python | #! /usr/bin/python | ||
# -*- coding: utf-8 -*- | # -*- coding: utf-8 -*- | ||
| Line 113: | Line 159: | ||
mainWindow.show () | mainWindow.show () | ||
app.exec_ () | app.exec_ () | ||
</syntaxhighlight> | |||
=== Walking through the code example === | |||
==== Importing Libraries ==== | |||
Lets go through this example to try and understand it. First we import the libraries that are needed to make it all work. Most of the Qt and KDE ones should be familiar to you, but to get dbus we need the one at the end: "import dbus". | |||
==== DBus Initialization ==== | |||
Now we have imported our libraries, we need to write our main window. In the __init__ (constructor, for the C++ people here) method, we set up the dbus connections: | |||
<syntaxhighlight lang="python"> | |||
self.sessionBus = dbus.SessionBus() | |||
self.powerdevil = self.sessionBus.get_object('org.freedesktop.PowerManagement', | |||
'/modules/powerdevil') | |||
</syntaxhighlight> | |||
Because the org.freedesktop.PowerManagement is on the Session Bus, we create an object self.sessionBus that represents that bus. We also grab our powerdevil Object via its path /moddules/powerdevil. We can now call methods on the object, but first we need to set up the gui framework, a button and its connection (via Qt signals/slots) to a python method that will call the dbus method. | |||
==== Layout and Buttons ==== | |||
<syntaxhighlight lang="python"> | |||
self.layout = QBoxLayout(QBoxLayout.TopToBottom, self) | |||
self.setLayout(self.layout) | |||
label = QLabel ("This is a simple PyKDE4 program", self) | |||
self.layout.addWidget(label) | |||
button = QPushButton("Push to turn off screen!", self) | |||
self.layout.addWidget(button) | |||
QObject.connect(button, SIGNAL("clicked()"), self.screenOff) | |||
</syntaxhighlight> | |||
If you need help understanding the above, you should consult the reading list linked at the top of this page. | |||
==== Calling DBus Methods ==== | |||
We now need to define the self.screenOff method that we have just connected to the button. | |||
<syntaxhighlight lang="python"> | |||
def screenOff(self): | |||
self.powerdevil.turnOffScreen(dbus_interface='org.kde.PowerDevil') | |||
</syntaxhighlight> | |||
It's relatively simple. We call the method turnOffScreen() on our powerdevil object (the method turnOffScreen was shown on the interface org.kde.PowerDevil in qdbusviewer) | |||
The rest of the application sets up the KDE app and populates it with author/name info. Again, if you need help with that, see the other reading linked to from the top of this tutorial. | |||
Congratulations, you should now have an applet that lets you turn off your screen at the push of a button. | |||
Latest revision as of 13:45, 31 May 2019


| Tutorial Series | Python |
| Previous | None |
| What's Next | |
| Further Reading | Qt Signals and Slots in python, Introduction to PyQT4, Qt DBus Intro |
Abstract
The aim of this tutorial is to give an overview of DBus in the context of python. By the end, the goal is to understand how to find DBus methods in existing applications and how to use them in PyQt4/PyKDE4. It assumes a basic working knowledge of Python and PyKDE4.
Future Plans
Later additions to this tutorial may cover creating and emitting dbus signals.
Introduction
DBus
First off, a small introduction to DBus. DBus is an inter-process communication framework. In other words, it allows different applications to talk to each other. DBus uses the concept of signals and methods, which are similar to the Signals and Slots in Qt. (For more information on Signals and Slots in python, suggested reading at the top) You can connect signals to methods, or call methods directly.
Bus Types
Everything sent or received in dbus is transferred over a bus. There are two main buses available, the Session Bus and the System Bus. The former handles per-session (per-user) information while the System Bus handles systemwide notification and settings. For example, the hal subsystem provides a number of interfaces on the System Bus, while Amarok or PowerDevil provides session-specific interfaces for control over music and power options, respectively.
Interfaces
A DBus path is made up of three parts, the Service Name, the Object Path and the Interface. The following table (taken from the Qt intro to dbus) provides some ways to distinguish between the three parts.
DBus Cheat Sheet
| D-Bus Concept | Analogy | Name format |
|---|---|---|
| Service name | Network hostnames | Dot-separated ("looks like a hostname") |
| Object path | URL path component | Slash-separated ("looks like a path") |
| Interface | Plugin identifier | Dot-separated |
Exploring DBus Interfaces
One of the easiest ways to discover a DBus method is by browsing for it using qdbusviewer. Run this program from your command line or KRunner (alt+f2) prompt.
QDBusViewer
You should see the following screen:
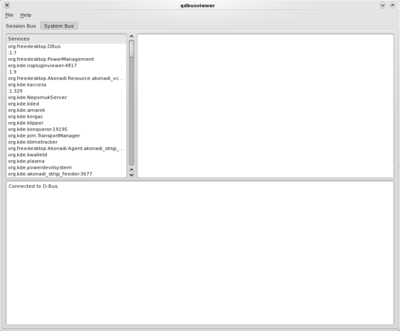
The two tabs available are the Session Bus and the System Bus.
Services
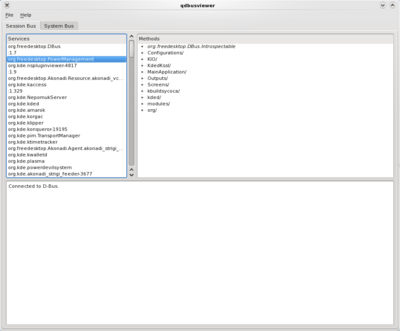
Within each bus, the left pane shows Service Names. If you click on a service, the right pane shows information about that service.
Find the org.freedesktop.PowerManagement service and select it. You show now see the following:
Object Paths
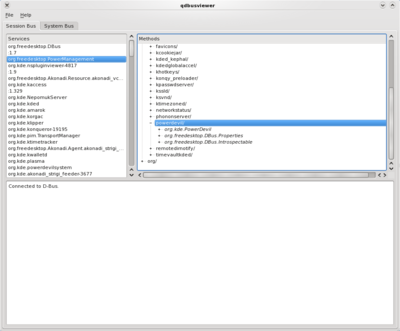
Everything you see on the right pane is the start of an Object Path. Try expanding down the modules/powerdevil/ path. You should now see the following:
Interfaces
org.kde.PowerDevil org.freedesktop.DBus.Properties org.freedesktop.DBus.Introspectable
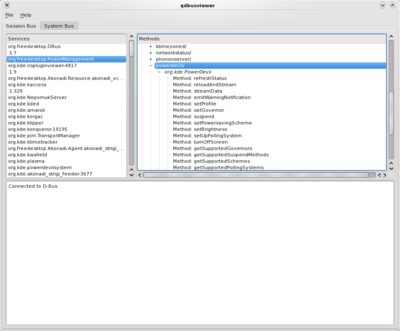
The above entries are Interfaces. They are the things that you can actually interact with. When you expand the org.kde.PowerDevil interface, you see a number of Methods and Signals:
Calling Methods
Clicking on a Method will call it. Try clicking on the "turnOffScreen" method. Your screen should go blank. Note: You can get your display back by wiggling your mouse.
When your display comes back, you should see some information in the bottom pane.
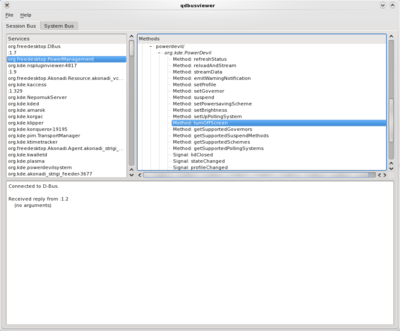
Since the method returned nothing, qdbusviewer told us that.
PyKDE4
Now, for working with methods in python and PyKDE4.
Code Example
First I'm going to throw a whole bunch of code at you. This example contains the basics for setting up a KDE application gui and connecting a button to a dbus method.
#! /usr/bin/python
# -*- coding: utf-8 -*-
import sys

from PyKDE4.kdecore import ki18n, KAboutData, KCmdLineArgs
from PyKDE4.kdeui import KApplication

from PyQt4.QtGui import QLabel, QWidget, QPushButton, QBoxLayout
from PyQt4.QtCore import Qt, QObject, SIGNAL

import dbus

class MainWindow (QWidget):
    def __init__ (self):
        QWidget.__init__ (self)

        self.sessionBus = dbus.SessionBus()
        self.powerdevil = self.sessionBus.get_object('org.freedesktop.PowerManagement',
                      '/modules/powerdevil')

        self.layout = QBoxLayout(QBoxLayout.TopToBottom, self)
        self.setLayout(self.layout)

        label = QLabel ("This is a simple PyKDE4 program", self)
        self.layout.addWidget(label)

        button = QPushButton("Push to turn off screen!", self)
        self.layout.addWidget(button)

        QObject.connect(button, SIGNAL("clicked()"), self.screenOff)

        self.resize (640, 480)

    def screenOff(self):
      self.powerdevil.turnOffScreen(dbus_interface='org.kde.PowerDevil')

#--------------- main ------------------
if __name__ == '__main__':

    appName     = "DBusApp"
    catalog     = ""
    programName = ki18n ("DBus Example Application")
    version     = "1.0"
    description = ki18n ("DBus Example")
    license     = KAboutData.License_GPL
    copyright   = ki18n ("(c) 2009 Andrew Stromme")
    text        = ki18n ("none")
    homePage    = "http://blog.chatonka.com"
    bugEmail    = "[email protected]"

    aboutData   = KAboutData (appName, catalog, programName, version, description,
                                license, copyright, text, homePage, bugEmail)


    KCmdLineArgs.init (sys.argv, aboutData)

    app = KApplication ()
    mainWindow = MainWindow ()
    mainWindow.show ()
    app.exec_ ()
Walking through the code example
Importing Libraries
Lets go through this example to try and understand it. First we import the libraries that are needed to make it all work. Most of the Qt and KDE ones should be familiar to you, but to get dbus we need the one at the end: "import dbus".
DBus Initialization
Now we have imported our libraries, we need to write our main window. In the __init__ (constructor, for the C++ people here) method, we set up the dbus connections:
        self.sessionBus = dbus.SessionBus()
        self.powerdevil = self.sessionBus.get_object('org.freedesktop.PowerManagement',
                      '/modules/powerdevil')
Because the org.freedesktop.PowerManagement is on the Session Bus, we create an object self.sessionBus that represents that bus. We also grab our powerdevil Object via its path /moddules/powerdevil. We can now call methods on the object, but first we need to set up the gui framework, a button and its connection (via Qt signals/slots) to a python method that will call the dbus method.
Layout and Buttons
        self.layout = QBoxLayout(QBoxLayout.TopToBottom, self)
        self.setLayout(self.layout)

        label = QLabel ("This is a simple PyKDE4 program", self)
        self.layout.addWidget(label)

        button = QPushButton("Push to turn off screen!", self)
        self.layout.addWidget(button)
        QObject.connect(button, SIGNAL("clicked()"), self.screenOff)
If you need help understanding the above, you should consult the reading list linked at the top of this page.
Calling DBus Methods
We now need to define the self.screenOff method that we have just connected to the button.
    def screenOff(self):
      self.powerdevil.turnOffScreen(dbus_interface='org.kde.PowerDevil')
It's relatively simple. We call the method turnOffScreen() on our powerdevil object (the method turnOffScreen was shown on the interface org.kde.PowerDevil in qdbusviewer)
The rest of the application sets up the KDE app and populates it with author/name info. Again, if you need help with that, see the other reading linked to from the top of this tutorial.
Congratulations, you should now have an applet that lets you turn off your screen at the push of a button.
