User:Aidosl/Python Hello World: Difference between revisions
m Code formatting |
Hi Aidosl, I found out that this page got blanked and I am notifying everybody and chaning links to similar pages. |
||
| (One intermediate revision by one other user not shown) | |||
| Line 10: | Line 10: | ||
{{tip|To get more information about any class you come across, Konqueror offers a quick shortcut. So to look for information about KMessageBox, just type "kde:kmessagebox" into Konqueror and you'll be taken to the documentation.}} | {{tip|To get more information about any class you come across, Konqueror offers a quick shortcut. So to look for information about KMessageBox, just type "kde:kmessagebox" into Konqueror and you'll be taken to the documentation.}} | ||
{{tip|You might want to use | {{tip|You might want to use an IDE for your projects, which does many nice things like code completion, easy access to API documentation or debugging support. | ||
Read [[Getting_Started/ | Read [[Getting_Started/Using_an_IDE_with_KDE4|this tutorial]] to set up an IDE correctly for this task. You probably want to check if the setup is working by testing opening an existing KDE 4 application first. | ||
}} | }} | ||
Latest revision as of 10:15, 25 September 2011
| Tutorial Series | Beginner Tutorial |
| Previous | Python, Qt, KDE4 development environment |
| What's Next | n/a |
| Further Reading | n/a |
Abstract
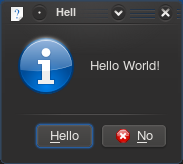
Your first program shall greet the world with a friendly "Hello World", what else? For that, we will use a KMessageBox and customise one of the buttons.


The Code
All the code we need will be in one file, tutorial1.py. Create that file with the code below:
- !/usr/bin/env python
- -*- coding: utf-8 -*-
import sys
from PyQt4.QtCore import QString
from PyKDE4.kdecore import ki18n, KCmdLineArgs, KAboutData, i18n
from PyKDE4.kdeui import KApplication, KGuiItem, KMessageBox
- The program name used internally
appName = "python-kde-tutorial1"
- The message catalog name
- If Null, program name is used instead
catalog = ""
- A displayable program name string
programName = ki18n("PyKDE Tutorial 1")
- The program version string
version = "1.0"
- Short description of what the app does
description = ki18n("Displays a KMessageBox popup")
- The license this code is released under
license = KAboutData.License_GPL
- Copyright statement
copyright = ki18n("(c) 2008")
- Optional text shown in the About box.
- Can contain any information desired.
text = ki18n("Some text...")
- The program homepage string
homePage = "techbase.kde.org"
- The bug report e-mail address
bugEmail = "[email protected]"
- Now we have to pass all that data in KAboutData
aboutData = KAboutData (
	appName,
	catalog,
	programName,
	version,
	description,
	license,
	copyright,
	text,
	homePage,
	bugEmail
)
KCmdLineArgs.init(sys.argv, aboutData)
app = KApplication()
yesButton = KGuiItem(
	i18n("Hello"),
	QString(),
	i18n("This is a tooltip."),
	i18n("This is a WhatsThis help text.")
)
KMessageBox.questionYesNo(
	None,
	i18n("Hello World!"),
	i18n("Hello"),
	yesButton
)
sys.exit(0)
The first KDE specific code we come across in this program is KAboutData. This is the class used to store information about the program such as a short description, authors or license information. Pretty much every KDE application should use this class.
Then we come to KCmdLineArgs. This is the class one would use to specify command line switches to, for example, open the program with a specific file. However, in this tutorial, we simply initialise it with the KAboutData object we created so we can use the --version or --author switches.
Then we create a KApplication object. This needs to be done exactly once in each program since it is needed for things such as i18n.
Now we've done all the necessary KDE setup, we can move on to doing interesting things with our application. We're going to create a popup box but we're going to customise one of the buttons. To do this customisation, we need to use a KGuiItem object. The first argument in the KGuiItem constructor is the text that will appear on the item (in our case, a button). Then we have an option of setting an icon for the button but we don't want one so we just give it QString(). We then set the tooltip (what appears when you hover over an item) and finally the "What's This?" (accessed through right-clicking or Shift-F1) text.
Now we have our item, we can create our popup. We call the KMessageBox.questionYesNo() function which, by default, creates a message box with a "Yes" and a "No" button. The second argument is the text that will appear in the message box above the buttons. The third is the caption the window will have and finally we set the KGuiItem for (what would normally be) the "Yes" button to the KGuiItem we created.
Note that all user-visible text is passed through the i18n() function; this is necessary for the UI to be translatable. More information on localization can be found in the localization tutorial.
We're all done as far as the code is concerned. Now to try it out. Launch it with:
python tutorial1.py
or make it executable and use:
./tutorial1.py
