Marble/MarblePythonSignalsSlots: Difference between revisions
No edit summary |
m Ochurlaud moved page Projects/Marble/MarblePythonSignalsSlots to Marble/MarblePythonSignalsSlots |
(No difference)
| |
Latest revision as of 21:01, 10 March 2016
| Tutorial Series | Marble Python Tutorial |
| Previous | Tutorial 2 - Changing basic map properties |
| What's Next | Tutorial 4 - Loading KML files into Marble |
| Further Reading | n/a |
Creating a window with controls

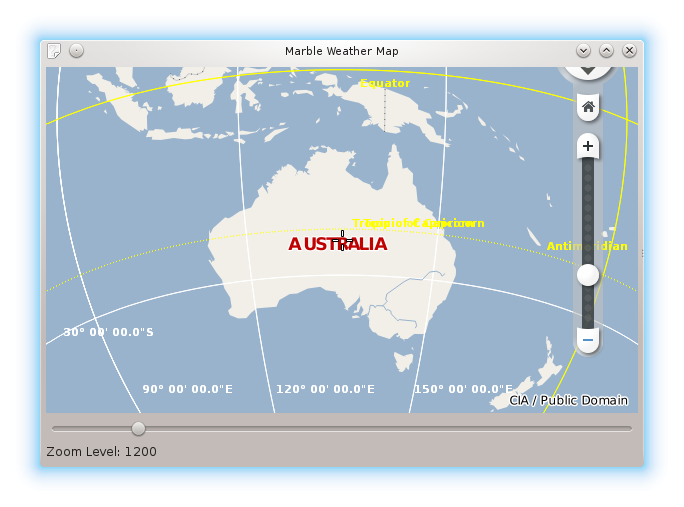
We'd like to add other widgets to our Marble window: A zoom slider and a label that shows the current zoom level of the map.
In order to achieve this we need to create a vertical layout. The layout must be added as the central widget to the application, and have the map, slider and label added to it. Also we zoom the globe to the slider's default value using the marble.zoomView(int) method.
We want to center our globe onto South America. So we create a new GeoDataCoordinates object that takes the longitude and the latitude as a parameter and we call marble.centerOn(location).
As you might have realized already GeoDataCoordinates is the geodetic "sister" of QPoint. They share a very similar API. Additionally GeoDataCoordinates features a nice set of string conversion methods (GeoDataCoordinates.fromString(), GeoDataCoordinates.lonToString() and GeoDataCoordinates.latToString()). They are used in various places inside Marble such as the signal MarbleWidget.mouseMoveGeoPosition(string) .
Finally we connect the signals and slots that MarbleWidget offers to the signals and slots of the slider and the label (and the label, through a custom method that prefixes the string 'Zoom Level:'):
#!/usr/bin/env python
from PyQt4.QtCore import *
from PyQt4.QtGui import *
from PyKDE4.marble import *
import sys


class MainWindow():
    def __init__(self):
        # create the app
        app = QApplication(sys.argv)

        # create the main window and set it's title
        window = QWidget()
        window.setWindowTitle("Marble Map with Controls")

        # create the marble widget
        marble = Marble.MarbleWidget()

        # Load the OpenStreetMap map
        marble.setMapThemeId("earth/plain/plain.dgml")

        # Enable the cloud cover and enable the country borders
        marble.setShowClouds(True)
        marble.setShowBorders(True)

        # Hide the FloatItems: Compass and StatusBar
        marble.setShowOverviewMap(False)
        marble.setShowScaleBar(False)
        marble.setShowCompass(False)

        # Change the map to center on Australia
        home = Marble.GeoDataCoordinates(135.0, -25.0, 0.0, Marble.GeoDataCoordinates.Degree)
        marble.centerOn(home)

        # create the slider
        zoomSlider = QSlider(Qt.Horizontal)
        # set the limits of the slider
        zoomSlider.setMinimum(1000)
        zoomSlider.setMaximum(2400)
        # set a default zoom value
        zoomSlider.setValue(1200)

        # zoom the map
        marble.zoomView(zoomSlider.value())

        # create the position label
        self.zoomLabel = QLabel()
        # show the current zoom level
        self.setZoomLabel(zoomSlider.value())

        # make elements size correctly
        self.zoomLabel.setSizePolicy(QSizePolicy.Preferred, QSizePolicy.Fixed)

        # create the layout
        layout = QVBoxLayout()

        # add all the components
        layout.addWidget(marble)
        layout.addWidget(zoomSlider)
        layout.addWidget(self.zoomLabel)

        # make the layout placeholder the central widget
        window.setLayout(layout)

        # connect slider value to map zoom via signal slots
        app.connect(zoomSlider, SIGNAL('valueChanged(int)'), marble.zoomView)

        # display the zoom level on the label, but pass it though the
        # custom self.setZoomLabel function to add prefix text
        app.connect(marble, SIGNAL('zoomChanged(int)'), self.setZoomLabel)

        # resize the window
        window.resize(600, 400)

        # display the app
        window.show()

        app.exec_()

    def setZoomLabel(self, value):
        self.zoomLabel.setText("Zoom Level: " + str(value))

MainWindow()
Save the code above as marble_controls.py and run it:
python marble_controls.py
If things go fine, you end up with a map application along with a slider and label below it. The map should be centered on Australia and have a zoom level of 1200 to start with:

