Development/Architecture/KDE3/Low-level Graphics: Difference between revisions
Neverendingo (talk | contribs) m Text replace - "</code>" to "</syntaxhighlight>" |
|||
| (3 intermediate revisions by 3 users not shown) | |||
| Line 17: | Line 17: | ||
So, it is possible to reuse the rendering code you use for displaying a widget for printing, with the same features supported. Of course, in practice, the code is used in a slightly different context. Drawing on a widget is almost exclusively done in the <tt>paintEvent()</tt> method of a widget class. | So, it is possible to reuse the rendering code you use for displaying a widget for printing, with the same features supported. Of course, in practice, the code is used in a slightly different context. Drawing on a widget is almost exclusively done in the <tt>paintEvent()</tt> method of a widget class. | ||
< | <syntaxhighlight lang="cpp-qt"> | ||
void FooWidget::paintEvent() | void FooWidget::paintEvent() | ||
{ | { | ||
| Line 24: | Line 24: | ||
// Use painter | // Use painter | ||
} | } | ||
</ | </syntaxhighlight> | ||
When drawing on a printer, you have to make sure to use <tt>QPrinter::newPage()</tt> to finish with a page and begin a new one - something that naturally is not relevant for painting widgets. Also, when printing, you may want to use the | When drawing on a printer, you have to make sure to use <tt>QPrinter::newPage()</tt> to finish with a page and begin a new one - something that naturally is not relevant for painting widgets. Also, when printing, you may want to use the | ||
Latest revision as of 20:49, 29 June 2011
Qt's low level imaging model is based on the capabilities provided by X11 and other windowing systems for which Qt ports exist. But it also extends these by implementing additional features such as arbitrary affine transformations for text and pixmaps.
Rendering with QPainter
The central graphics class for 2D painting with Qt is QPainter. It can draw on a QPaintDevice. There are three possible paint devices implemented: One is QWidget which represents a widget on the screen. The second is QPrinter which represents a printer and produces Postscript output. The third it the class QPicture which records paint commands and can save them on disk and play them back later. A possible storage format for paint commands is the W3C standard SVG.
So, it is possible to reuse the rendering code you use for displaying a widget for printing, with the same features supported. Of course, in practice, the code is used in a slightly different context. Drawing on a widget is almost exclusively done in the paintEvent() method of a widget class.
void FooWidget::paintEvent()
{
    QPainter p(this);
    // Setup painter
    // Use painter
}
When drawing on a printer, you have to make sure to use QPrinter::newPage() to finish with a page and begin a new one - something that naturally is not relevant for painting widgets. Also, when printing, you may want to use the device metrics in order to compute coordinates.
Transformations
By default, when using the QPainter, it draws in the natural coordinate system of the device used. This means, if you draw a line along the horizontal axis with a length of 10 units, it will be painted as a horizontal line on the screen with a length of 10 pixels. However, QPainter can apply arbitrary affine transformations before actually rendering shapes and curves. An affine transformation maps the x and y coordinates linearly into x' and y' according to
$ {\begin{pmatrix}x'\\y'\\1\end{pmatrix}}={\begin{pmatrix}m_{1}1&m_{1}2&0\\m_{2}1&m_{2}2&0\\dx&dy&1\\\end{pmatrix}}{\begin{pmatrix}x\\y\\1\end{pmatrix}} $
Formula for affine transformation
The 3x3 matrix in this equation can be set with QPainter::setWorldMatrix() and is of type QWMatrix. Normally, this is the identity matrix, i.e. m11 and m22 are one, and the other parameters are zero. There are basically three different groups of transformations:
- Translations: These move all points of an object by a fixed amount in some direction. A translation matrix can be obtained by calling method m.translate(dx, dy) for a QWMatrix. This corresponds to the matrix
$ {\begin{pmatrix}1&0&0\\0&1&0\\dx&dy&1\end{pmatrix}} $
Formula for translating transformation
- Scaling: These stretch or shrink the coordinates of an object, making it bigger or smaller without distorting it. A scaling transformation can be applied to a QWMatrix by calling m.scale(sx, sy). By setting one of the parameters to a negative value, one can achieve a mirroring of the coordinate system. The corresponding matrix looks like this
$ {\begin{pmatrix}sx&0&0\\0&sy&0\\0&0&1\end{pmatrix}} $
Formula for scaling transformation
- Shearing: A distortion of the coordinate system with two parameters. A shearing transformation can be applied by calling m.shear(sh, sv), corresponding to the matrix
$ {\begin{pmatrix}1&sv&0\\sh&1&0\\0&0&1\end{pmatrix}} $
Formula for shearing transformation
- Rotating: This rotates an object. A rotation transformation can be applied by calling m.rotate(alpha). Note that the angle has to be given in degrees, not as mathematical angle! Notate that a rotation is equivalent with a combination of scaling and shearing. The corresponding matrix is
$ {\begin{pmatrix}\cos {\alpha }&\sin {\alpha }&0\\-\sin {\alpha }&\cos {\alpha }&0\\0&0&1\end{pmatrix}} $
Formula for rotating transformation
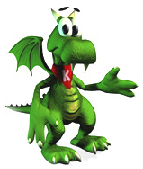
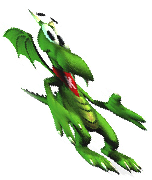
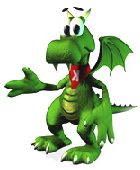
Here are some pictures that show the effect of the elementary transformation to our mascot:
 |
 |
 |
 |
Transformations can be combined by multiplying elementary matrices. Note that matrix operations are not commutative in general, and therefore the combined effect of of a concatenation depends on the order in which the matrices are multiplied.
Setting stroking attributes
The rendering of lines, curves and outlines of polygons can be modified by setting a special pen with QPainter::setPen(). The argument of this function is a QPen object. The properties stored in it are a style, a color, a join style and a cap style.
The pen style is member of the enum Qt::PenStyle. and can take one of the following values:

The join style is a member of the enum Qt::PenJoinStyle. It specifies how the junction between multiple lines which are attached to each other is drawn. It takes one of the following values:
The cap style is a member of the enum Qt::PenCapStyle and specifies how the end points of lines are drawn. It takes one of the values from the following table:
Setting fill attributes
The fill style of polygons, circles or rectangles can be modified by setting a special brush with QPainter::setBrush() This function takes a QBrush object as argument. Brushes can be constructed in four different ways:
- QBrush::QBrush() - This creates a brush that does not fill shapes.
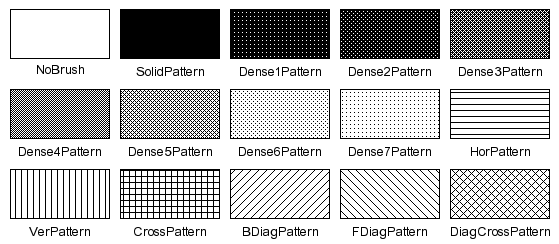
- QBrush::QBrush(BrushStyle) - This creates a black brush with one of the default patterns shown below.
- QBrush::QBrush(const QColor &, BrushStyle) - This creates a colored brush with one of the patterns shown below.
- QBrush::QBrush(const QColor &, const QPixmap) - This creates a colored brush with the custom pattern you give as second parameter.
A default brush style is from the enum Qt::BrushStyle. Here is a picture of all predefined patterns:

A further way to customize the brush behavior is to use the function QPainter::setBrushOrigin().
Colors
Colors play a role both when stroking curves and when filling shapes. In Qt, colors are represented by the class QColor. Qt does not support advanced graphics features like ICC color profiles and color correction. Colors are usually constructed by specifying their red, green and blue components, as the RGB model is the way pixels are composed of on a monitor.
It is also possible to use hue, saturation and value. This HSV representation is what you use in the Gtk color dialog, e.g. in GIMP. There, the hue corresponds to the angle on the color wheel, while the saturation corresponds to the distance from the center of the circle. The value can be chosen with a separate slider.
Other settings
Normally, when you paint on a paint device, the pixels you draw replace those that were there previously. This means, if you paint a certain region with a red color and paint the same region with a blue color afterwards, only the blue color will be visible. Qt's imaging model does not support transparency, i.e. a way to blend the painted foreground with the background. However, there is a simple way to combine background and foreground with boolean operators. The method QPainter::setRasterOp() sets the used operator, which comes from the enum RasterOp.
The default is CopyROP which ignores the background. Another popular choice is XorROP. If you paint a black line with this operator on a colored image, then the covered area will be inverted. This effect is for example used to create the rubberband selections in image manipulation programs known as "marching ants".
Drawing graphics primitives
In the following we list the elementary graphics elements supported by QPainter. Most of them exist in several overloaded versions which take a different number of arguments. For example, methods that deal with rectangles usually either take a QRect as an argument or a set of four integers.
- Drawing a single point - drawPoint().
- Drawing lines - drawLine(), drawLineSegments() and drawPolyLine().
- Drawing and filling rectangles - drawRect(), drawRoundRect(), fillRect() and eraseRect().
- Drawing and filling circles, ellipses and parts or them - drawEllipse(), drawArc(), drawPie() and drawChord().
- Drawing and filling general polygons - drawPolygon().
- Drawing bezier curves - drawQuadBezier() [drawCubicBezier() in Qt 3.0].
Drawing pixmaps and images
Qt provides two very different classes to represent images.
QPixmap directly corresponds to the pixmap objects in X11. Pixmaps are server-side objects and may - on a modern graphics card - even be stored directly in the card's memory. This makes it very efficient to transfer pixmaps to the screen. Pixmaps also act as an off-screen equivalent of widgets - the QPixmap class is a subclass of QPaintDevice, so you can draw on it with a QPainter. Elementary drawing operations are usually accelerated by modern graphics. Therefore, a common usage pattern is to use pixmaps for double buffering. This means, instead of painting directly on a widget, you paint on a temporary pixmap object and use the bitBlt function to transfer the pixmap to the widget. For complex repaints, this helps to avoid flicker.
In contrast, QImage objects live on the client side. Their emphasis in on providing direct access to the pixels of the image. This makes them of use for image manipulation, and things like loading and saving to disk (QPixmap's load() method takes QImage as intermediate step). On the other hand, painting an image on a widget is a relatively expensive operation, as it implies a transfer to the X server, which can take some time, especially for large images and for remote servers. Depending on the color depth, the conversion from QImage to QPixmap may also require dithering.
Drawing text
Text can be drawn with one of the overloaded variants of the method QPainter::drawText(). These draw a QString either at a given point or in a given rectangle, using the font set by QPainter::setFont(). There is also a parameter which takes an ORed combination of some flags from the enums Qt::AlignmentFlags and Qt::TextFlags
Beginning with version 3.0, Qt takes care of the complete text layout even for languages written from right to left.
A more advanced way to display marked up text is the QSimpleRichText class. Objects of this class can be constructed with a piece of text using a subset of the HTML tags, which is quite rich and provides even tables. The text style can be customized by using a QStyleSheet (the documentation of the tags can also be found here). Once the rich text object has been constructed, it can be rendered on a widget or another paint device with the QSimpleRichText::draw() method.
Initial Author: Bernd Gehrmann


