Archive:Development/Tutorials/Qt4 Ruby Tutorial/Chapter 12 (zh TW): Difference between revisions
No edit summary |
No edit summary |
||
| Line 9: | Line 9: | ||
pre=[[Development/Tutorials/Qt4_Ruby_Tutorial/Chapter_11_(zh_TW)|教學 11 - Giving It a Shot]]| | pre=[[Development/Tutorials/Qt4_Ruby_Tutorial/Chapter_11_(zh_TW)|教學 11 - Giving It a Shot]]| | ||
next=[[Development/Tutorials/Qt4_Ruby_Tutorial/ | next=[[Development/Tutorials/Qt4_Ruby_Tutorial/Chapter_13_(zh_TW)|教學 13 - Game Over]] | ||
}} | }} | ||
== Hanging in the Air the Way Bricks Don't == | == Hanging in the Air the Way Bricks Don't == | ||
| Line 104: | Line 104: | ||
這個函式會在新的隨機位置建立一個目標中心點。 | 這個函式會在新的隨機位置建立一個目標中心點。 | ||
我們建立了 [http://doc.qt.nokia.com/latest/qtime.html Qt::Time] 物件 '''<tt>midnight</tt>''',代表時間00:00:00。接下來,我們取出從午夜到目前為止經過的秒數,並使用它作為亂數子(random seed)。請參閱文件 [http://doc.qt.nokia.com/latest/qdate.html Qt::Date]、[http://doc.qt.nokia.com/latest/qtime.html Qt::Time] 和[http://doc.qt.nokia.com/latest/qdatetime.html Qt::DateTime] 以取得更多資訊。 | |||
最後,我們計算出目標的中心點。我們保持它在 widget 的底邊為 y 值0,讓 y 值向上增加,x 是正常的左側邊緣為0,以及右側增加x值的坐標系統中的矩形(x=200,y=35,寬=190,高=255。換句話說,可能的 x 和 y 值分別是200至389和35至289)。 | |||
通過實驗我們發現這樣砲彈都可以擊中。 | |||
<code ruby> | <code ruby> | ||
| Line 118: | Line 118: | ||
</code> | </code> | ||
來自前面章節的這部分計時器事件並沒有改變。 | |||
<code ruby> | <code ruby> | ||
| Line 126: | Line 126: | ||
</code> | </code> | ||
這個 '''<tt>if</tt>''' 敘述檢查砲彈矩形是否與目標矩形相交。如果是這樣,砲彈會擊中了目標(哎喲!)。我們停止射擊計時器,並發出 '''<tt>hit()</tt>''' 訊號來告訴外界目標被摧毀,並且返回。請注意,我們可以在這個點上建立一個新的目標,但是因為 '''<tt>CannonField</tt>''' 是一個組件,我們把這樣的決定留給組件的使用者。 | |||
<code ruby> | <code ruby> | ||
| Line 134: | Line 134: | ||
</code> | </code> | ||
這與前面章節是一樣的,但它現在發出 '''<tt>missed()</tt>''' 訊號來告訴外界射擊失敗。 | |||
<code ruby> | <code ruby> | ||
| Line 145: | Line 145: | ||
</code> | </code> | ||
而函式的剩下部分與之前一樣。 | |||
'''<tt>CannonField::paintEvent()</tt>''' | '''<tt>CannonField::paintEvent()</tt>''' 和之前相同,除了加入這個: | ||
<code ruby> | <code ruby> | ||
paintTarget(painter) | paintTarget(painter) | ||
</code> | </code> | ||
這行可以確保在必要時目標也會畫出。 | |||
<code ruby> | <code ruby> | ||
| Line 162: | Line 163: | ||
</code> | </code> | ||
這個函式繪製目標;一個填充了紅色和黑色外框的長方形。 | |||
<code ruby> | <code ruby> | ||
| Line 172: | Line 173: | ||
</code> | </code> | ||
這個私有函式返回封裝目標的矩形。還記得取自 '''<tt>newTarget()</tt>''' 的 '''<tt>target</tt>''' 點使用 widget 的底部為 y 坐標0。,我們在呼叫 [http://doc.qt.nokia.com/latest/qrect.html#moveCenter Qt::Rect::moveCenter()] 之前,在 widget 坐標中計算這個點。 | |||
我們之所以選擇這個坐標映射(coordinate mapping)是為了要固定目標和 widget 底部之間的距離。請記住,使用者或程式可以在任何時候改變 widget 大小。 | |||
'''[http://www.darshancomputing.com/qt4-qtruby-tutorial/tutorial/t12/t12.rb t12.rb]''' | '''[http://www.darshancomputing.com/qt4-qtruby-tutorial/tutorial/t12/t12.rb t12.rb]''' | ||
'''<tt>MyWidget</tt>''' 類別中沒有新的成員。但我們現在稍微修改建構子來設定新的 '''<tt>LCDRange</tt>''' 文字標籤。 | |||
<code ruby> | <code ruby> | ||
| Line 184: | Line 185: | ||
</code> | </code> | ||
我們設定了角度文字標籤為「ANGLE」。 | |||
<code ruby> | <code ruby> | ||
| Line 190: | Line 191: | ||
</code> | </code> | ||
我們設定了力量文字標籤為「FORCE」。 | |||
===執行應用程式=== | ===執行應用程式=== | ||
'''<tt>LCDRange</tt>''' widgets 看起來有點怪:當 '''<tt>MyWidget</tt>''' 大小改變時,[http://doc.qt.nokia.com/latest/qvboxlayout.html Qt::VBoxLayout] 內建的佈局管理給標籤太多的空間了,其它的就不夠用;使得兩個 '''<tt>LCDRange</tt>''' widget 之間的空間改變大小。我們將在下一章修正。 | |||
===練習=== | ===練習=== | ||
做一個作弊按鈕。當按下時,使 '''<tt>CannonField</tt>''' 顯示5秒的射擊軌跡。 | |||
如果你做了前一章的「圓形砲彈」練習,請嘗試把 '''<tt>shotRect()</tt>''' 更改為返回[http://doc.qt.nokia.com/latest/qregion.html Qt::Region] 的 '''<tt>shotRegion()</tt>''',這樣你就可以有相當精確的碰撞檢測。 | |||
做一個移動的目標。 | |||
請確保目標建立時,總是完整的在螢幕上。 | |||
請確保這個 widget 不能調整大小,以免目標變成不可見的。[提示:[http://doc.qt.nokia.com/latest/qwidget.html#minimumSize-prop Qt::Widget::setMinimumSize()] 是你的好朋友。] | |||
這不太容易。同一時間有多個砲彈在空中。[提示:建立 '''<tt>Shot</tt>''' 類別。] | |||
[[Category:Ruby]] | [[Category:Ruby]] | ||
Revision as of 03:28, 16 January 2010
Template:I18n/Language Navigation Bar (zh TW)
Template:TutorialBrowser (zh TW)
Hanging in the Air the Way Bricks Don't

檔案:
概覽
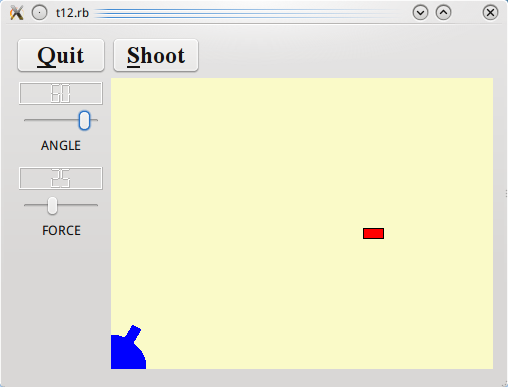
在這個範例中,我們擴充我們的 LCDRange 類別來包含一個文字標籤。我們還提供一些用來射擊的目標。
一行一行的瀏覽
def initialize(s, parent = nil)
 super(parent)
 init()
 setText(s)
end
這個建構子先呼叫 init(),然後設定標籤文字。init() 是一個執行大部分初始化的獨立函式,因為在原來的C++版本中是函式重載。
def init()
 lcd = Qt::LCDNumber.new(2)
 lcd.setSegmentStyle(Qt::LCDNumber::Filled)
 @slider = Qt::Slider.new(Qt::Horizontal)
 @slider.setRange(0, 99)
 @slider.setValue(0)
 @label = Qt::Label.new()
 @label.setAlignment(Qt::AlignHCenter.to_i | Qt::AlignTop.to_i)
 connect(@slider, SIGNAL('valueChanged(int)'),
 lcd, SLOT('display(int)'))
 connect(@slider, SIGNAL('valueChanged(int)'),
 self, SIGNAL('valueChanged(int)'))
 layout = Qt::VBoxLayout.new()
 layout.addWidget(lcd)
 layout.addWidget(@slider)
 layout.addWidget(@label)
 setLayout(layout)
setFocusProxy(@slider)
end
lcd 的結構和前面章節的 slider 是一樣的。接下來,我們建立一個 Qt::Label,並告訴它以水平置中和與垂直向上的方式對齊內容。Qt::Object::connect() 呼叫也取自前面章節。
def setText(s)
@label.setText(s)
end
這個函式設定標籤文字。
CannonField 現在有兩個新的訊號:hit() 和 missed()。此外,它還多了一個目標。
signals 'hit()', 'missed()' #...
一旦砲彈擊中了目標,hit() 訊號就會被發出。而當砲彈越過了 widget 右側或底部的邊緣,missed() 訊號就會被發出(換言之,可以肯定的是它不會命中目標)。
newTarget()
這行已經加入到建構子中。它為目標建立了一個「隨機」的位置。事實上,newTarget() 函式將嘗試畫出目標。因為我們是在建構子中,CannonField widget 是不可見的。Qt 保證在一個隱藏的 widget 中呼叫Qt::Widget::update() 是無害。
@@first_time = true
def newTarget()
 if @@first_time
   @@first_time = false
   midnight = Qt::Time.new(0, 0, 0)
   srand(midnight.secsTo(Qt::Time.currentTime()))
 end
 @target = Qt::Point.new(200 + rand(190), 10 + rand(255))
 update()
end
這個函式會在新的隨機位置建立一個目標中心點。
我們建立了 Qt::Time 物件 midnight,代表時間00:00:00。接下來,我們取出從午夜到目前為止經過的秒數,並使用它作為亂數子(random seed)。請參閱文件 Qt::Date、Qt::Time 和Qt::DateTime 以取得更多資訊。
最後,我們計算出目標的中心點。我們保持它在 widget 的底邊為 y 值0,讓 y 值向上增加,x 是正常的左側邊緣為0,以及右側增加x值的坐標系統中的矩形(x=200,y=35,寬=190,高=255。換句話說,可能的 x 和 y 值分別是200至389和35至289)。
通過實驗我們發現這樣砲彈都可以擊中。
def moveShot()
 region = Qt::Region.new(shotRect())
 @timerCount += 1
shotR = shotRect()
來自前面章節的這部分計時器事件並沒有改變。
if shotR.intersects(targetRect())
 @autoShootTimer.stop()
 emit hit()
這個 if 敘述檢查砲彈矩形是否與目標矩形相交。如果是這樣,砲彈會擊中了目標(哎喲!)。我們停止射擊計時器,並發出 hit() 訊號來告訴外界目標被摧毀,並且返回。請注意,我們可以在這個點上建立一個新的目標,但是因為 CannonField 是一個組件,我們把這樣的決定留給組件的使用者。
elsif shotR.x() > width() || shotR.y() > height()
 @autoShootTimer.stop()
 emit missed()
這與前面章節是一樣的,但它現在發出 missed() 訊號來告訴外界射擊失敗。
 else
   region = region.unite(Qt::Region.new(shotR))
 end

 update(region)
end
而函式的剩下部分與之前一樣。
CannonField::paintEvent() 和之前相同,除了加入這個:
paintTarget(painter)
這行可以確保在必要時目標也會畫出。
def paintTarget(painter)
 painter.setBrush(Qt::Brush.new(Qt::red))
 painter.setPen(Qt::Pen.new(Qt::Color.new(Qt::black)))
 painter.drawRect(targetRect())
end
這個函式繪製目標;一個填充了紅色和黑色外框的長方形。
def targetRect()
 result = Qt::Rect.new(0, 0, 20, 10)
 result.moveCenter(Qt::Point.new(@target.x(), height() - 1 - @target.y()))
 return result
end
這個私有函式返回封裝目標的矩形。還記得取自 newTarget() 的 target 點使用 widget 的底部為 y 坐標0。,我們在呼叫 Qt::Rect::moveCenter() 之前,在 widget 坐標中計算這個點。
我們之所以選擇這個坐標映射(coordinate mapping)是為了要固定目標和 widget 底部之間的距離。請記住,使用者或程式可以在任何時候改變 widget 大小。
MyWidget 類別中沒有新的成員。但我們現在稍微修改建構子來設定新的 LCDRange 文字標籤。
angle = LCDRange.new(tr('ANGLE'))
我們設定了角度文字標籤為「ANGLE」。
force = LCDRange.new(tr('FORCE'))
我們設定了力量文字標籤為「FORCE」。
執行應用程式
LCDRange widgets 看起來有點怪:當 MyWidget 大小改變時,Qt::VBoxLayout 內建的佈局管理給標籤太多的空間了,其它的就不夠用;使得兩個 LCDRange widget 之間的空間改變大小。我們將在下一章修正。
練習
做一個作弊按鈕。當按下時,使 CannonField 顯示5秒的射擊軌跡。
如果你做了前一章的「圓形砲彈」練習,請嘗試把 shotRect() 更改為返回Qt::Region 的 shotRegion(),這樣你就可以有相當精確的碰撞檢測。
做一個移動的目標。
請確保目標建立時,總是完整的在螢幕上。
請確保這個 widget 不能調整大小,以免目標變成不可見的。[提示:Qt::Widget::setMinimumSize() 是你的好朋友。]
這不太容易。同一時間有多個砲彈在空中。[提示:建立 Shot 類別。]
