Archive:Development/Tutorials/Qt4 Ruby Tutorial/Chapter 11 (zh TW): Difference between revisions
No edit summary |
No edit summary |
||
| Line 9: | Line 9: | ||
pre=[[Development/Tutorials/Qt4_Ruby_Tutorial/Chapter_10_(zh_TW)|教學 10 - Smooth as Silk]]| | pre=[[Development/Tutorials/Qt4_Ruby_Tutorial/Chapter_10_(zh_TW)|教學 10 - Smooth as Silk]]| | ||
next=[[Development/Tutorials/Qt4_Ruby_Tutorial/ | next=[[Development/Tutorials/Qt4_Ruby_Tutorial/Chapter_12_(zh_TW)|教學 12 - Hanging in the Air the Way Bricks Don't]] | ||
}} | }} | ||
== Giving It a Shot == | == Giving It a Shot == | ||
| Line 82: | Line 82: | ||
它的工作是計算新的位置、更新螢幕上的砲彈到新的位置,並且在必要時停止計時器。 | 它的工作是計算新的位置、更新螢幕上的砲彈到新的位置,並且在必要時停止計時器。 | ||
首先,我們建立一個 [http://doc.qt.nokia.com/latest/qregion.html Qt::Region] 來保留舊的 '''<tt>shotRect()</tt>''' | 首先,我們建立一個 [http://doc.qt.nokia.com/latest/qregion.html Qt::Region] 來保留舊的 '''<tt>shotRect()</tt>'''。[http://doc.qt.nokia.com/latest/qregion.html Qt::Region] 有保留任何區域種類的能力,而我們將在這裡用它來簡化繪圖。'''<tt>shotRect()</tt>''' 會返回砲彈現在位置的矩形。這在稍後會詳細解釋。 | ||
然後我們遞增 '''<tt>timerCount</tt>''',它影響砲彈沿彈道移動的每一步。 | |||
接下來,我們取得新的砲彈矩形。 | |||
如果砲彈已經越過 widget 右側或底部邊界,那麼我們停止計時器,否則我們加入新的 '''<tt>shotRect()</tt>''' 到 [http://doc.qt.nokia.com/latest/qregion.html Qt::Region]。 | |||
最後,我們重繪 [http://doc.qt.nokia.com/latest/qregion.html Qt::Region]。這將發出只有一、兩個矩形需要更新的單一的繪圖事件。 | |||
<code ruby> | <code ruby> | ||
| Line 105: | Line 105: | ||
</code> | </code> | ||
繪圖事件函式比起前面的章節已經簡化。大部分的邏輯操作已經移動到新的 '''<tt>paintShot()</tt>''' 和 '''<tt>paintCannon()</tt>''' 函式。 | |||
<code ruby> | <code ruby> | ||
| Line 115: | Line 115: | ||
</code> | </code> | ||
這個私有函式畫出一個黑色填充矩形作為砲彈。 | |||
我們省略了 '''<tt>paintCannon()</tt>''' 的實作,它和前面章節 [http://doc.qt.nokia.com/latest/qwidget.html#paintEvent Qt::Widget::paintEvent()] 的重新實作相同。 | |||
<code ruby> | <code ruby> | ||
| Line 140: | Line 140: | ||
</code> | </code> | ||
這個私有函式計算砲彈的中心點,並且返回封裝砲彈的矩形。除了隨時間推移而增加的 '''<tt>timerCount</tt>''' 外,它還使用加農砲起始的力量和角度。 | |||
這個公式使用的是重力場中無摩擦運動的標準牛頓公式。為簡單起見,我們選擇忽略任何愛因斯坦效應(Einstein effect)。 | |||
我們在y坐標向上增加的坐標系統中計算中心點。在我們計算出中心點後,我們建構一個大小為6×6的 [http://doc.qt.nokia.com/latest/qrect.html Qt::Rect] 並移動它的中心點到算出的中心點之上。藉由相同的操作,我們把這個點轉換成 widget 的坐標系統(參閱[http://doc.qt.nokia.com/latest/coordsys.html 坐標系統])。 | |||
'''[http://www.darshancomputing.com/qt4-qtruby-tutorial/tutorial/t11/t11.rb t11.rb]''' | '''[http://www.darshancomputing.com/qt4-qtruby-tutorial/tutorial/t11/t11.rb t11.rb]''' | ||
唯一增加的是 <strong>Shoot</strong> 按鈕。 | |||
<code ruby> | <code ruby> | ||
| Line 155: | Line 155: | ||
</code> | </code> | ||
在建構子中,我們建立並設定了 <strong>Shoot</strong> 按鈕,就像我們為 <strong>Quit</strong> 按鈕作的。 | |||
<code ruby> | <code ruby> | ||
| Line 161: | Line 161: | ||
</code> | </code> | ||
連接 <strong>Shoot</strong> 按鈕的 '''<tt>clicked()</tt>''' 訊號,到'''<tt>CannonField</tt>''' 的 '''<tt>shoot()</tt>''' 槽。 | |||
===執行應用程式=== | ===執行應用程式=== | ||
Revision as of 17:15, 14 January 2010
Template:I18n/Language Navigation Bar (zh TW)
Template:TutorialBrowser (zh TW)
Giving It a Shot

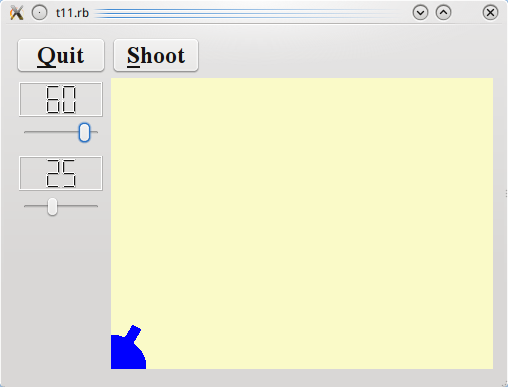
檔案:
概覽
在這個範例中,我們引入一個計時器來實現動畫的射擊。
一行一行的瀏覽
CannonField 現在有射擊能力了。
include Math
我們含入(include)Math,因為我們需要 sin() 和 cos() 函數。
@timerCount = 0
@autoShootTimer = Qt::Timer.new(self)
connect(@autoShootTimer, SIGNAL('timeout()'),
self, SLOT('moveShot()'))
@shootAngle = 0
@shootForce = 0
我們初始化新的私有變數,並且連接 Qt::Timer::timeout() 訊號到 moveShot() 槽。我們將在每次計時器超時(times out)時移動砲彈。
timerCount 會不斷追踪發射後經過的時間。shootAngle 是加農砲發射時的角度,而 shootForce 是加農砲發射時的力量。
def shoot()
 if @autoShootTimer.isActive()
   return
 end;
 @timerCount = 0
 @shootAngle = @currentAngle
 @shootForce = @currentForce
 @autoShootTimer.start(5)
end
除非有砲彈在空中,否則這個函式會發射砲彈。timerCount 重設為零。shootAngle 和 shootForce 變數會被設定為當前加農砲的角度和力量。最後,我們啟動計時器。
def moveShot()
 region = Qt::Region.new(shotRect())
 @timerCount += 1
shotR = shotRect()
 if shotR.x() > width() || shotR.y() > height()
   @autoShootTimer.stop()
 else
   region = region.unite(Qt::Region.new(shotR))
 end
 update(region)
end
moveShot() 是一個移動砲彈的槽,當Qt::Timer啟動後,每5毫秒被呼叫一次。
它的工作是計算新的位置、更新螢幕上的砲彈到新的位置,並且在必要時停止計時器。
首先,我們建立一個 Qt::Region 來保留舊的 shotRect()。Qt::Region 有保留任何區域種類的能力,而我們將在這裡用它來簡化繪圖。shotRect() 會返回砲彈現在位置的矩形。這在稍後會詳細解釋。
然後我們遞增 timerCount,它影響砲彈沿彈道移動的每一步。
接下來,我們取得新的砲彈矩形。
如果砲彈已經越過 widget 右側或底部邊界,那麼我們停止計時器,否則我們加入新的 shotRect() 到 Qt::Region。
最後,我們重繪 Qt::Region。這將發出只有一、兩個矩形需要更新的單一的繪圖事件。
def paintEvent(event)
painter = Qt::Painter.new(self)
 paintCannon(painter)
 if @autoShootTimer.isActive()
   paintShot(painter)
 end
painter.end()
end
繪圖事件函式比起前面的章節已經簡化。大部分的邏輯操作已經移動到新的 paintShot() 和 paintCannon() 函式。
def paintShot(painter)
 painter.setPen(Qt::NoPen)
 painter.setBrush(Qt::Brush.new(Qt::black))
 painter.drawRect(shotRect())
end
這個私有函式畫出一個黑色填充矩形作為砲彈。
我們省略了 paintCannon() 的實作,它和前面章節 Qt::Widget::paintEvent() 的重新實作相同。
def shotRect()
gravity = 4.0
 time = @timerCount / 20.0
 velocity = @shootForce
 radians = @shootAngle * 3.14159265 / 180.0
 velx = velocity * cos(radians)
 vely = velocity * sin(radians)
 x0 = (@barrelRect.right() + 5.0) * cos(radians)
 y0 = (@barrelRect.right() + 5.0) * sin(radians)
 x = x0 + velx * time
 y = y0 + vely * time - 0.5 * gravity * time * time
 result = Qt::Rect.new(0, 0, 6, 6)
 result.moveCenter(Qt::Point.new(x.round, height() - 1 - y.round))
 return result
end
這個私有函式計算砲彈的中心點,並且返回封裝砲彈的矩形。除了隨時間推移而增加的 timerCount 外,它還使用加農砲起始的力量和角度。
這個公式使用的是重力場中無摩擦運動的標準牛頓公式。為簡單起見,我們選擇忽略任何愛因斯坦效應(Einstein effect)。
我們在y坐標向上增加的坐標系統中計算中心點。在我們計算出中心點後,我們建構一個大小為6×6的 Qt::Rect 並移動它的中心點到算出的中心點之上。藉由相同的操作,我們把這個點轉換成 widget 的坐標系統(參閱坐標系統)。
唯一增加的是 Shoot 按鈕。
shoot = Qt::PushButton.new(tr('&Shoot'))
shoot.setFont(Qt::Font.new('Times', 18, Qt::Font::Bold))
在建構子中,我們建立並設定了 Shoot 按鈕,就像我們為 Quit 按鈕作的。
connect(shoot, SIGNAL('clicked()'), cannonField, SLOT('shoot()'))
連接 Shoot 按鈕的 clicked() 訊號,到CannonField 的 shoot() 槽。
執行應用程式
加農砲可以射擊,但沒有東西會被射中。
練習
使砲彈變成一個填滿的圓。[提示:Qt::Painter::drawEllipse() 可能會有幫助。]
當砲彈在空中時,改變加農砲的顏色。
