Archive:Development/Tutorials/Qt4 Ruby Tutorial/Chapter 06 (zh TW): Difference between revisions
No edit summary |
No edit summary |
||
| Line 114: | Line 114: | ||
</code> | </code> | ||
我們在 [http://doc.qt.nokia.com/latest/qwidget.html Qt::Widget] 中建立一個包含三行(column)的 [http://doc.qt.nokia.com/latest/qgridlayout.html Qt::GridLayout]。 | |||
[http://doc.qt.nokia.com/latest/qgridlayout.html Qt::GridLayout] 會自動排列在其中 widget 的行和列。在 widget 加入佈局時, 您可以指定行和列的數字,[http://doc.qt.nokia.com/latest/qgridlayout.html Qt::GridLayout] | [http://doc.qt.nokia.com/latest/qgridlayout.html Qt::GridLayout] 會自動排列在其中 widget 的行和列。在 widget 加入佈局時, 您可以指定行和列的數字,[http://doc.qt.nokia.com/latest/qgridlayout.html Qt::GridLayout] 會填入他們到網格(grid)中。 | ||
<code ruby> | <code ruby> | ||
Revision as of 09:21, 3 January 2010
Template:I18n/Language Navigation Bar (zh TW)
Template:TutorialBrowser (zh TW)
Building Blocks Galore!

檔案:
概覽
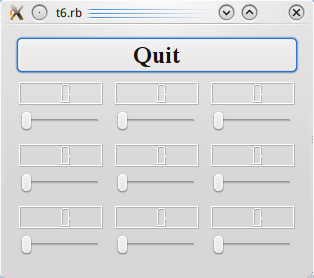
這個範例展示如何封裝兩個 widget 為一個新的組件,以及使用在多量 widget 時是多麼容易。這是第一次,我們使用自訂的 widget 作為子 widget。
require 'Qt4'
class LCDRange < Qt::Widget
 def initialize(parent = nil)
   super()
   lcd = Qt::LCDNumber.new(2)
   slider = Qt::Slider.new(Qt::Horizontal)
   slider.setRange(0, 99)
   slider.setValue(0)
connect(slider, SIGNAL('valueChanged(int)'), lcd, SLOT('display(int)'))
   layout = Qt::VBoxLayout.new()
   layout.addWidget(lcd)
   layout.addWidget(slider)
   setLayout(layout)
 end
end
class MyWidget < Qt::Widget
 def initialize(parent = nil)
   super()
   quit = Qt::PushButton.new(tr('Quit'))
   quit.setFont(Qt::Font.new('Times', 18, Qt::Font::Bold))
   connect(quit, SIGNAL('clicked()'), $qApp, SLOT('quit()'))
   grid = Qt::GridLayout.new()

   for row in 0..2
     for column in 0..2
       grid.addWidget(LCDRange.new(), row, column)
     end
   end
   layout = Qt::VBoxLayout.new()
   layout.addWidget(quit)
   layout.addLayout(grid)
   setLayout(layout)
 end
end
app = Qt::Application.new(ARGV)
widget = MyWidget.new()
widget.show()
一行一行的瀏覽
class LCDRange < Qt::Widget
LCDRange widget 是一個沒有任何 API 的 widget。它只有一個建構子。這種 widget 並不是非常有用,所以稍後我們將會加入一些 API。
def initialize(parent = nil)
 super()
 lcd = Qt::LCDNumber.new(2)
 slider = Qt::Slider.new(Qt::Horizontal)
 slider.setRange(0, 99)
 slider.setValue(0)
connect(slider, SIGNAL('valueChanged(int)'), lcd, SLOT('display(int)'))
 layout = Qt::VBoxLayout.new()
 layout.addWidget(lcd)
 layout.addWidget(slider)
 setLayout(layout)
end
這是直接抄襲第5章的 MyWidget 建構子。唯一的差別是,拿掉了 Quit 按鈕和重新命名這個類別。
class MyWidget < Qt::Widget
MyWidget 同樣除了一個建構子外,沒有其他 API。
def initialize(parent = nil)
 super()
 quit = Qt::PushButton.new(tr('Quit'))
 quit.setFont(Qt::Font.new('Times', 18, Qt::Font::Bold))
 connect(quit, SIGNAL('clicked()'), $qApp, SLOT('quit()'))
這個過去在改名為 LCDRange 類別裡的按鈕,被分離出來。這樣我們能有一個 Quit 按鈕,和許多 LCDRange 物件。
grid = Qt::GridLayout.new()
我們在 Qt::Widget 中建立一個包含三行(column)的 Qt::GridLayout。
Qt::GridLayout 會自動排列在其中 widget 的行和列。在 widget 加入佈局時, 您可以指定行和列的數字,Qt::GridLayout 會填入他們到網格(grid)中。
for row in 0..2
 for column in 0..2
   grid.addWidget(LCDRange.new(), row, column)
 end
end
We create nine LCDRange widgets, all of which are children of the grid object, and we arrange them in three rows and three columns.
執行應用程式
This program shows how easy it is to use many widgets at a time. Each one behaves like the slider and LCD number in the previous chapter. Again, the difference lies in the implementation.
練習
Initialize each slider with a different/random value on startup.
